For a downloadable PDF version of this guide CLICK HERE!


Tunnel Mountain is an easy hike in the town of Banff that is very popular and accommodating to new hikers. Despite the relatively short hike to the summit, it has incredible views of the town and surrounding Mountains. After hiking Tunnel Mountain another must see is Bow Falls, right in the heart of the town of Banff.


ADVENTURE STATISTICS

Time Required: 0.5-1 Hours

Location: Banff, AB

Distance: Roughly 4km round trip

Highest Elevation: 1677m

Elevation Gain: 267m

Difficulty: 3/10 – Family friendly

Season: Year Round

Additional Requirements: N/A


DRIVING DIRECTIONS

From Calgary: Take the Trans-Canada (Hwy 1) west approximately 110km and exit into the town of Banff.  Follow Banff Ave to Fox St, take a left, then a right onto Deer St, Deer St will turn into Otter St, take a left onto Moose St, which will turn right onto Grizzly St. Take a slight left onto St. Julien Rd and continue for 350m and the Lower Tunnel Mountain Parking Lot will be on your left. This sounds confusing so just plug “Tunnel Mountain Trailhead (Lower Parking Area)” into google maps and you’ll get there no problem.


WHAT TO BRING

  • Comfortable Footwear: Hiking shoes. Make sure your shoes are broken in prior to tackling this hike to prevent unexpected blisters. You could get away with running shoes but having extra grip on the rock surfaces will definitely come in handy!
  • Water: This hike has some elevation gain to reach the summit. Be sure to bring a water bottle or two.
  • Snacks: Bring some of your favorite snacks to enjoy along the hike or at the summit.  Some of our favorite snacks are trail mix, bananas, beef jerky and licorice.
  • Weather appropriate clothing: You will be exposed to the elements throughout this hike. Check the weather forecast and plan accordingly.
  • Sunscreen: If it is sunny and you’re like Mattson, who easily burns, bring sunscreen!
  • Insect Repellent: Insect repellent can greatly improve your hiking experience.
  • Bear Spray: You are in bear country. Always hike with bear spray that is easily accessible.
  • Camera: There are numerous photo opportunities you won’t want to miss.
  • This Guide: Print a copy of this guide to reference throughout the hike


OTHER CONSIDERATIONS

Wildlife: You will be hiking in bear country.  It is always advisable to check in at the local Visitor Information Center to learn of any trail closures due to wildlife.  Carry bear spray in an easily accessible location.  Travel in groups of multiple hikers and make lots of noise to avoid an unexpected encounter.

Leave No Trace: It is important that we enjoy the outdoors responsibly and sustainably. Some key principles to consider when hiking to “Leave No Trace” are:

  • Plan ahead and prepare: Proper planning allows adventurers to hike safely while minimizing damage to the land.
  • Travel on durable surfaces: Stick to the trail when possible. If there is no trail, or you must travel off trail, stay on durable surfaces to reduce your impact.
  • Dispose of waste properly: Pack it in, pack it out.
  • Leave what you find: Leave rocks, plants, archaeological artifacts and other objects of interest as you find them.
  • Respect wildlife: Observe wildlife from a distance. Never feed wild animals.
  • Be considerate of other visitors: Be courteous to others to allow everyone to enjoy their outdoor experience.

To learn more about “Leave No Trace” visit http://www.leavenotrace.ca


HIKING DIRECTIONS

Summary: The hike up tunnel mountain is straightforward and relatively easy. You can start at either the lower or upper trailhead and there is a clearly marked and easy to follow trail that will take you to the summit.
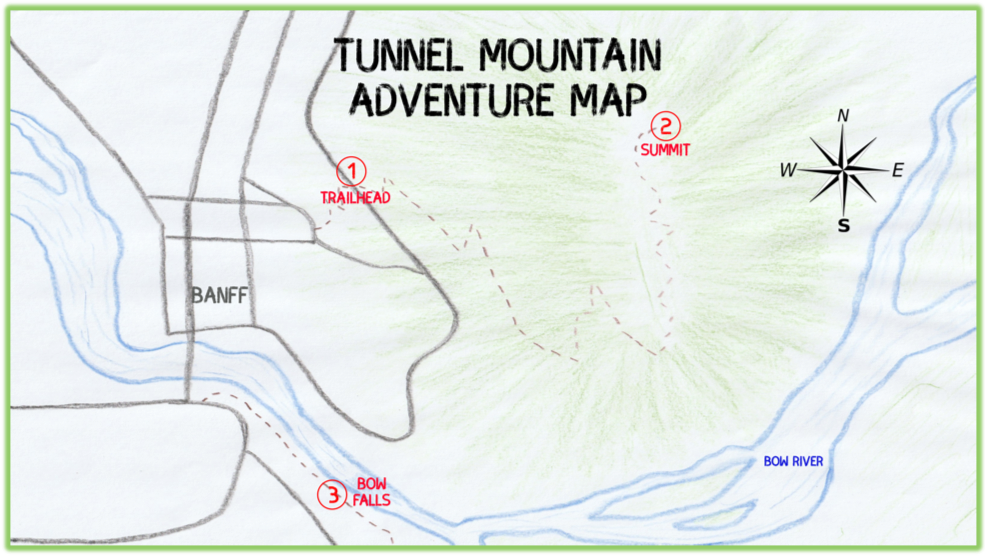
 

Tunnel Mountain Adventure Map - Banff - Epic Trip Adventures
Image 1: Tunnel Mountain Adventure Map


Step-By-Step Guide:

There are two places to park and start this hike from. The lower parking area, and the upper parking area. We were planning on starting at the upper parking lot (Route marker #1 on the map) but the road to it is closed during winter months so we had to park at the gate and walk down the road for a few minutes. It would have been easier to have just gone to the lower parking lot. At both the lower and upper parking area there is signage marking the trailhead.


Tunnel Mountain Upper Trailhead - Banff - Epic Trip Adventures
Image 2: The Upper Trailhead
Tunnel Mountain Hike - Banff - Epic Trip Adventures
Image 3: Tunnel Mountain Trail


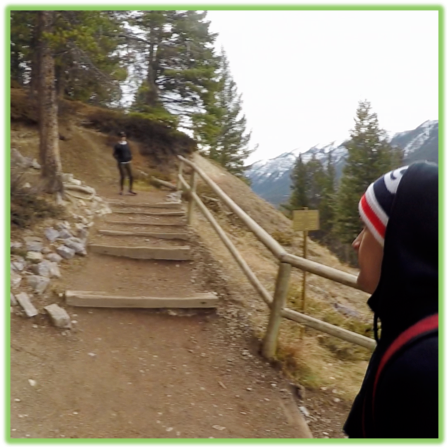
This trail to the summit is extremely easy to follow and is heavily trafficked. There are a few switchbacks, some elevation gain, and a couple spots to stop and soak in the views looking both east and west. At the summit (Route marker #2 on the map) there are stunning views of the town of Banff and surrounding mountains.


Tunnel Mountain Viewpoint - Banff - Epic Trip Adventures
Image 4: Views of the Bow River along the hike
Tunnel Mountain Summit - Banff - Epic Trip Adventures
Image 5: The summit of Tunnel Mountain


After our hike up Tunnel Mountain we wandered our way across the river in town to check out Bow Falls (Route marker #3 on the map). It’s a beautiful walk along the river and the falls are stunning. Park on Glen Ave or at the YMCA and enjoy the walk to the falls from there.


Bow Falls - Banff - Epic Trip Adventures
Image 6: Bow Falls
Bow Falls - Banff - Epic Trip Adventures
Image 7: Bow Falls


WE WANT TO HEAR FROM YOU

Thank you for choosing Epic Trip Adventures as your guide. We are committed to continually updating our guides to be as relevant and accurate as possible. If you have feedback to improve this guide please leave it in the comments below.

We also want to hear about your Tunnel Mountain adventures. If you have stories, pictures or even a link to your own adventure video please share them below!


Have fun out there!

– ETA


For a downloadable PDF version of this guide CLICK HERE!


Johnston Canyon is close to Banff and rated as an easy hike. The trail is mostly paved, with railings and bridges, and it takes you on a journey through a stunning hundred-foot-high canyon with beautiful trees, streams and waterfalls. Between Upper Falls, Lower Falls and the Ink Pots, there are lots of beautiful sights to see along the way.


ADVENTURE STATISTICS

Time Required: 3-4 Hours

Location: 38km west of Banff, AB

Distance: 11.4km round trip

Highest Elevation: 1440m

Elevation Gain: 330m

Difficulty: 3/10 – easy to follow trail with some elevation gain

Season: Year-Round – May require micro spikes in the winter

Additional Requirements: N/A


DRIVING DIRECTIONS

From Calgary:  Take the Trans-Canada (Hwy 1) west approximately 121km to Bow Valley Parkway (Hwy 1A). Follow Hwy 1A 17.5 km east and the trailhead for Johnston Canyon will be on your right.


WHAT TO BRING

  • Comfortable Footwear: Hiking shoes or a comfortable pair of sneakers. The trail has good footing and is easy to follow.
  • Water: It is always a good idea to bring lots of water when hiking.
  • Snacks: Bring some of your favorite snacks to enjoy along the hike. Some of our favorite snacks are trail mix, bananas, beef jerky and licorice.
  • Weather appropriate clothing: You will be exposed to the elements throughout this hike. Check the weather forecast and plan accordingly.
  • Strollers/Wheelchairs: The first part of this hike is wheelchair and stroller accessible. The trail can get very busy so if you can choose a time that’s less busy it may make the hike less stressful. Also note that strollers and wheelchairs can only make it to Lower Falls, the trail from there has uneven terrain and more elevation.
  • Ice Cleats: If you decide to do this hike in the winter, the trail can become very icy from the change in temperature so ice cleats may be worth considering bringing.
  • Sunscreen: If it is sunny and you’re like Mattson, who easily burns, bring sunscreen!
  • Insect Repellent: Insect repellent can greatly improve your hiking experience.
  • Bear Spray: You are in bear country. Always hike with bear spray that is easily accessible.
  • Camera: There are numerous photo opportunities you won’t want to miss.
  • This Guide: Print a copy of this guide to reference throughout the hike


OTHER CONSIDERATIONS

Wildlife: You will be hiking in bear country.  It is always advisable to check in at the local Visitor Information Center to learn of any trail closures due to wildlife.  Carry bear spray in an easily accessible location.  Travel in groups of multiple hikers and make lots of noise to avoid an unexpected encounter.

Leave No Trace: It is important that we enjoy the outdoors responsibly and sustainably. Some key principles to consider when hiking to “Leave No Trace” are:

  • Plan ahead and prepare: Proper planning allows adventurers to hike safely while minimizing damage to the land.
  • Travel on durable surfaces: Stick to the trail when possible. If there is no trail, or you must travel off trail, stay on durable surfaces to reduce your impact.
  • Dispose of waste properly: Pack it in, pack it out.
  • Leave what you find: Leave rocks, plants, archaeological artifacts and other objects of interest as you find them.
  • Respect wildlife: Observe wildlife from a distance. Never feed wild animals.
  • Be considerate of other visitors: Be courteous to others to allow everyone to enjoy their outdoor experience.

To learn more about “Leave No Trace” visit http://www.leavenotrace.ca


HIKING DIRECTIONS

Summary: Johnston Canyon is a popular, straight forward, out and back hike. There is basically no need for directions as this is one of the most popular hikes in Banff and the trail is very well maintained. The highlights of the hike are Lower Falls, Upper Falls and the Ink Pots.


Johnston Canyon Adventure Map- Banff - Epic Trip Adventures
Image 1: Johnston Canyon Adventure Map


Step-By-Step Guide:

From the parking lot, enter the trail through the pretty obvious wooden arch that says Johnston Canyon at the North end of the parking lot (Route marker #1 on the map). From there you will follow a paved trail, very easy to follow, that has railings and steps and is manageable for all skill levels. The trail follows the canyon and eventually ends up at Lower Falls. The distance from the trailhead to Lower Falls (Route marker #2 on the map) is 1.2km with 50m elevation gain.


Johnston Canyon - Banff - Epic Trip Adventures
Image 2: Johnston Canyon Trailhead
Johnston Canyon - Banff - Epic Trip Adventures
Image 3: The trail to Lower Falls


Johnston Canyon Lower Falls - Banff - Epic Trip Adventures
Image 4: Johnston Canyon Lower Falls


From Lower Falls to Upper Falls (Route marker #3 on the map) the trail gets slightly more challenging with 70m more elevation gain and 1.3km further to walk. Although the trail isn’t wheelchair accessible from Lower Falls on, it is still very manageable for nearly all skill levels. There may be a lineup of people waiting for their turn to take a picture at the Upper Falls.

Johnston Canyon - Banff - Epic Trip Adventures
Image 5: Smaller waterfalls along the way
Johnston Canyon - Banff - Epic Trip Adventures
Image 7: The lineup at Upper Falls


Johnston Canyon Upper Falls - Banff - Epic Trip Adventures
Image 7: Johnston Canyon Upper Falls


If you have the energy and want your adventure to continue it is only another 3.2km and 210m elevation gain to reach the Ink Pots (Route marker #4 on the map). This trail is not paved and travels up through the forest then back down the other side of the ridge. Eventually the trail opens out of the trees to a nice meadow where you’ll find the Ink Pots. The Ink Pots are spring fed mineral pools that will occasionally bubble up and swirl with different colors. The Ink Pots are a great spot for a picnic before you begin your hike back.


Johnston Canyon - Banff - Epic Trip Adventures
Image 8: The trail to the Ink Pots
Johnston Canyon - Banff - Epic Trip Adventures
Image 9: Dirt trail to the Ink Pots
Johnston Canyon Ink Pots - Banff - Epic Trip Adventures
Image 10: Anderson at the Ink Pots
Johnston Canyon Ink Pots - Banff - Epic Trip Adventures
Image 11: Staring at the Ink Pots


WE WANT TO HEAR FROM YOU

Thank you for choosing Epic Trip Adventures as your guide. We are committed to continually updating our guides to be as relevant and accurate as possible. If you have feedback to improve this guide please leave it in the comments below.

We also want to hear about your Johnston Canyon adventures. If you have stories, pictures or even a link to your own adventure video please share them below!


Have fun out there!

– ETA


For a downloadable PDF version of this guide CLICK HERE!


Mount Norquay is an iconic mountain in the Banff National Park. It has everything from wedding venues and events to outdoor activities like hiking and skiing. The Mount Norquay Via Ferrata is one of the many activities that can be experienced on the mountain. It’s the perfect summer outdoor activity for a group of adventurous friends. We ended up doing this hike for Mattson’s birthday and were able to get 8 friends all together in one group. We chose to challenge the Summiteer route which was a 6-hour tour.


ADVENTURE STATISTICS

Time Required: 6 Hours

Location: Just north of Banff

Distance: 3.2km round trip

Highest Elevation: 2450m

Elevation Gain: 360m

Difficulty: 5/10 – Heights and exposure

Season: June to mid-October

Additional Requirements: A tour reservation


DRIVING DIRECTIONS

From Calgary: Take the Trans-Canada (Hwy 1) west to Banff, take the second Banff exit onto Mt Norquay Road and turn right (away from Banff) and follow Mt Norquay Road until you reach the resort.


WHAT TO BRING


  • Comfortable Footwear: Hiking shoes with good grip and lots of support.  If you don’t have a good pair they can supply hiking boots. Make sure your shoes are broken in prior to tackling this hike to prevent unexpected blisters.
  • Water: This hike has lots of elevation gain to reach the summit.  Be sure to bring enough water.
  • Snacks: A bag lunch is provided with the 6-hour tour but if you have specific diet needs or wants bring your own snacks!
  • Weather appropriate clothing: You will be exposed to the elements throughout this hike.  Check the weather forecast and plan accordingly.
  • Sunscreen: If it is sunny and you’re like Mattson, who easily burns, bring sunscreen!
  • Insect Repellent: Insect repellent can greatly improve your hiking experience.
  • Camera: There are numerous photo opportunities you won’t want to miss.


OTHER CONSIDERATIONS

Leave No Trace: It is important that we enjoy the outdoors responsibly and sustainably. Some key principles to consider when hiking to “Leave No Trace” are:

  • Plan ahead and prepare: Proper planning allows adventurers to hike safely while minimizing damage to the land.
  • Travel on durable surfaces: Stick to the trail when possible. If there is no trail, or you must travel off trail, stay on durable surfaces to reduce your impact.
  • Dispose of waste properly: Pack it in, pack it out.
  • Leave what you find: Leave rocks, plants, archaeological artifacts and other objects of interest as you find them.
  • Respect wildlife: Observe wildlife from a distance. Never feed wild animals.
  • Be considerate of other visitors: Be courteous to others to allow everyone to enjoy their outdoor experience.

To learn more about “Leave No Trace” visit http://www.leavenotrace.ca


HIKING DIRECTIONS

Summary: Every tour is guided so you don’t have to worry about taking the right route or getting lost. The guides a Mt Norquay are fantastic and made sure we were 100% prepared to take on the mountain.

Via Ferrata is Italian for “Iron path” which is the perfect way to describe this adventure. A Via Ferrata is a climbing route up a mountain that has been made easier, and safe, with the use of carabiners, harnesses, cables and iron hand/foot holds that have been mounted into the mountain itself.

Mt Norquay Via Ferrata - Banff - Epic Trip Adventures
Image 1: Anderson crossing a 3 cable bridge
Mt Norquay Via Ferrata - Banff - Epic Trip Adventures
Image 2: Mattson crossing a 2 cable bridge


Mt Norquay has 4 options for routes:

  • Explorer – 2-2.5 hour hike
  • Ridgewalker – 3.5-4 hour hike
  • Skyline – 4.5-5 hour hike
  • Summiteer – 5-6 hour hike

Each hike has its own highlights and attractions from ladders to suspension bridges. This adventure requires a reservation so be sure to call or book online.

https://banffnorquay.com/summer/via-ferrata/routes/


Mt Norquay Via Ferrata - Banff - Epic Trip Adventures
Image 3: Hanging out on the Via Ferrata
Mt Norquay Via Ferrata - Banff - Epic Trip Adventures
Image 4: The suspension bridge


WE WANT TO HEAR FROM YOU

Thank you for choosing Epic Trip Adventures as your guide. We are committed to continually updating our guides to be as relevant and accurate as possible. If you have feedback to improve this guide please leave it in the comments below.

We also want to hear about your Via Ferrata adventures. If you have stories, pictures or even a link to your own adventure video please share them below!


Have fun out there!

– ETA