When you think of scuba diving most people picture swimming through crystal clear water with tropical reef fish surrounding you. Monterey Bay offers a completely different diving experience. The cold water kelp forest off the coast of California offers a unique diving experience that will not be forgotten! Monterey Bay has a number of Dive Shops that offer rentals and guided tours! WE WANT TO HEAR FROM YOU Thank you for choosing Epic Trip Adventures as your guide. We are committed to continually updating our guides to be as relevant and accurate as possible. If you have feedback to improve this guide please leave it in the comments below. We also want to hear about your Monterey Bay Scuba Diving adventures. If you have stories, pictures or even a link to your own adventure video please share them below! Have fun out there! - ETA
When you think of scuba diving most people picture swimming through crystal clear water with tropical reef fish surrounding you. Monterey Bay offers a completely different diving experience. The cold water kelp forest off the coast of California offers a unique diving experience that will not be forgotten! Monterey Bay has a number of Dive Shops that offer rentals and guided tours!
WE WANT TO HEAR FROM YOU
Thank you for choosing Epic Trip Adventures as your guide. We are committed to continually updating our guides to be as relevant and accurate as possible. If you have feedback to improve this guide please leave it in the comments below.
We also want to hear about your Monterey Bay Scuba Diving adventures. If you have stories, pictures or even a link to your own adventure video please share them below!
For a downloadable PDF version of this guide McCloud Falls is a fun place for the whole family and is only 30 minutes east of the town of Mount Shasta. It’s a great daily getaway location for locals, and it’s not too far off the main drag if you’re driving through. McCloud Falls is a short 4 mile hike along the stunning McCloud River. It includes three different waterfalls and there is a campground if you plan to stay for more than a day. If you’re driving south on the I-5, you have to make the stop at McCloud Falls and enjoy the scenery. ADVENTURE STATISTICS Time Required: 2 Hours Location: 25 miles east of Mount Shasta Distance: 4 miles return trip (can be hiked or driven) Highest Elevation: 300 feet Difficulty: 3/10 Season: May to October are ideal, but McCloud Falls can be visited year-round Additional Requirements: N/A DRIVING DIRECTIONS From Mt Shasta: Head south on Mt. Shasta Blvd, take a left on CA-89 (Volcanic Legacy Scenic Byway) and follow that highway for 15.5 miles. Take a right off that highway onto Fowler’s Public Camp Rd. You will see a sign saying “Fowler/Lower Falls” on the highway. Follow it for about a mile down to the Lower Falls parking lot. There will be signs directing you to the Upper and Middle Falls if you want to drive to them from Lower Falls. WHAT TO BRING Comfortable Footwear: Always nice to have comfortable footwear. Water: In the summer months this area can be very warm. It is important to stay hydrated. Snacks: Bring some of your favorite snacks to enjoy along the hike as well as a light lunch for when you arrive at the falls. Some of our favorite snacks are trail mix, bananas, beef jerky and licorice. Weather appropriate
For a downloadable PDF version of this guide CLICK HERE!
McCloud Falls is a fun place for the whole family and is only 30 minutes east of the town of Mount Shasta. It’s a great daily getaway location for locals, and it’s not too far off the main drag if you’re driving through. McCloud Falls is a short 4 mile hike along the stunning McCloud River. It includes three different waterfalls and there is a campground if you plan to stay for more than a day. If you’re driving south on the I-5, you have to make the stop at McCloud Falls and enjoy the scenery.
ADVENTURE STATISTICS
Time Required: 2 Hours
Location: 25 miles east of Mount Shasta
Distance: 4 miles return trip (can be hiked or driven)
Highest Elevation:300 feet
Difficulty:3/10
Season: May to October are ideal, but McCloud Falls can be visited year-round
Additional Requirements: N/A
Image 1: Mattson at Middle Falls
DRIVING DIRECTIONS
From Mt Shasta: Head south on Mt. Shasta Blvd, take a left on CA-89 (Volcanic Legacy Scenic Byway) and follow that highway for 15.5 miles. Take a right off that highway onto Fowler’s Public Camp Rd. You will see a sign saying “Fowler/Lower Falls” on the highway. Follow it for about a mile down to the Lower Falls parking lot. There will be signs directing you to the Upper and Middle Falls if you want to drive to them from Lower Falls.
WHAT TO BRING
Comfortable Footwear: Always nice to have comfortable footwear.
Water: In the summer months this area can be very warm. It is important to stay hydrated.
Snacks: Bring some of your favorite snacks to enjoy along the hike as well as a light lunch for when you arrive at the falls. Some of our favorite snacks are trail mix, bananas, beef jerky and licorice.
Weather appropriate clothing: If it’s a hot day, bring a swim suit. If you like cliff jumping, bring some water shoes to break the surface tension of the water. The Middle Falls is a great location for cliff jumping and usually quite popular in the summer.
Beer: Beer and a lawn chair. It isn’t uncommon to see people unfold a lawn chair and crack a cold one on the rocks at the Lower Falls. It’s a great place to relax and spend time with friends and family.
Sunscreen: If it is sunny and you’re like Mattson, who easily burns, bring sunscreen!
Insect Repellent: Insect repellent can greatly improve your hiking experience.
Bear Spray: You are in bear country. Always hike with bear spray that is easily accessible.
Camping Gear: If you plan on camping, bring a tent, sleeping bag, cooking gear etc.
Camera: There are numerous photo opportunities you won’t want to miss.
This Guide: Print a copy of this guide to reference throughout the hike
OTHER CONSIDERATIONS
Wildlife: You will be hiking in bear country. It is always advisable to check in at the local Visitor Information Center to learn of any trail closures due to wildlife. Carry bear spray in an easily accessible location. Travel in groups of multiple hikers and make lots of noise to avoid an unexpected encounter.
Camping Permits: Fowlers Campground has a ton of very well kept campsites with lots of activities and amenities in the area. Here is a link if you’d like to book a spot.
Leave No Trace: It is important that we enjoy the outdoors responsibly and sustainably. Some key principles to consider when hiking to “Leave No Trace” are:
Plan ahead and prepare: Proper planning allows adventurers to hike safely while minimizing damage to the land.
Travel on durable surfaces: Stick to the trail when possible. If there is no trail, or you must travel off trail, stay on durable surfaces to reduce your impact.
Dispose of waste properly: Pack it in, pack it out.
Leave what you find: Leave rocks, plants, archaeological artifacts and other objects of interest as you find them.
Respect wildlife: Observe wildlife from a distance. Never feed wild animals.
Be considerate of other visitors: Be courteous to others to allow everyone to enjoy their outdoor experience.
Summary: McCloud falls is a very straightforward hike easy enough for anyone to enjoy. Our guide outlines the hike starting from Lower Falls, and continuing to both Middle and Upper Falls. Alternatively, there are roads with parking lots at each falls, so another option is to drive to each of the falls separately.
Image 2: McCloud Falls Adventure Map
Step-By-Step Guide:
This hike is very easy, straightforward and can be done by almost all skill level of hiker. Starting at the Lower Falls (Route marker #1 on the map), follow the paved trail up along the river. You will pass the Fowler’s Campground Area and the paved trail will end and turn into a dirt trail. The distance between the Lower and Middle Falls is roughly one mile. Depending on your adventurousness/skill level, you could also rock hop your way along the river from the Lower Falls to the Middle Falls.
Image 3: Lower Falls
In our opinion, the Middle Falls (Route marker #2 on the map) is the most exciting of the three. At about 50 feet high and twice that in width, Middle Falls is the biggest by far. This is a great location for a swim on a hot day, or to go cliff jumping if you’re looking for an adrenaline rush. Always make sure to check the depth of the water before cliff jumping! In the winter months it is too cold to swim but the falls are still very worth checking out. Middle Falls can be viewed from the lookout point up top, or you can make your way down a steep trail to view the falls closer up. Both areas provide spectacular vantage points.
Image 4: Middle Falls
Image 5: Bird’s-eye View of Middle Falls
Upper Falls can be reached by following the railing from the lookout point at Middle Falls. Along the way you will hike through some trees and be treated to views of the McCloud River Canyon below. As you hike, look back towards the Northwest and you may be able to catch a glimpse of Mount Shasta poking through the trees. After about 10-15 minutes, you will come to the Upper Falls pouring out of a narrow gorge into a pool below (Route marker #3 on the map). The pool is surrounded by immense rock walls on either side. The Upper Falls and river gorge can also be viewed from above as you continue following the trail.
Image 6: Upper Falls
This is a very straightforward hike easy enough for anyone to enjoy. There is also the option to drive to and from each of the falls, and there are wheelchair accessible paths from each parking lot to the waterfall lookout points. In the summer months the falls can be busy and it can be difficult to find parking. This makes making the hike between the falls the more attractive option.
Whichever way you choose to experience McCloud Falls, we hope you enjoy it, and we hope this guide helps you along the way!
WE WANT TO HEAR FROM YOU
Thank you for choosing Epic Trip Adventures as your guide. We are committed to continually updating our guides to be as relevant and accurate as possible. If you have feedback to improve this guide please leave it in the comments below.
We also want to hear about your McCloud Falls adventures. If you have stories, pictures or even a link to your own adventure video please share them below!
For a downloadable PDF version of this guide Valencia Peak Trail is located on the central coast of California in Montana De Oro State Park. It is a doable hike for most skill levels and rewards successful hikers with panoramic views of the coastline. If you look north from the summit, you can see all the way to Morro Bay and catch a glimpse of Morro Rock. ADVENTURE STATISTICS Time Required: 2-3 Hours Location: 5 miles south of Los Osos, CA Distance: 4.5 mile (7.2km) round Highest Elevation: 1347ft (410m) Elevation Gain: 1275ft (388m) Difficulty: 5/10 – elevation gain Season: Year Round Additional Requirements: N/A DRIVING DIRECTIONS From Los Osos: Head West on Foothills Blvd. Turn right on Los Osos Valley Rd and follow for 8.5 miles. At mile 7 you will need to stay left to remain on Los Osos Valley Rd. Continue onto Pecho Valley Rd for another 3.8 miles. You will reach a parking lot at the Montana De Oro State Park. Park 100 yards further in a small lot at the Valencia Peak Trailhead. WHAT TO BRING Comfortable Footwear: Hiking shoes.Make sure your shoes are broken in prior to tackling this hike to prevent unexpected blisters. You could get away with running shoes but having extra grip on the rock surfaces will definitely come in handy! Water: This hike is long, exposed to the hot sun and has lots of elevation gain. Be sure to bring enough water for 2-3 hours of physical exertion. Snacks: Bring some of your favorite snacks to enjoy along the hike as well as a light lunch for when you arrive at the summit. Some of our favorite snacks are trail mix, bananas, beef jerky and licorice. Weather appropriate clothing: You will be exposed to the elements throughout this hike. Check the weather forecast
For a downloadable PDF version of this guide CLICK HERE!
Valencia Peak Trail is located on the central coast of California in Montana De Oro State Park. It is a doable hike for most skill levels and rewards successful hikers with panoramic views of the coastline. If you look north from the summit, you can see all the way to Morro Bay and catch a glimpse of Morro Rock.
ADVENTURE STATISTICS
Time Required: 2-3 Hours
Location: 5 miles south of Los Osos, CA
Distance: 4.5 mile (7.2km) round
Highest Elevation: 1347ft (410m)
Elevation Gain:1275ft (388m)
Difficulty:5/10 – elevation gain
Season: Year Round
Additional Requirements: N/A
DRIVING DIRECTIONS
From Los Osos: Head West on Foothills Blvd. Turn right on Los Osos Valley Rd and follow for 8.5 miles. At mile 7 you will need to stay left to remain on Los Osos Valley Rd. Continue onto Pecho Valley Rd for another 3.8 miles. You will reach a parking lot at the Montana De Oro State Park. Park 100 yards further in a small lot at the Valencia Peak Trailhead.
WHAT TO BRING
Comfortable Footwear: Hiking shoes.Make sure your shoes are broken in prior to tackling this hike to prevent unexpected blisters. You could get away with running shoes but having extra grip on the rock surfaces will definitely come in handy!
Water: This hike is long, exposed to the hot sun and has lots of elevation gain. Be sure to bring enough water for 2-3 hours of physical exertion.
Snacks: Bring some of your favorite snacks to enjoy along the hike as well as a light lunch for when you arrive at the summit. Some of our favorite snacks are trail mix, bananas, beef jerky and licorice.
Weather appropriate clothing: You will be exposed to the elements throughout this hike. Check the weather forecast and plan accordingly.
Sunscreen: If it is sunny and you’re like Mattson, who easily burns, bring sunscreen!
Insect Repellent: Insect repellent can greatly improve your hiking experience.
Camera: There are numerous photo opportunities you won’t want to miss.
This Guide: Print a copy of this guide to reference throughout the hike
OTHER CONSIDERATIONS
Leave No Trace: It is important that we enjoy the outdoors responsibly and sustainably. Some key principles to consider when hiking to “Leave No Trace” are:
Plan ahead and prepare: Proper planning allows adventurers to hike safely while minimizing damage to the land.
Travel on durable surfaces: Stick to the trail when possible. If there is no trail, or you must travel off trail, stay on durable surfaces to reduce your impact.
Dispose of waste properly: Pack it in, pack it out.
Leave what you find: Leave rocks, plants, archaeological artifacts and other objects of interest as you find them.
Respect wildlife: Observe wildlife from a distance. Never feed wild animals.
Be considerate of other visitors: Be courteous to others to allow everyone to enjoy their outdoor experience.
Summary: The starting point for this hike is in Montana De Oro State Park near Spooner’s Cove (Route marker #2 on the map). The trail to the summit of Valencia Peak is well maintained and marked so there will be no issues finding your way to the summit.
Image 1: Valencia Peak Adventure Map
Morro Bay:
We highly recommend making a pit stop at Morro Bay (Route marker #1 on the map) on the way to Valencia Peak. Morro Bay is about 5 minutes North of Los Osos and is a quaint little fishing town that is worth checking out!
Image 2: The Morro Rock
Image 3: A small seafood restaurant in Morro Bay
Valencia Peak Step-By-Step Guide:
The Valencia Peak trailhead is at a small parking lot just south of Spooner’s Cove (Route marker #2 on the map)and the Montana De Oro State Park Visitors Center. From the parking area, the trail heads inland towards a large pyramid shaped peak. This trail is well trafficked, well marked and should be easy for you to follow.
Image 4: The Valencia Peak Trailhead
Image 5: The trail up Valencia Peak
After following the trail for about a half mile, you will begin gaining elevation up a series switchbacks. There is a consistent elevation up this leg of the journey. You will come to a junction with Badger Trail at 1.15 miles but the intersection is well signed to direct you onward to Valencia Peak. Once you reach the summit, relax at the picnic table and enjoy the coastal views.
Image 6: Mattson and Noelle at the summit of Valencia Peak
The hike down from the peak is substantially easier and the view out to the ocean is beautiful. Once you reach the parking lot at the bottom, be sure to check out Spooner’s Cove (Route marker #2 on the map). It is a small bay at the entrance to Montana De Oro State Park with big rocks and bluffs to walk along. Spooner’s Cove is a great place to watch the sunset and we recommend planning your day to be here at that time.
Image 7: Anderson in Spooner’s Cove
Image 7: Spooner’s Cove
WE WANT TO HEAR FROM YOU
Thank you for choosing Epic Trip Adventures as your guide. We are committed to continually updating our guides to be as relevant and accurate as possible. If you have feedback to improve this guide please leave it in the comments below.
We also want to hear about your Valencia Peak adventures. If you have stories, pictures or even a link to your own adventure video please share them below!
For a downloadable PDF version of this guide Reservoir Canyon Trail is a great half day hike for anyone in the San Luis Obispo area. The hike takes roughly three hours to complete and begins just outside of the city. From the top, you will be rewarded with incredible views of SLO, the hilly landscape that surrounds it, and the coastline. ADVENTURE STATISTICS Time Required:2.5 - 4 Hours Location: Just east of San Luis Obispo Distance: 5.3 miles (8.5km) round trip Highest Elevation: 1700ft (520m) Elevation Gain: 1358ft (414m) Difficulty: 5/10 – Steep switchbacks Season: Year Round Additional Requirements: N/A DRIVING DIRECTIONS From San Luis Obispo: Jump on the 101 North for a couple miles and take a right on Reservoir Canyon Road. This road is not very well marked and T’s up with the freeway so keep your eyes peeled. A half mile down this road you will get to the parking lot and trailhead. WHAT TO BRING Comfortable Footwear:Hiking shoes.Make sure your shoes are broken in prior to tackling this hike to prevent unexpected blisters. You could get away with running shoes but having extra grip on the rock surfaces will definitely come in handy! Water:This hike has lots of elevation gain in a short period of time. Be sure to bring enough water for 4 hours of physical exertion. Snacks: Bring some of your favorite snacks to enjoy along the hike. Some of our favorite snacks are trail mix, bananas, beef jerky and licorice. Weather appropriate clothing:You will be exposed to the elements throughout this hike. Check the weather forecast and plan accordingly. Sunscreen:If it is sunny and you’re like Mattson, who easily burns, bring sunscreen! Insect Repellent:Insect repellent can greatly improve your hiking experience. Camera:There are numerous photo opportunities you won’t want to miss. This Guide:Print
For a downloadable PDF version of this guide CLICK HERE!
Reservoir Canyon Trail is a great half day hike for anyone in the San Luis Obispo area. The hike takes roughly three hours to complete and begins just outside of the city. From the top, you will be rewarded with incredible views of SLO, the hilly landscape that surrounds it, and the coastline.
ADVENTURE STATISTICS
Time Required:2.5 – 4 Hours
Location: Just east of San Luis Obispo
Distance: 5.3 miles (8.5km) round trip
Highest Elevation:1700ft (520m)
Elevation Gain:1358ft (414m)
Difficulty:5/10 – Steep switchbacks
Season: Year Round
Additional Requirements: N/A
Image 1: Anderson at the summit
DRIVING DIRECTIONS
From San Luis Obispo: Jump on the 101 North for a couple miles and take a right on Reservoir Canyon Road. This road is not very well marked and T’s up with the freeway so keep your eyes peeled. A half mile down this road you will get to the parking lot and trailhead.
WHAT TO BRING
Comfortable Footwear:Hiking shoes.Make sure your shoes are broken in prior to tackling this hike to prevent unexpected blisters. You could get away with running shoes but having extra grip on the rock surfaces will definitely come in handy!
Water:This hike has lots of elevation gain in a short period of time. Be sure to bring enough water for 4 hours of physical exertion.
Snacks: Bring some of your favorite snacks to enjoy along the hike. Some of our favorite snacks are trail mix, bananas, beef jerky and licorice.
Weather appropriate clothing:You will be exposed to the elements throughout this hike. Check the weather forecast and plan accordingly.
Sunscreen:If it is sunny and you’re like Mattson, who easily burns, bring sunscreen!
Insect Repellent:Insect repellent can greatly improve your hiking experience.
Camera:There are numerous photo opportunities you won’t want to miss.
This Guide:Print a copy of this guide to reference throughout the hike
OTHER CONSIDERATIONS
Leave No Trace: It is important that we enjoy the outdoors responsibly and sustainably. Some key principles to consider when hiking to “Leave No Trace” are:
Plan ahead and prepare: Proper planning allows adventurers to hike safely while minimizing damage to the land.
Travel on durable surfaces: Stick to the trail when possible. If there is no trail, or you must travel off trail, stay on durable surfaces to reduce your impact.
Dispose of waste properly: Pack it in, pack it out.
Leave what you find: Leave rocks, plants, archaeological artifacts and other objects of interest as you find them.
Respect wildlife: Observe wildlife from a distance. Never feed wild animals.
Be considerate of other visitors: Be courteous to others to allow everyone to enjoy their outdoor experience.
Summary: The starting point for this hike is just off of Reservoir Canyon Road. From there we recommend taking a quick detour to a small waterfall and cave before following the main trail to the summit.
Image 2: Reservoir Canyon Trail Adventure Map
Step-By-Step Guide:
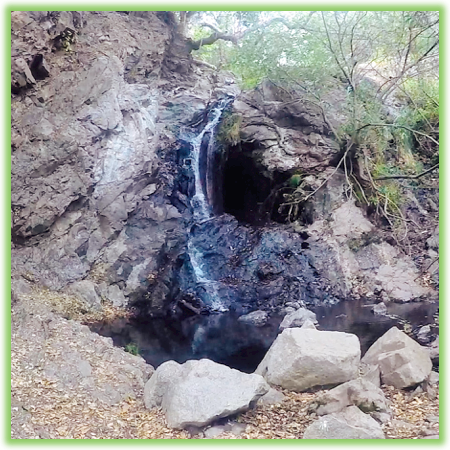
From the parking lot (Route marker #1 on the map), the trail heads south in line with the road. A short way down the trail you will come to a fork. The path to the left is reservoir canyon trail, but it’s worth your time to go right and check out a nice 30-foot waterfall and cave (Route marker #2 on the map). After checking out the waterfall, head back to the main trail to continue the hike.
Image 3: The Waterfall
Image 4: Anderson entering the cave
The first mile of Reservoir Canyon Trail is quite level, heavily trafficked and easy to follow. The trees provide nice shade to keep you cool on a hot day. The trail follows a nearby creek and eventually crosses it via a large wooden bridge. About half a mile after crossing the bridge the trail begins to gain elevation and the challenging part of the hike begins. Over the next mile and a half, you will gain 1100 feet in elevation ascending steep switchbacks while being exposed to the hot California sun.
Image 5: The wooden bridge
Image 6: Ascending the switchbacks
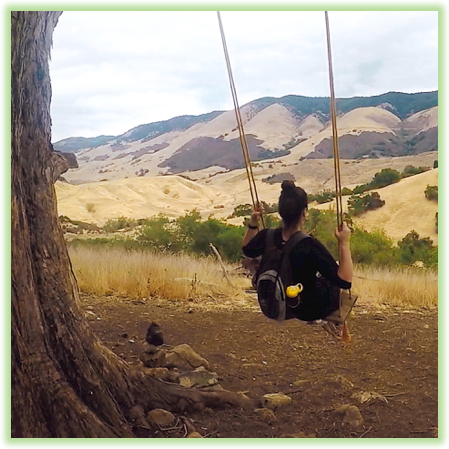
About half way up the hill, you’ll come across some scrap metal sculptures and swing that hangs from a large eucalyptus tree (Route marker #3 on the map). Enjoy a restful swing, and catch your breath before continuing on as the trail gets steeper.
Image 7: The swing set
Image 8: Scrap metal sculptures
At the summit you’ll find a stone memorial sculpture and a wooden bench to soak in the views (Route marker #4 on the map). San Luis Obispo surrounds the base of the hill and to the south you can see the Pismo sand dunes on the coast. Enjoy the summit views and when you feel rested and energized, follow the same trail back to the hikes starting point.
Image 9: The view from the summit!
WE WANT TO HEAR FROM YOU
Thank you for choosing Epic Trip Adventures as your guide. We are committed to continually updating our guides to be as relevant and accurate as possible. If you have feedback to improve this guide please leave it in the comments below.
We also want to hear about your Reservoir Canyon adventures. If you have stories, pictures or even a link to your own adventure video please share them below!
For a downloadable PDF version of this guide McCloud Falls is a fun place for the whole family and is only 30 minutes east of the town of Mount Shasta. It’s a great daily getaway location for locals, and it’s not too far off the main drag if you’re driving through. McCloud Falls is a short 4 mile hike along the stunning McCloud River. It includes three different waterfalls and there is a campground if you plan to stay for more than a day. If you’re driving south on the I-5, you have to make the stop at McCloud Falls and enjoy the scenery. ADVENTURE STATISTICS Time Required: 2 Hours Location: 25 miles east of Mount Shasta Distance: 4 miles return trip (can be hiked or driven) Highest Elevation: 300 feet Difficulty: 3/10 Season: May to October are ideal, but McCloud Falls can be visited year-round Additional Requirements: N/A DRIVING DIRECTIONS From Mt Shasta: Head south on Mt. Shasta Blvd, take a left on CA-89 (Volcanic Legacy Scenic Byway) and follow that highway for 15.5 miles. Take a right off that highway onto Fowler’s Public Camp Rd. You will see a sign saying “Fowler/Lower Falls” on the highway. Follow it for about a mile down to the Lower Falls parking lot. There will be signs directing you to the Upper and Middle Falls if you want to drive to them from Lower Falls. WHAT TO BRING Comfortable Footwear: Always nice to have comfortable footwear. Water: In the summer months this area can be very warm. It is important to stay hydrated. Snacks: Bring some of your favorite snacks to enjoy along the hike as well as a light lunch for when you arrive at the falls. Some of our favorite snacks are trail mix, bananas, beef jerky and licorice.
For a downloadable PDF version of this guide CLICK HERE!
McCloud Falls is a fun place for the whole family and is only 30 minutes east of the town of Mount Shasta. It’s a great daily getaway location for locals, and it’s not too far off the main drag if you’re driving through. McCloud Falls is a short 4 mile hike along the stunning McCloud River. It includes three different waterfalls and there is a campground if you plan to stay for more than a day. If you’re driving south on the I-5, you have to make the stop at McCloud Falls and enjoy the scenery.
ADVENTURE STATISTICS
Time Required: 2 Hours
Location: 25 miles east of Mount Shasta
Distance: 4 miles return trip (can be hiked or driven)
Highest Elevation:300 feet
Difficulty:3/10
Season: May to October are ideal, but McCloud Falls can be visited year-round
Additional Requirements: N/A
Image 1: Mattson at Middle Falls
DRIVING DIRECTIONS
From Mt Shasta: Head south on Mt. Shasta Blvd, take a left on CA-89 (Volcanic Legacy Scenic Byway) and follow that highway for 15.5 miles. Take a right off that highway onto Fowler’s Public Camp Rd. You will see a sign saying “Fowler/Lower Falls” on the highway. Follow it for about a mile down to the Lower Falls parking lot. There will be signs directing you to the Upper and Middle Falls if you want to drive to them from Lower Falls.
WHAT TO BRING
Comfortable Footwear: Always nice to have comfortable footwear.
Water: In the summer months this area can be very warm. It is important to stay hydrated.
Snacks: Bring some of your favorite snacks to enjoy along the hike as well as a light lunch for when you arrive at the falls. Some of our favorite snacks are trail mix, bananas, beef jerky and licorice.
Weather appropriate clothing: If it’s a hot day, bring a swim suit. If you like cliff jumping, bring some water shoes to break the surface tension of the water. The Middle Falls is a great location for cliff jumping and usually quite popular in the summer.
Beer: Beer and a lawn chair. It isn’t uncommon to see people unfold a lawn chair and crack a cold one on the rocks at the Lower Falls. It’s a great place to relax and spend time with friends and family.
Sunscreen: If it is sunny and you’re like Mattson, who easily burns, bring sunscreen!
Insect Repellent: Insect repellent can greatly improve your hiking experience.
Bear Spray: You are in bear country. Always hike with bear spray that is easily accessible.
Camping Gear: If you plan on camping, bring a tent, sleeping bag, cooking gear etc.
Camera: There are numerous photo opportunities you won’t want to miss.
This Guide: Print a copy of this guide to reference throughout the hike
OTHER CONSIDERATIONS
Wildlife: You will be hiking in bear country. It is always advisable to check in at the local Visitor Information Center to learn of any trail closures due to wildlife. Carry bear spray in an easily accessible location. Travel in groups of multiple hikers and make lots of noise to avoid an unexpected encounter.
Camping Permits: Fowlers Campground has a ton of very well kept campsites with lots of activities and amenities in the area. Here is a link if you’d like to book a spot.
Leave No Trace: It is important that we enjoy the outdoors responsibly and sustainably. Some key principles to consider when hiking to “Leave No Trace” are:
Plan ahead and prepare: Proper planning allows adventurers to hike safely while minimizing damage to the land.
Travel on durable surfaces: Stick to the trail when possible. If there is no trail, or you must travel off trail, stay on durable surfaces to reduce your impact.
Dispose of waste properly: Pack it in, pack it out.
Leave what you find: Leave rocks, plants, archaeological artifacts and other objects of interest as you find them.
Respect wildlife: Observe wildlife from a distance. Never feed wild animals.
Be considerate of other visitors: Be courteous to others to allow everyone to enjoy their outdoor experience.
Summary: McCloud falls is a very straightforward hike easy enough for anyone to enjoy. Our guide outlines the hike starting from Lower Falls, and continuing to both Middle and Upper Falls. Alternatively, there are roads with parking lots at each falls, so another option is to drive to each of the falls separately.
Image 2: McCloud Falls Adventure Map
Step-By-Step Guide:
This hike is very easy, straightforward and can be done by almost all skill level of hiker. Starting at the Lower Falls (Route marker #1 on the map), follow the paved trail up along the river. You will pass the Fowler’s Campground Area and the paved trail will end and turn into a dirt trail. The distance between the Lower and Middle Falls is roughly one mile. Depending on your adventurousness/skill level, you could also rock hop your way along the river from the Lower Falls to the Middle Falls.
Image 3: Lower Falls
In our opinion, the Middle Falls (Route marker #2 on the map) is the most exciting of the three. At about 50 feet high and twice that in width, Middle Falls is the biggest by far. This is a great location for a swim on a hot day, or to go cliff jumping if you’re looking for an adrenaline rush. Always make sure to check the depth of the water before cliff jumping! In the winter months it is too cold to swim but the falls are still very worth checking out. Middle Falls can be viewed from the lookout point up top, or you can make your way down a steep trail to view the falls closer up. Both areas provide spectacular vantage points.
Image 4: Middle Falls
Image 5: Bird’s-eye View of Middle Falls
Upper Falls can be reached by following the railing from the lookout point at Middle Falls. Along the way you will hike through some trees and be treated to views of the McCloud River Canyon below. As you hike, look back towards the Northwest and you may be able to catch a glimpse of Mount Shasta poking through the trees. After about 10-15 minutes, you will come to the Upper Falls pouring out of a narrow gorge into a pool below (Route marker #3 on the map). The pool is surrounded by immense rock walls on either side. The Upper Falls and river gorge can also be viewed from above as you continue following the trail.
Image 6: Upper Falls
This is a very straightforward hike easy enough for anyone to enjoy. There is also the option to drive to and from each of the falls, and there are wheelchair accessible paths from each parking lot to the waterfall lookout points. In the summer months the falls can be busy and it can be difficult to find parking. This makes making the hike between the falls the more attractive option.
Whichever way you choose to experience McCloud Falls, we hope you enjoy it, and we hope this guide helps you along the way!
WE WANT TO HEAR FROM YOU
Thank you for choosing Epic Trip Adventures as your guide. We are committed to continually updating our guides to be as relevant and accurate as possible. If you have feedback to improve this guide please leave it in the comments below.
We also want to hear about your McCloud Falls adventures. If you have stories, pictures or even a link to your own adventure video please share them below!
For a downloadable PDF version of this guide The city of Mount Shasta is located in Northern California at the base of one of the largest volcanoes in the state. Mount Shasta is a must visit location in California with endless outdoor activities including hiking, biking, fishing, and camping. ADVENTURE STATISTICS Location: 62 miles north of Redding, CA Highest Elevation: Mount Shasta’s elevation is 14,179 feet Difficulty: Varied depending on the adventure activities you choose! Season: June to mid-October as there is snow in the winter Additional Requirements: Bikes are nice to have when exploring Siskiyou Lake. DRIVING DIRECTIONS To Mount Shasta Hiking Trails from the I-5 South: Take exit 740 onto Mount Shasta Blvd to enter the city of Mount Shasta. Then turn left onto Ski Village Drive and take a quick right to stay on Ski Village Drive. In 0.8 miles turn left onto Everitt Memorial Hwy and follow that road to the hiking trailhead of your choice. To Lake Siskiyou from the I-5 South: Take exit 738 as you drive through the town of Mount Shasta and turn right onto W Lake Street. Turn left at S Old Stage Road and follow the road as it makes a slight right onto W A Barr Road. After about 2 miles you cross the Wagon Creek Bridge and will find a parking lot on the lake side. WHAT TO BRING Comfortable Footwear: Hiking shoes or winter boots in case there is snow on the mountain. Water: Always smart to bring water when you are hiking. Snacks: Bring some of your favorite snacks to enjoy along the hike as well as a light lunch for when you arrive at the falls. Some of our favorite snacks are trail mix, bananas, beef jerky and licorice.
For a downloadable PDF version of this guide CLICK HERE!
The city of Mount Shasta is located in Northern California at the base of one of the largest volcanoes in the state. Mount Shasta is a must visit location in California with endless outdoor activities including hiking, biking, fishing, and camping.
ADVENTURE STATISTICS
Location: 62 miles north of Redding, CA
Highest Elevation:Mount Shasta’s elevation is 14,179 feet
Difficulty:Varied depending on the adventure activities you choose!
Season: June to mid-October as there is snow in the winter
Additional Requirements: Bikes are nice to have when exploring Siskiyou Lake.
Image 1: Mount Shasta
DRIVING DIRECTIONS
To Mount Shasta Hiking Trails from the I-5 South: Take exit 740 onto Mount Shasta Blvd to enter the city of Mount Shasta. Then turn left onto Ski Village Drive and take a quick right to stay on Ski Village Drive. In 0.8 miles turn left onto Everitt Memorial Hwy and follow that road to the hiking trailhead of your choice.
To Lake Siskiyou from the I-5 South: Take exit 738 as you drive through the town of Mount Shasta and turn right onto W Lake Street. Turn left at S Old Stage Road and follow the road as it makes a slight right onto W A Barr Road. After about 2 miles you cross the Wagon Creek Bridge and will find a parking lot on the lake side.
WHAT TO BRING
Comfortable Footwear: Hiking shoes or winter boots in case there is snow on the mountain.
Water: Always smart to bring water when you are hiking.
Snacks: Bring some of your favorite snacks to enjoy along the hike as well as a light lunch for when you arrive at the falls. Some of our favorite snacks are trail mix, bananas, beef jerky and licorice.
Weather appropriate clothing: Depending on the time of year, you may want shorts and a T-shirt or some winter clothing. Check the weather forecast and plan accordingly.
Mountain Bikes: If you have a bike, the trail around Lake Siskiyou is a pleasant pedal with exceptional views of Mount Shasta in the distance.
Sunscreen: If it is sunny and you’re like Mattson, who easily burns, bring sunscreen!
Insect Repellent: Insect repellent can greatly improve your hiking experience.
Bear Spray: You are in bear country. Always hike with bear spray that is easily accessible.
Camera: There are numerous photo opportunities you won’t want to miss.
This Guide: Print a copy of this guide to reference throughout the hike
OTHER CONSIDERATIONS
Wildlife: You will be hiking in bear country. It is always advisable to check in at the local Visitor Information Center to learn of any trail closures due to wildlife. Carry bear spray in an easily accessible location. Travel in groups of multiple hikers and make lots of noise to avoid an unexpected encounter.
Leave No Trace: It is important that we enjoy the outdoors responsibly and sustainably. Some key principles to consider when hiking to “Leave No Trace” are:
Plan ahead and prepare: Proper planning allows adventurers to hike safely while minimizing damage to the land.
Travel on durable surfaces: Stick to the trail when possible. If there is no trail, or you must travel off trail, stay on durable surfaces to reduce your impact.
Dispose of waste properly: Pack it in, pack it out.
Leave what you find: Leave rocks, plants, archaeological artifacts and other objects of interest as you find them.
Respect wildlife: Observe wildlife from a distance. Never feed wild animals.
Be considerate of other visitors: Be courteous to others to allow everyone to enjoy their outdoor experience.
Summary: Mount Shasta is an area with many opportunities for adventure. We were only able to spend one day in Mount Shasta but you could easily fill a few days there. We have attached a link below that includes a thorough description of all of the available hikes and other activities to do in the area.
The remainder of this guide describes our day at Mount Shasta and the recommendations we have, for the activities we did.
Image 2: Mount Shasta Adventure Map
One day in Mount Shasta:
Our initial goal was to summit Mount Shasta but due to the time of year, and the amount of snow, this was not a possibility. Instead we decided to head for a leisurely bike ride around Lake Siskiyou before driving up Mount Shasta as far as the winter roads would allow.
Some of the best views of Mount Shasta come from the southwest shore of Lake Siskiyou. We left the city of Mount Shasta (Route marker #1 on the map) and parked in a parking lot on the southeast edge of the lake (Route marker #2 on the map). There is a well maintained 7 mile trail that runs through the trees and loops around the lake. The trail has minimal elevation gain and can be walked or biked. In the winter, if there is snow, the trail is used for snowshoeing and cross country skiing. As you travel around the lake there are breaks in the trees that provide stunning views of Mount Shasta in the distance.
Image 3: Biking around Lake Siskiyou
Image 4: Mount Shasta from Lake Siskiyou
After soaking in the views from the lake we drove back through the city and up the mountain for a short hike off the Bunny Flat Trailhead (Route marker #3 on the map). The roads up to Bunny Flats are plowed year round and in the winter this is as high as you can reach by vehicle. We did our trip in November and there was a fresh 8-10 inches of snow at the Bunny Flats parking lot!
The Bunny Flat Trailhead is at 6950 feet and there is hours of hiking that begin from this point. Our hike was only about an hour due to the amount of snow, but the views were incredible. We lucked out and had a very clear day with blue skies and the sun shining.
Image 5: Anderson on Mount Shasta
Image 4: Mattson hiking through the snow
Mount Shasta is an area filled with adventure opportunities and beautiful scenery. It is a bit off the beaten track but totally worth spending a few days in!
Image 7: Anderson hanging out at Lake Siskiyou
WE WANT TO HEAR FROM YOU
Thank you for choosing Epic Trip Adventures as your guide. We are committed to continually updating our guides to be as relevant and accurate as possible. If you have feedback to improve this guide please leave it in the comments below.
We also want to hear about your Mount Shasta adventures. If you have stories, pictures or even a link to your own adventure video please share them below!