Canmore Cave Tours provides unforgettable caving tours of Rat’s Nest Cave underneath Grotto Mountain. Their flagship Adventure Tour is about 6 hours and includes an 18m repel, chamber traversing, crawling, sliding and some very tight squeezes! Canmore Cave Tours provides all the required technical gear so all you have to do is show up with an adventurous attitude! Book your tour now! www.canmorecavetours.com/?cref=CCTVIP-RYSV-130225 TOUR OVERVIEW: The tour begins at the Canmore Cave Tours office in Canmore where you'll get suited up with gear for the adventure. From there it's a 6 minute drive to the trailhead where you'll hike approximately 45 minutes to the cave. The hike has about 200m elevation gain so you'll want to wear sturdy footwear and dress for mountain weather. The underground portion of the tour lasts about 4 hours and includes a 20m rappel, tight squeezes, and large cave chambers. The temperature in the cave is 5 degrees year round so you will want to dress in layers that make you feel comfortable at this temperature. Fortunately the guides take care of all of the underground navigation so all you have to do is follow along and enjoy the adventure! WE WANT TO HEAR FROM YOU Thank you for choosing Epic Trip Adventures as your guide. We are committed to continually updating our guides to be as relevant and accurate as possible. If you have feedback to improve this guide please leave it in the comments below. We also want to hear about your Rat's Nest Cave adventures. If you have stories, pictures or even a link to your own adventure video please share them below! Have fun out there! - ETA
Canmore Cave Tours provides unforgettable caving tours of Rat’s Nest Cave underneath Grotto Mountain. Their flagship Adventure Tour is about 6 hours and includes an 18m repel, chamber traversing, crawling, sliding and some very tight squeezes! Canmore Cave Tours provides all the required technical gear so all you have to do is show up with an adventurous attitude!
The tour begins at the Canmore Cave Tours office in Canmore where you’ll get suited up with gear for the adventure. From there it’s a 6 minute drive to the trailhead where you’ll hike approximately 45 minutes to the cave. The hike has about 200m elevation gain so you’ll want to wear sturdy footwear and dress for mountain weather.
The underground portion of the tour lasts about 4 hours and includes a 20m rappel, tight squeezes, and large cave chambers. The temperature in the cave is 5 degrees year round so you will want to dress in layers that make you feel comfortable at this temperature. Fortunately the guides take care of all of the underground navigation so all you have to do is follow along and enjoy the adventure!
WE WANT TO HEAR FROM YOU
Thank you for choosing Epic Trip Adventures as your guide. We are committed to continually updating our guides to be as relevant and accurate as possible. If you have feedback to improve this guide please leave it in the comments below.
We also want to hear about your Rat’s Nest Cave adventures. If you have stories, pictures or even a link to your own adventure video please share them below!
For a downloadable PDF version of this guide Heart Creek Trail is a popular hike that is suitable for people of all abilities. The hike offers beautiful scenery along an easy walking trail to a waterfall. At the end of the trail if you’re feeling adventurous you can climb into the waterfall canyon or hike to the top of the falls. ADVENTURE STATISTICS Time Required: 2-3 Hours Location: 90km west of Calgary off Hwy 1 Distance: 5-6km round trip depending if you go to the top of the waterfall Elevation Gain: 542m to the top of the waterfall Difficulty: 3/10 – easy trail with minimal elevation gain Season: June to mid-October for summer conditions Additional Requirements: N/A DRIVING DIRECTIONS From Calgary: Take the Trans Canada (Hwy 1) west approximately 90 km to the turnoff for Lac Des Arcs (Range Rd 91A). Park in the designated gravel parking lot just south of Hwy 1. From Canmore: Take the Trans Canada (Hwy 1) east 15 km to the turnoff for Lac Des Arcs (Range Rd 91A). Park in the designated gravel parking lot just south of Hwy 1. WHAT TO BRING Comfortable Footwear: Hiking shoes or a good pair of runners. Water: Even though Heart Creek Trail is a short hike it is always a good idea to bring water Snacks: Bring some of your favorite snacks to enjoy along the hike and at the waterfall. Some of our favorite snacks are trail mix, bananas, beef jerky and licorice. Weather appropriate clothing: You will be exposed to the elements throughout this hike. Check the weather forecast and plan accordingly. Sunscreen: If it is sunny and you’re like Mattson, who easily burns, bring sunscreen! Insect Repellent: Insect repellent can greatly improve your hiking experience. Bear Spray: You
For a downloadable PDF version of this guide CLICK HERE!
Heart Creek Trail is a popular hike that is suitable for people of all abilities. The hike offers beautiful scenery along an easy walking trail to a waterfall. At the end of the trail if you’re feeling adventurous you can climb into the waterfall canyon or hike to the top of the falls.
ADVENTURE STATISTICS
Time Required: 2-3 Hours
Location: 90km west of Calgary off Hwy 1
Distance: 5-6km round trip depending if you go to the top of the waterfall
Elevation Gain:542m to the top of the waterfall
Difficulty:3/10 – easy trail with minimal elevation gain
Season: June to mid-October for summer conditions
Additional Requirements: N/A
DRIVING DIRECTIONS
From Calgary: Take the Trans Canada (Hwy 1) west approximately 90 km to the turnoff for Lac Des Arcs (Range Rd 91A). Park in the designated gravel parking lot just south of Hwy 1.
From Canmore: Take the Trans Canada (Hwy 1) east 15 km to the turnoff for Lac Des Arcs (Range Rd 91A). Park in the designated gravel parking lot just south of Hwy 1.
WHAT TO BRING
Comfortable Footwear: Hiking shoes or a good pair of runners.
Water: Even though Heart Creek Trail is a short hike it is always a good idea to bring water
Snacks: Bring some of your favorite snacks to enjoy along the hike and at the waterfall. Some of our favorite snacks are trail mix, bananas, beef jerky and licorice.
Weather appropriate clothing: You will be exposed to the elements throughout this hike. Check the weather forecast and plan accordingly.
Sunscreen: If it is sunny and you’re like Mattson, who easily burns, bring sunscreen!
Insect Repellent: Insect repellent can greatly improve your hiking experience.
Bear Spray: You are in bear country. Always hike with bear spray that is easily accessible.
Camera: There are numerous photo opportunities you won’t want to miss.
This Guide: Print a copy of this guide to reference throughout the hike
OTHER CONSIDERATIONS
Wildlife: You will be hiking in bear country. It is always advisable to check in at the local Visitor Information Center to learn of any trail closures due to wildlife. Carry bear spray in an easily accessible location. Travel in groups of multiple hikers and make lots of noise to avoid an unexpected encounter.
Leave No Trace: It is important that we enjoy the outdoors responsibly and sustainably. Some key principles to consider when hiking to “Leave No Trace” are:
Plan ahead and prepare: Proper planning allows adventurers to hike safely while minimizing damage to the land.
Travel on durable surfaces: Stick to the trail when possible. If there is no trail, or you must travel off trail, stay on durable surfaces to reduce your impact.
Dispose of waste properly: Pack it in, pack it out.
Leave what you find: Leave rocks, plants, archaeological artifacts and other objects of interest as you find them.
Respect wildlife: Observe wildlife from a distance. Never feed wild animals.
Be considerate of other visitors: Be courteous to others to allow everyone to enjoy their outdoor experience.
Summary: Heart Creek Trail is an out and back hike that follows a creek to a waterfall. The trail is easy to follow and has minimal elevation gain. Near the waterfall there is a side trail with more elevation that takes you to the top of the waterfall.
Image 1: Heart Creek Trail Adventure Map
Step-By-Step Guide:
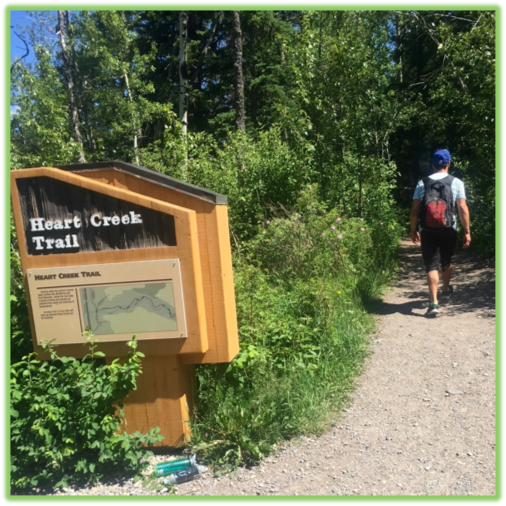
From the parking lot (Route marker #1 on the map) follow the clearly marked trail.
Image 2: Heart Creek Trail Trailhead
Take a right at the yellow sign (Route marker #2 on the map) to Heart Creek Canyon and then follow the trail along the creek. The scenic trial is about 2km long and will cross Heart Creek multiple times.
Image 3: The yellow sign (take a right)
Image 4: Heart Creek Canyon
At the end of the trail is a waterfall (Route marker #4 on the map) but it can be difficult to see as it is deep inside the canyon. If you want to get a better view of the waterfall we recommend checking it out from the top of the canyon! From the waterfall canyon backtrack to the last wooden bridge you crossed (Route marker #3 on the map). From there, if you stand on the wooden bridge facing the waterfall canyon, there is a path behind you on the right side that will loop around to the top of the waterfall.
Image 5: Wooden bridges crossing Heart Creek
Follow the trail up to the top of the falls. This is the best place to view and take photos of the waterfall so explore a bit before heading back down to the creek.
If you are feeling adventurous when you arrive back at the creek you can follow it into the canyon to the bottom of the waterfall. We’d recommended that you leave anything electronic or valuable behind before venturing into the canyon as it is very slippery and there is a good chance you will get wet. Be careful of your footing when crossing the floating logs into the canyon as they are not very stable and will move under your feet.
Image 6: Heart Creek Canyon
Image 8: Heart Creek Trail Waterfall
Once you’re inside the canyon you have a good view of the waterfall. You also have the option of going for a very cold swim if you want to get closer!
WE WANT TO HEAR FROM YOU
Thank you for choosing Epic Trip Adventures as your guide. We are committed to continually updating our guides to be as relevant and accurate as possible. If you have feedback to improve this guide please leave it in the comments below.
We also want to hear about your Heart Creek Trail adventures. If you have stories, pictures or even a link to your own adventure video please share them below!
For a downloadable PDF version of this guide Grotto Canyon is a relatively simple trail walk with interesting features that make it a very worthwhile excursion. Walking between the narrow walls of the canyon provides an eerie experience and at the end of the canyon there is a small waterfall and cave to explore. You can also find ancient pictographs painted on the canyon walls if you know where to look! ADVENTURE STATISTICS Time Required: 1-2 Hours Location: 16km east of Canmore, AB Distance: Up to 7km round trip Highest Elevation: 1550m Elevation Gain: 250m Difficulty: 3/10 – Some uneven footing Season: Year-Round - May be icy and slippery in the winter. Additional Requirements: N/A DRIVING DIRECTIONS From Calgary: Take the Trans-Canada (Hwy 1) west approximately 65 km to Exit 114 and take Hwy 1X north. After 3.5km turn left and head west on Hwy 1A. Follow Hwy 1A 11km and park at the Grotto Pong Day use area. From Canmore: Take Hwy 1A east approximately 16km and park at the Grotto Pond Day use area. WHAT TO BRING Comfortable Footwear: A pair of comfortable sneakers will be sufficient for this hike. In the winter you may want winter boots and potentially micro spikes as it could be icy. Water: One water bottle per hiker will be sufficient as this is a fairly easy, short hike. Snacks: Bring some of your favorite snacks to enjoy along the trail. Weather appropriate clothing: Check the weather forecast and plan accordingly. Sunscreen: If it is sunny and you’re like Mattson, who easily burns, bring sunscreen! Insect Repellent: Insect repellent can greatly improve your hiking experience. Bear Spray: You are in bear country. Always hike with bear spray that is easily accessible. Camera: There are numerous photo opportunities
For a downloadable PDF version of this guide CLICK HERE!
Grotto Canyon is a relatively simple trail walk with interesting features that make it a very worthwhile excursion. Walking between the narrow walls of the canyon provides an eerie experience and at the end of the canyon there is a small waterfall and cave to explore. You can also find ancient pictographs painted on the canyon walls if you know where to look!
ADVENTURE STATISTICS
Time Required: 1-2 Hours
Location: 16km east of Canmore, AB
Distance: Up to 7km round trip
Highest Elevation:1550m
Elevation Gain:250m
Difficulty:3/10 – Some uneven footing
Season: Year-Round – May be icy and slippery in the winter.
Additional Requirements: N/A
DRIVING DIRECTIONS
From Calgary: Take the Trans-Canada (Hwy 1) west approximately 65 km to Exit 114 and take Hwy 1X north. After 3.5km turn left and head west on Hwy 1A. Follow Hwy 1A 11km and park at the Grotto Pong Day use area.
From Canmore: Take Hwy 1A east approximately 16km and park at the Grotto Pond Day use area.
WHAT TO BRING
Comfortable Footwear: A pair of comfortable sneakers will be sufficient for this hike. In the winter you may want winter boots and potentially micro spikes as it could be icy.
Water: One water bottle per hiker will be sufficient as this is a fairly easy, short hike.
Snacks: Bring some of your favorite snacks to enjoy along the trail.
Weather appropriate clothing: Check the weather forecast and plan accordingly.
Sunscreen: If it is sunny and you’re like Mattson, who easily burns, bring sunscreen!
Insect Repellent: Insect repellent can greatly improve your hiking experience.
Bear Spray: You are in bear country. Always hike with bear spray that is easily accessible.
Camera: There are numerous photo opportunities you won’t want to miss.
This Guide: Print a copy of this guide to reference throughout the hike
OTHER CONSIDERATIONS
Wildlife: You will be hiking in bear country. It is always advisable to check in at the local Visitor Information Center to learn of any trail closures due to wildlife. Carry bear spray in an easily accessible location. Travel in groups of multiple hikers and make lots of noise to avoid an unexpected encounter.
Leave No Trace: It is important that we enjoy the outdoors responsibly and sustainably. Some key principles to consider when hiking to “Leave No Trace” are:
Plan ahead and prepare: Proper planning allows adventurers to hike safely while minimizing damage to the land.
Travel on durable surfaces: Stick to the trail when possible. If there is no trail, or you must travel off trail, stay on durable surfaces to reduce your impact.
Dispose of waste properly: Pack it in, pack it out.
Leave what you find: Leave rocks, plants, archaeological artifacts and other objects of interest as you find them.
Respect wildlife: Observe wildlife from a distance. Never feed wild animals.
Be considerate of other visitors: Be courteous to others to allow everyone to enjoy their outdoor experience.
Summary: The Hike through Grotto Canyon begins at the Grotto Pond Day Use Area just off Hwy 1A. There is a well-marked trail that will take you from the Day Use Area to the entrance of Grotto Canyon. As you venture up the canyon follow this guide to find ancient hopi pictographs painted on the canyon walls, the waterfall that feeds grotto creek and a small cave.
Image 1: Grotto Canyon Adventure Map
Step-By-Step Guide:
From the Grotto Pond Day Use Area, the trailhead to Grotto Canyon is clearly marked (Route marker #1 on the map). Begin following the trail into the forest. 450m down the trail you will come to a work access road. Cross the road and continue following the trail towards the noisy Baymeg Plant.
Image 2: Grotto Canyon Trailhead
Image 3: Cross the work access road
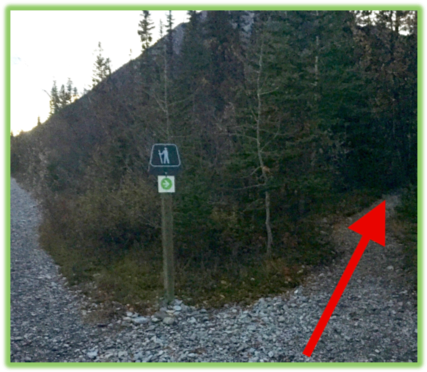
Follow the trail 350m more and you will hit a fork in the road. Follow the right trail indicated by the arrow in the green circle on the sign.
Image 4: The trail to Grotto Canyon
This path will take you to a rocky creek bed which leads to the canyon. At this point you can climb down into the creek bed and follow it or take the higher trail on the right side through the trees. The trail through the trees will traverse the hillside and then lead you down into the canyon.
Image 5: The creek bed
Image 6: The upper trail through the trees
Follow the rocky creek bed into the canyon. You will cross back and forth over the creek as you make your way deeper into the canyon
Image 7: Grotto Canyon
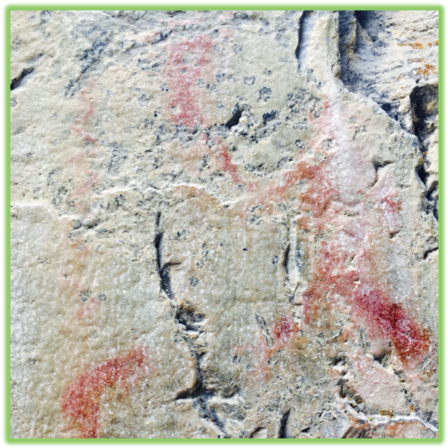
600m into the canyon from where you first hit the rocky creek bed is the rock wall where ancient Hopi Pictographs can be seen (Route marker #2 on the map). They are a faint red color approximately at eye level. The picture below shows a group of hikers viewing the pictographs.
Image 8: Hopi Pictographs
Image 9: Hopi Pictographs
Image 10: Hopi Pictographs
Image 11: Hopi Pictographs
Image 12: Hopi Pictographs
200m further down the canyon you will come to a T-intersection. The creek is fed from a small waterfall to your right. A very short walk along the creek will take you to the waterfall (Route marker #3 on the map). Be cautious on the wet rocks as they are very slippery.
Image 13: The view towards the waterfall
Image 14: The waterfall
If you go left from the T-intersection the canyon will widen and you will trek through a valley of rock cairns built by previous hikers.
Image 15: Rock Cairns
1km down this path you will come to a small cave on the side of the rock face (Route marker #4 on the map). It is a steep climb to get up to the cave, but it is worth checking out before starting the return journey.
Image 16: Grotto Canyon Cave
When you’ve seen enough of Grotto Canyon head back the way you came to the Grotto Pond Day Use Area.
WE WANT TO HEAR FROM YOU
Thank you for choosing Epic Trip Adventures as your guide. We are committed to continually updating our guides to be as relevant and accurate as possible. If you have feedback to improve this guide please leave it in the comments below.
We also want to hear about your Grotto Canyon adventures. If you have stories, pictures or even a link to your own adventure video please share them below!
For a downloadable PDF version of this guide Located on the north side of the town of Canmore is Mount Lady Macdonald. Lady Mac is a big old piece of rock that offers plenty of stunning Rocky Mountain views the whole hike up. Lady Mac is a challenge and really allows the hiker to experience what it’s like hiking in the Canadian Rockies. Because of its convenient location, it is a local favorite and is one of the mountains climbed as part of Canmore’s Triple Crown or 4 peak challenge. ADVENTURE STATISTICS Time Required: 4-6 Hours Location: NE of Canmore – Bow Valley Wildland Provincial Park Distance: 11km round trip Highest Elevation: 2600m Elevation Gain: 1180m Difficulty: 7/10 – Rapid elevation gain and extreme exposure at the summit. Season: June to mid-October Additional Requirements: N/A DRIVING DIRECTIONS From Canmore: Follow Benchlands Trail north of the Trans Canada and then take the second exit at the traffic circle to continue on Benchlands Trail. At any point after that traffic circle, find a spot in the parking lot to your right. If it’s full try to find parking on the street. WHAT TO BRING Comfortable Footwear: Hiking shoes. Make sure your shoes are broken in prior to tackling this hike to prevent unexpected blisters. You could get away with running shoes but having extra grip on the rock surfaces will definitely come in handy! Water: This hike is long with lots of elevation gain to reach the summit. Be sure to bring enough water for 5-6 hours of physical exertion. Snacks: Bring some of your favorite snacks to enjoy along the hike. Some of our favorite snacks are trail mix, bananas, beef jerky and licorice. Weather appropriate clothing: You will be exposed to the elements throughout this hike. It
For a downloadable PDF version of this guide CLICK HERE!
Located on the north side of the town of Canmore is Mount Lady Macdonald. Lady Mac is a big old piece of rock that offers plenty of stunning Rocky Mountain views the whole hike up. Lady Mac is a challenge and really allows the hiker to experience what it’s like hiking in the Canadian Rockies. Because of its convenient location, it is a local favorite and is one of the mountains climbed as part of Canmore’s Triple Crown or 4 peak challenge.
ADVENTURE STATISTICS
Time Required: 4-6 Hours
Location: NE of Canmore – Bow Valley Wildland Provincial Park
Distance: 11km round trip
Highest Elevation: 2600m
Elevation Gain:1180m
Difficulty:7/10 – Rapid elevation gain and extreme exposure at the summit.
Season: June to mid-October
Additional Requirements: N/A
DRIVING DIRECTIONS
From Canmore: Follow Benchlands Trail north of the Trans Canada and then take the second exit at the traffic circle to continue on Benchlands Trail. At any point after that traffic circle, find a spot in the parking lot to your right. If it’s full try to find parking on the street.
WHAT TO BRING
Comfortable Footwear: Hiking shoes. Make sure your shoes are broken in prior to tackling this hike to prevent unexpected blisters. You could get away with running shoes but having extra grip on the rock surfaces will definitely come in handy!
Water: This hike is long with lots of elevation gain to reach the summit. Be sure to bring enough water for 5-6 hours of physical exertion.
Snacks: Bring some of your favorite snacks to enjoy along the hike. Some of our favorite snacks are trail mix, bananas, beef jerky and licorice.
Weather appropriate clothing: You will be exposed to the elements throughout this hike. It can be deceivingly cold up at the summit, and especially windy. Check the weather forecast and plan accordingly.
Sunscreen: If it is sunny and you’re like Mattson, who easily burns, bring sunscreen!
Insect Repellent: Insect repellent can greatly improve your hiking experience.
Bear Spray: You are in bear country. Always hike with bear spray that is easily accessible.
Camera: There are numerous photo opportunities you won’t want to miss.
This Guide: Print a copy of this guide to reference throughout the hike
OTHER CONSIDERATIONS
Wildlife: You will be hiking in bear country. It is always advisable to check in at the local Visitor Information Center to learn of any trail closures due to wildlife. Carry bear spray in an easily accessible location. Travel in groups of multiple hikers and make lots of noise to avoid an unexpected encounter.
Leave No Trace: It is important that we enjoy the outdoors responsibly and sustainably. Some key principles to consider when hiking to “Leave No Trace” are:
Plan ahead and prepare: Proper planning allows adventurers to hike safely while minimizing damage to the land.
Travel on durable surfaces: Stick to the trail when possible. If there is no trail, or you must travel off trail, stay on durable surfaces to reduce your impact.
Dispose of waste properly: Pack it in, pack it out.
Leave what you find: Leave rocks, plants, archaeological artifacts and other objects of interest as you find them.
Respect wildlife: Observe wildlife from a distance. Never feed wild animals.
Be considerate of other visitors: Be courteous to others to allow everyone to enjoy their outdoor experience.
Summary: This hike begins at the parking lot on Benchlands Trail and begins by following the wide rocky outwash from cougar creek. From there the trail winds up switchbacks to the “Teahouse” above the tree line. Then to reach the summit you must ascend a scree slope and cross a very narrow exposed ridge.
Image 1: Lady MacDonald Adventure Map
Step-By-Step Guide:
From the parking lot (Route marker #1 on the map), walk along the west side of the gravel outwash for about 700m. At this point there will be a trail to enter into the trees and a sign marking Montane Traverse Trail.
Image 2: The gravel outwash
Image 3: Montana Traverse trailhead
Follow Montane Traverse Trail for a little ways until you reach another fork. Take the right fork onto Lady Macdonald Trail. If you go left, you’ll stay on Montane Traverse Trail. At first the trail is well travelled and relatively effortless to walk on, but it quickly starts to gain elevation up long switchbacks.
Image 4: The fork to Lady MacDonald Trail
Image 5: The trail map
Eventually, you’ll poke out of the trees and begin hiking the rockier section of the trail. Keep following the trail up the mountain and eventually you’ll reach the “Teahouse” (Route marker #2 on the map). Here you’ll find a big old wooden helipad. This is a great spot to stop for a break before you make the push to the summit. They call it the “Teahouse” because there was an unfinished teahouse being built in the mid 1990’s that was suddenly abandoned. The plan was for it to be open to the public Friday through Sunday as a place to stop during the hike, enjoy a cup of tea and take in the amazing views. When the construction was cut short the building was left half finished. In 2013, the Bow Valley Wildland Provincial Park decided to tear down the teahouse and an old wooden helipad is all that remains.
Image 6: The Teahouse helipad
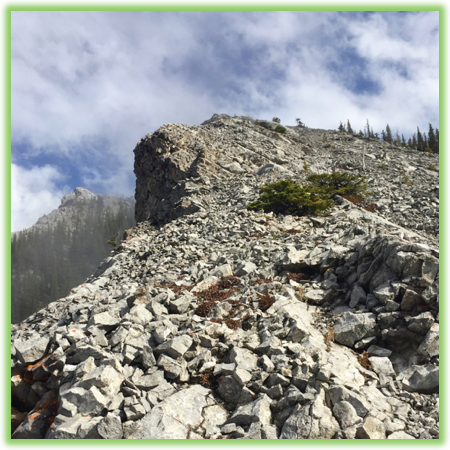
The helipad is the turnaround point for many hikers. The rest of the hike is substantially more difficult and there is dangerous exposure on the ridge to the summit. From the helipad you can see a very faded goat path up the scree slope. If you are choosing to hike to the summit take the path up the scree slope. It can be frustrating hiking up the scree because for every step you take, it feels like you’re sliding back down a half step.
Image 7: Anderson hiking up the scree slope
Image 8: The trail to the summit ridge
Once you reach the top of the scree slope, you’ve made it to what people call “the knife edge summit”. If you’re adventurous enough you can walk the knife edge and make it to the true summit (Route marker #3 on the map). Take as much caution as possible as this ridge has an extreme amount of exposure on either side and is very dangerous. If the weather conditions aren’t right or you’re not comfortable with the exposure, don’t risk it.
Image 9: The ridge walk
Image 10: Crossing the knife edge ridge
WE WANT TO HEAR FROM YOU
Thank you for choosing Epic Trip Adventures as your guide. We are committed to continually updating our guides to be as relevant and accurate as possible. If you have feedback to improve this guide please leave it in the comments below.
We also want to hear about your Lady Macdonald adventures. If you have stories, pictures or even a link to your own adventure video please share them below!
For a downloadable PDF version of this guide Bald Eagle Peak is one of the best hikes in the Canmore area. The route takes you through dense forest, up a beautiful creek bed and along a narrow ridge with a shear drop off to the valley below. The climax of the hike is an exciting scramble to the summit. ADVENTURE STATISTICS Time Required: 5-7 Hours Location: Canmore, AB Distance: 12km round trip Highest Elevation: 2500m Elevation Gain: 1300m Difficulty: 8/10 – Route finding, exposure, large elevation gain and moderate scrambling. Season: June to mid-October Additional Requirements: N/A DRIVING DIRECTIONS From Canmore: Take Hwy 1 just west of Canmore to the Harvie Heights exit. Take the exit and head northwest 800m down Harvie Heights Road. Park your vehicle in the small lot on the north side of the road. WHAT TO BRING Comfortable Footwear: Hiking shoes. Make sure your shoes are broken in prior to tackling this hike to prevent unexpected blisters. You could get away with running shoes but having extra grip on the rock surfaces will definitely come in handy! Water: This hike is long with lots of elevation gain. Be sure to bring enough water for 5-7 hours of physical exertion. Snacks: Bring some of your favorite snacks to enjoy along the hike as well as a light lunch for when you arrive at the summit. Some of our favorite snacks are trail mix, bananas, beef jerky and licorice. Weather appropriate clothing: You will be exposed to the elements throughout this hike. Check the weather forecast and plan accordingly. Sunscreen: If it is sunny and you’re like Mattson, who easily burns, bring sunscreen! Insect Repellent: Insect repellent can greatly improve your hiking experience. Bear Spray: You are in bear country. Always hike with bear spray that is easily accessible. Camera: There are numerous photo opportunities you
For a downloadable PDF version of this guide CLICK HERE!
Bald Eagle Peak is one of the best hikes in the Canmore area. The route takes you through dense forest, up a beautiful creek bed and along a narrow ridge with a shear drop off to the valley below. The climax of the hike is an exciting scramble to the summit.
ADVENTURE STATISTICS
Time Required: 5-7 Hours
Location: Canmore, AB
Distance: 12km round trip
Highest Elevation: 2500m
Elevation Gain:1300m
Difficulty:8/10 – Route finding, exposure, large elevation gain and moderate scrambling.
Season: June to mid-October
Additional Requirements: N/A
DRIVING DIRECTIONS
From Canmore: Take Hwy 1 just west of Canmore to the Harvie Heights exit. Take the exit and head northwest 800m down Harvie Heights Road. Park your vehicle in the small lot on the north side of the road.
WHAT TO BRING
Comfortable Footwear: Hiking shoes. Make sure your shoes are broken in prior to tackling this hike to prevent unexpected blisters. You could get away with running shoes but having extra grip on the rock surfaces will definitely come in handy!
Water: This hike is long with lots of elevation gain. Be sure to bring enough water for 5-7 hours of physical exertion.
Snacks: Bring some of your favorite snacks to enjoy along the hike as well as a light lunch for when you arrive at the summit. Some of our favorite snacks are trail mix, bananas, beef jerky and licorice.
Weather appropriate clothing: You will be exposed to the elements throughout this hike. Check the weather forecast and plan accordingly.
Sunscreen: If it is sunny and you’re like Mattson, who easily burns, bring sunscreen!
Insect Repellent: Insect repellent can greatly improve your hiking experience.
Bear Spray: You are in bear country. Always hike with bear spray that is easily accessible.
Camera: There are numerous photo opportunities you won’t want to miss.
This Guide: Print a copy of this guide to reference throughout the hike
OTHER CONSIDERATIONS
Wildlife: You will be hiking in bear country. It is always advisable to check in at the local Visitor Information Center to learn of any trail closures due to wildlife. Carry bear spray in an easily accessible location. Travel in groups of multiple hikers and make lots of noise to avoid an unexpected encounter.
Leave No Trace: It is important that we enjoy the outdoors responsibly and sustainably. Some key principles to consider when hiking to “Leave No Trace” are:
Plan ahead and prepare: Proper planning allows adventurers to hike safely while minimizing damage to the land.
Travel on durable surfaces: Stick to the trail when possible. If there is no trail, or you must travel off trail, stay on durable surfaces to reduce your impact.
Dispose of waste properly: Pack it in, pack it out.
Leave what you find: Leave rocks, plants, archaeological artifacts and other objects of interest as you find them.
Respect wildlife: Observe wildlife from a distance. Never feed wild animals.
Be considerate of other visitors: Be courteous to others to allow everyone to enjoy their outdoor experience.
Summary: Bald Eagle Peak is minutes from Canmore but does not receive near as much traffic as other hikes in the area. For this reason, there is some route finding required at the beginning of this hike. Through multiple treks to this summit, we have determined the easiest and most well defined route. Starting from the parking lot (Route marker #1 on the map) off Harvie Heights Road there is a trail leading into the dense forest. From there you will travel along well-maintained paths to a drainage (Route marker #2 on the map). Follow this drainage until it becomes impassable and take the trail up the east side of the valley (Route marker #3 on the map) through the thinning trees. Once you clear the tree line follow the ridge to the protruding “bald eagle’s head” where some scrambling is required to reach the summit (Route marker #4 on the map).
Image 1: Bald Eagle Peak Adventure Map
Step-By-Step Guide:
From the parking lot (Route marker #1 on the map) there is a small trail heading into the forest. Follow this trail and you will come to a sign displaying the network of trails in the area.
Image 2: Anderson beginning down the trail
Make your way west to the drainage (Route marker #2 on the map) indicated by the blue line on the map. Our recommended route it to follow the “Ridge Traverse” and “Tibits Quarry Trail” as indicated by the red arrow.
Image 3: The trail to the drainage
The drainage is large and impossible to miss. Follow the drainage northeast up the mountain.
Image 4: Anderson hiking up the drainage
Depending on the water levels in the drainage, it may be easy to walk right up the middle. If there is a larger volume of water flowing through the drainage keep to the right hand side as this is the direction you will ultimately go. There is some minor scrambling as you climb up the drainage over small waterfalls.
The drainage reaches a point where it is too difficult to continue travelling up but there is a small path on the right hand side (Route marker #3 on the map). Take this trail east up the side of the drainage valley.
Image 5: The trail out of the drainage
At this point you will start to gain elevation very rapidly. The trail will take you to the east up through the trees. Once you break through the tree line the trail ends and you will be on a shale slope. Ascending up the shale is difficult and frustrating, so work your way left to the ridge.
There is a large drop to the valley below from the ridge. Follow the ridge to the summit being cautious of your footing on the lose rock. Some scrambling is required as you make your way along the ridge.
Image 6: The ridge to the summit
After a physically demanding climb up the ridge you will be presented with your final challenge of the hike, summiting the “bald eagle’s head”. Although it looks like the climb to the top is near impossible it is relatively moderate. Stay to the left as you approach the “eagle’s head” and ascend the slope on that side.
Continue as far around the northwest side of the “eagle’s head” as you can and there is a fairly easy trail that will lead up and to the right to the summit (Route marker #4 on the map).
Image 7: Head around the right side of the “eagle’s head”
Image 8: Ascend the back side of the “eagles head”
Once you have reached the top, take in the incredible views of Canmore and the surrounding area. Make sure to take a brief rest and replenish on food and water as the downward trek is challenging and requires as much attention and care as the climb up. Return down the same route you ascended.
WE WANT TO HEAR FROM YOU
Thank you for choosing Epic Trip Adventures as your guide. We are committed to continually updating our guides to be as relevant and accurate as possible. If you have feedback to improve this guide please leave it in the comments below.
We also want to hear about your Bald Eagle Peak adventures. If you have stories, pictures or even a link to your own adventure video please share them below!
For a downloadable PDF version of this guide Yamnuska (Mt. Laurie) is a moderate scramble with unique elements that make it a very fun and popular hike. Highlights include an exciting walk along the ledge of a cliff assisted by a chain, a great scree slope for the descent, and a spectacular view of both the mountains and prairies. ADVENTURE STATISTICS Time Required: 3-4 Hours Location: 65 km west of Calgary off of Hwy 1A Distance: 10.5 km round trip Highest Elevation: 2240m Elevation Gain: 900m Difficulty: 7/10 – Route finding, rapid elevation gain, and basic scrambling. Season: June to mid-October Additional Requirements: N/A DRIVING DIRECTIONS From Calgary: Take the Trans Canada (Hwy 1) west approximately 65 km to Hwy 1X (exit 114). Follow 1X 3.5 km north to Hwy 1A and head 2km east. Turn left into the marked Yamnuska day use area. From Canmore: Take the Trans Canada (Hwy 1) east approximately 20 km to Hwy 1X (exit 114). Follow 1X 3.5 km north to Hwy 1A and head 2km east. Turn left into the marked Yamnuska day use area. WHAT TO BRING Comfortable Footwear: Hiking shoes.Make sure your shoes are broken in prior to tackling this hike to prevent unexpected blisters. You could get away with running shoes but having extra grip on the rock surfaces will definitely come in handy! Water: This hike is long with lots of elevation gain.Be sure to bring enough water for 3-4 hours of physical exertion. Snacks: Bring some of your favorite snacks to enjoy along the hike as well as a light lunch for when you arrive at the summit. Some of our favorite snacks are trail mix, bananas, beef jerky and licorice. Weather appropriate clothing: You will be exposed to the elements throughout this hike. Check the weather forecast and plan accordingly. Sunscreen: If
For a downloadable PDF version of this guide CLICK HERE!
Yamnuska (Mt. Laurie) is a moderate scramble with unique elements that make it a very fun and popular hike. Highlights include an exciting walk along the ledge of a cliff assisted by a chain, a great scree slope for the descent, and a spectacular view of both the mountains and prairies.
ADVENTURE STATISTICS
Time Required: 3-4 Hours
Location: 65 km west of Calgary off of Hwy 1A
Distance: 10.5 km round trip
Highest Elevation: 2240m
Elevation Gain:900m
Difficulty:7/10 – Route finding, rapid elevation gain, and basic scrambling.
Season: June to mid-October
Additional Requirements: N/A
DRIVING DIRECTIONS
From Calgary: Take the Trans Canada (Hwy 1) west approximately 65 km to Hwy 1X (exit 114). Follow 1X 3.5 km north to Hwy 1A and head 2km east. Turn left into the marked Yamnuska day use area.
From Canmore: Take the Trans Canada (Hwy 1) east approximately 20 km to Hwy 1X (exit 114). Follow 1X 3.5 km north to Hwy 1A and head 2km east. Turn left into the marked Yamnuska day use area.
WHAT TO BRING
Comfortable Footwear: Hiking shoes.Make sure your shoes are broken in prior to tackling this hike to prevent unexpected blisters. You could get away with running shoes but having extra grip on the rock surfaces will definitely come in handy!
Water: This hike is long with lots of elevation gain.Be sure to bring enough water for 3-4 hours of physical exertion.
Snacks: Bring some of your favorite snacks to enjoy along the hike as well as a light lunch for when you arrive at the summit. Some of our favorite snacks are trail mix, bananas, beef jerky and licorice.
Weather appropriate clothing: You will be exposed to the elements throughout this hike. Check the weather forecast and plan accordingly.
Sunscreen: If it is sunny and you’re like Mattson, who easily burns, bring sunscreen!
Insect Repellent: Insect repellent can greatly improve your hiking experience.
Bear Spray: You are in bear country. Always hike with bear spray that is easily accessible.
Camera: There are numerous photo opportunities you won’t want to miss.
This Guide: Print a copy of this guide to reference throughout the hike
OTHER CONSIDERATIONS
Wildlife: You will be hiking in bear country. It is always advisable to check in at the local Visitor Information Center to learn of any trail closures due to wildlife. Carry bear spray in an easily accessible location. Travel in groups of multiple hikers and make lots of noise to avoid an unexpected encounter.
Leave No Trace: It is important that we enjoy the outdoors responsibly and sustainably. Some key principles to consider when hiking to “Leave No Trace” are:
Plan ahead and prepare: Proper planning allows adventurers to hike safely while minimizing damage to the land.
Travel on durable surfaces: Stick to the trail when possible. If there is no trail, or you must travel off trail, stay on durable surfaces to reduce your impact.
Dispose of waste properly: Pack it in, pack it out.
Leave what you find: Leave rocks, plants, archaeological artifacts and other objects of interest as you find them.
Respect wildlife: Observe wildlife from a distance. Never feed wild animals.
Be considerate of other visitors: Be courteous to others to allow everyone to enjoy their outdoor experience.
Summary: The starting point for this hike is at the Yamnuska day use area. From there you will hike around the east side of the mountain and ascend the north face. On the descent you will make your way around the west side of the mountain and take the scree slope down under the south cliff face to return to the day use area.
Image 1: Yamnuska Adventure Map
Step-By-Step Guide:
Follow the trail from the parking lot (Route marker #1 on the map) about 500m to a sign that shows climbers to the left, hikers to the right (Route marker #2 on the map). Take the route to the right
Image 2: The trail from the Parking lot
Image 3: The trail fork
The path will wind through the forest to the bottom of the east side of the main cliff face. From this point on there is some scrambling required to reach the mountain’s summit.
Image 4: The trail to the base of Yamnuska
The easiest path is conveniently marked with blue spray painted squares. The path begins by climbing through the Chimney in the cliff (Route marker #3 on the map).
Image 5: Blue markers along the trail
Image 6: The Chimney
Follow the path from one blue square to the next winding your way up the north side of the mountain.
Image 7: The trail on the north side of Yamnuska
Image 8: The painted blue markers
You will eventually come to a narrow path along the edge of a cliff with a chain to hang onto as you traverse (Route marker #4 on the map). Follow the chain across the side of the cliff and then down a small ledge. From here follow the path as it dips below the next cliff before ascending to the summit (Route marker #5 on the map).
You can descend the mountain the same way you came, but the fastest, and most fun, route down is the path to the west side of the cliff face. Take the trail down the scree to the west. You will eventually wrap around to the south side of the cliff face.
Image 9: The route down from the summit
Once under the south cliff face follow the path as far to the east as you can go. There will be a few paths that appear to head down the scree slope below but you want to continue as far as you can to the very last one (Route marker #6 on the map). Take the last scree shoot that cuts straight down and continues as a path into the trees below. The descent down the slope is a lot of fun as you can run or hop down the loose scree all the way to the trees below.
Image 10: Traverse the base of Yamnuska
Image 11: The scree slope
Once you are back in the trees follow the marked path to the sign you passed on the way up pointing climbers left and hikers right (Route marker #2 on the map). From the sign follow the trail down back to the parking lot.
Image 12: Follow the blue markers back to the trail
WE WANT TO HEAR FROM YOU
Thank you for choosing Epic Trip Adventures as your guide. We are committed to continually updating our guides to be as relevant and accurate as possible. If you have feedback to improve this guide please leave it in the comments below.
We also want to hear about your Yamnuska adventures. If you have stories, pictures or even a link to your own adventure video please share them below!
For a downloadable PDF version of this guide Ha Ling is a peak at the western end of Mount Lawrence Grassi. Ha Ling is a very popular well-trafficked trail because of its convenient location just south of the city of Canmore. Ha Ling is a moderately difficult scramble with steep consistent elevation gain and spectacular views from the summit. ADVENTURE STATISTICS Time Required: 3-5 Hours Location: Just south of Canmore, AB Distance: 6km round trip Highest Elevation: 2450m Elevation Gain: 700m Difficulty: 6/10 – steep ascent Season: May to October for summer hiking conditions Additional Requirements: N/A DRIVING DIRECTIONS From Canmore: Take Three Sisters Drive up the hill and turn right on Three Sisters Pkwy (AB-742) towards the Nordic Centre. Keep on that windy road for 7.3km. On the right will be a large parking lot, you can’t miss it. From the parking lot it’s a quick walk to the trailhead. WHAT TO BRING Comfortable Footwear: Hiking shoes. Make sure your shoes are broken in prior to tackling this hike to prevent unexpected blisters. You could get away with running shoes but having extra grip on the rock surfaces will definitely come in handy! Water: This hike has lots of elevation gain to reach the summit. Be sure to bring lots of water. Snacks: Bring some of your favorite snacks to enjoy along the hike and at the summit. Some of our favorite snacks are trail mix, bananas, beef jerky and licorice. Weather appropriate clothing: You will be exposed to the elements throughout this hike. You could get snow, rain, or sun on any day of the year. Check the weather forecast and plan accordingly. Sunscreen: If it is sunny and you’re like Mattson, who easily burns, bring sunscreen! Insect Repellent: Insect repellent can greatly
For a downloadable PDF version of this guide CLICK HERE!
Ha Ling is a peak at the western end of Mount Lawrence Grassi. Ha Ling is a very popular well-trafficked trail because of its convenient location just south of the city of Canmore. Ha Ling is a moderately difficult scramble with steep consistent elevation gain and spectacular views from the summit.
ADVENTURE STATISTICS
Time Required: 3-5 Hours
Location:Just south of Canmore, AB
Distance: 6km round trip
Highest Elevation: 2450m
Elevation Gain:700m
Difficulty:6/10 – steep ascent
Season:May to October for summer hiking conditions
Additional Requirements: N/A
DRIVING DIRECTIONS
From Canmore: Take Three Sisters Drive up the hill and turn right on Three Sisters Pkwy (AB-742) towards the Nordic Centre. Keep on that windy road for 7.3km. On the right will be a large parking lot, you can’t miss it. From the parking lot it’s a quick walk to the trailhead.
WHAT TO BRING
Comfortable Footwear: Hiking shoes. Make sure your shoes are broken in prior to tackling this hike to prevent unexpected blisters. You could get away with running shoes but having extra grip on the rock surfaces will definitely come in handy!
Water: This hike has lots of elevation gain to reach the summit. Be sure to bring lots of water.
Snacks: Bring some of your favorite snacks to enjoy along the hike and at the summit. Some of our favorite snacks are trail mix, bananas, beef jerky and licorice.
Weather appropriate clothing: You will be exposed to the elements throughout this hike. You could get snow, rain, or sun on any day of the year. Check the weather forecast and plan accordingly.
Sunscreen: If it is sunny and you’re like Mattson, who easily burns, bring sunscreen!
Insect Repellent: Insect repellent can greatly improve your hiking experience.
Bear Spray: You are in bear country. Always hike with bear spray that is easily accessible.
Camera: There are numerous photo opportunities you won’t want to miss.
This Guide: Print a copy of this guide to reference throughout the hike
OTHER CONSIDERATIONS
Wildlife: You will be hiking in bear country. It is always advisable to check in at the local Visitor Information Center to learn of any trail closures due to wildlife. Carry bear spray in an easily accessible location. Travel in groups of multiple hikers and make lots of noise to avoid an unexpected encounter.
Leave No Trace: It is important that we enjoy the outdoors responsibly and sustainably. Some key principles to consider when hiking to “Leave No Trace” are:
Plan ahead and prepare: Proper planning allows adventurers to hike safely while minimizing damage to the land.
Travel on durable surfaces: Stick to the trail when possible. If there is no trail, or you must travel off trail, stay on durable surfaces to reduce your impact.
Dispose of waste properly: Pack it in, pack it out.
Leave what you find: Leave rocks, plants, archaeological artifacts and other objects of interest as you find them.
Respect wildlife: Observe wildlife from a distance. Never feed wild animals.
Be considerate of other visitors: Be courteous to others to allow everyone to enjoy their outdoor experience.
Summary: The hike begins at the Goat Creek Day use area. West of the parking lot is the trailhead and the hike quickly ascends through the trees. From start to finish, the elevation gain remains constant. Eventually you will rise above the tree line and have a final push over some scree to the summit.
Image 1: Ha Ling Peak Adventure Map
Step-By-Step Guide:
Starting from the parking lot (Route marker #1 on the map), make your way back up to the road. If you’re facing south, you should be able to see a ramp that veers off to the left. Follow that road up the hill where you’ll come to concrete bridge. Cross this bridge, and make your way to the tree line.
Image 2: The ramp to the trailhead
Image 3: Continue across the bridge
Past the bridge near the tree line, you’ll see a couple of power poles. The trailhead to Ha Ling is right there, you can miss it. The first leg of your journey will be on a wide, root ridden trail with a consistently difficult elevation gain. The trail is very well travelled.
Image 4: Ha Ling Peak trailhead
Follow the trail up the mountain. As you gain elevation the trees will become sparser and you will get more opportunities to enjoy the views you’ve worked so hard for. When you rise above the tree line, you will see the summit of Miner’s Peak and Three Humps on the east side of the saddle, Ha Ling Peak is the steep summit to the west.
Image 5: The well-defined trail through the trees
Image 6: The trail to the summit
The last leg of this hike is an easy scramble. Keep the summit in your sights, and take whichever path you think is easiest for you. We recommend trying to stay on the areas of slab and avoiding the scree. The rock slabs will provide better footing and a safer, more comfortable ascent. It’s common for it to be quite windy at the top of Ha Ling Peak. Bring a jacket to stay warm and most importantly, be careful! Once you reach the top (Route marker #2 on the map), take a break and enjoy the Rocky Mountain views and Canmore down below!
Image 7: Anderson at the summit
WE WANT TO HEAR FROM YOU
Thank you for choosing Epic Trip Adventures as your guide. We are committed to continually updating our guides to be as relevant and accurate as possible. If you have feedback to improve this guide please leave it in the comments below.
We also want to hear about your Ha Ling Peak adventures. If you have stories, pictures or even a link to your own adventure video please share them below!
The Four Peak Challenge, also known as the Canmore Quad, consists of running/walking up the 4 main peaks surrounding Canmore. The peaks are Grotto Mountain, Mount Lady MacDonald, East End of Rundle, and Ha Ling Peak. To add to the difficulty, you must start and finish in the town of Canmore and can only travel on foot between the mountains! In total, this amounts to around 57km with 4800m elevation! ADVENTURE STATISTICS Time Required: Must be completed in one day Location: Canmore, Alberta Distance: 57km Highest Elevation: 2706m Elevation Gain: 4800m Difficulty: 10/10 – Extreme elevation gain and distance! Season: June when there is the most daylight Additional Requirements: Serious physical and mental preparation 4 Peak Challenge Rules To officially complete the 4 Peak Challenge you must follow the below rules: The start and finish point is at the Georgetown Inn in Canmore The challenge must be finished before midnight (completed in one day) You must summit and take a photo at the top of Grotto Mountain, Mount Lady Macdonald, East End of Rundle and Ha Ling Peak You can only travel by foot between the mountains Our Route Although there are no rules on which order you must complete the summits, most people begin with Grotto Mountain and end with Ha Ling. In total the 4 Peak Challenge took us 18 hours and 24 minutes. Our goal was simply to complete this challenge but if you want to go for a record the fastest time recorded is 9 hours and 14 minutes.... which is insane! Starting from the Georgetown Inn (Route marker #1 on the map) we ran through town and along the Horseshoe Trails to the Alpine Club of Canada. From there we headed up Grotto Mountain to the summit (Route marker #2 on the map).
The Four Peak Challenge, also known as the Canmore Quad, consists of running/walking up the 4 main peaks surrounding Canmore. The peaks are Grotto Mountain, Mount Lady MacDonald, East End of Rundle, and Ha Ling Peak. To add to the difficulty, you must start and finish in the town of Canmore and can only travel on foot between the mountains! In total, this amounts to around 57km with 4800m elevation!
ADVENTURE STATISTICS
Time Required: Must be completed in one day
Location: Canmore, Alberta
Distance: 57km
Highest Elevation:2706m
Elevation Gain:4800m
Difficulty:10/10 – Extreme elevation gain and distance!
Season: June when there is the most daylight
Additional Requirements: Serious physical and mental preparation
4 Peak Challenge Rules
To officially complete the 4 Peak Challenge you must follow the below rules:
The start and finish point is at the Georgetown Inn in Canmore
The challenge must be finished before midnight (completed in one day)
You must summit and take a photo at the top of Grotto Mountain, Mount Lady Macdonald, East End of Rundle and Ha Ling Peak
You can only travel by foot between the mountains
Our Route
Although there are no rules on which order you must complete the summits, most people begin with Grotto Mountain and end with Ha Ling. In total the 4 Peak Challenge took us 18 hours and 24 minutes. Our goal was simply to complete this challenge but if you want to go for a record the fastest time recorded is 9 hours and 14 minutes…. which is insane!
Image 1: 4 Peak Challenge Adventure Map
Starting from the Georgetown Inn (Route marker #1 on the map) we ran through town and along the Horseshoe Trails to the Alpine Club of Canada. From there we headed up Grotto Mountain to the summit (Route marker #2 on the map).
From Grotto Mountain we descended the same trail we went up and cut back through the Horseshoe Trails to the Lady Macdonald Trail Head. There are many trails between the two mountains but to shave off a few kilometres we took the furthest west one. The hike to the top of Lady Macdonald is a well beaten trail until the top of the ridge where there is a very sketchy ridge walk to reach the true summit of Mount Lady MacDonald (Route marker #3 on the map).
After completing Lady Macdonald we ran back through town, stopped for lunch, and then began the long trek to the East End of Rundle. We cut through downtown, across the Bow River on the Canmore Engine Bridge, and up to Three Sisters Parkway (742) near the Canmore Nordic Centre. From there it was a long run/walk along the Three Sisters Parkway to reach the trailhead to the East End of Rundle.
Note: We cut through Grassi Lakes on the way up, but it probably would have been faster to just stay on the road.
Both the East End of Rundle (Route marker #4 on the map) and Ha Ling Peak (Route marker #5 on the map) are popular well trodden hikes. We did EEOR first and then Ha Ling Peak as our last summit of the day.
After Ha Ling it was a long jog back down the Three Sister Parkway (742) and through Canmore to the Georgetown Inn where we completed the challenge with 6 minutes to spare!
WE WANT TO HEAR FROM YOU
Thank you for choosing Epic Trip Adventures as your guide. We are committed to continually updating our guides to be as relevant and accurate as possible. If you have feedback to improve this guide please leave it in the comments below.
If you’ve attempted the 4 Peak Challenge, we want to hear about it. If you have stories, pictures or even a link to your own adventure video please share them below!