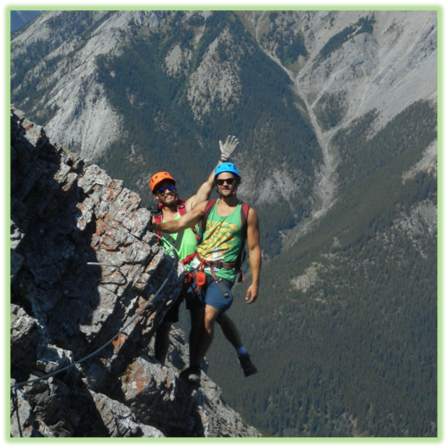
For a downloadable PDF version of this guide Grotto Canyon is a relatively simple trail walk with interesting features that make it a very worthwhile excursion. Walking between the narrow walls of the canyon provides an eerie experience and at the end of the canyon there is a small waterfall and cave to explore. You can also find ancient pictographs painted on the canyon walls if you know where to look! ADVENTURE STATISTICS Time Required: 1-2 Hours Location: 16km east of Canmore, AB Distance: Up to 7km round trip Highest Elevation: 1550m Elevation Gain: 250m Difficulty: 3/10 – Some uneven footing Season: Year-Round - May be icy and slippery in the winter. Additional Requirements: N/A DRIVING DIRECTIONS From Calgary: Take the Trans-Canada (Hwy 1) west approximately 65 km to Exit 114 and take Hwy 1X north. After 3.5km turn left and head west on Hwy 1A. Follow Hwy 1A 11km and park at the Grotto Pong Day use area. From Canmore: Take Hwy 1A east approximately 16km and park at the Grotto Pond Day use area. WHAT TO BRING Comfortable Footwear: A pair of comfortable sneakers will be sufficient for this hike. In the winter you may want winter boots and potentially micro spikes as it could be icy. Water: One water bottle per hiker will be sufficient as this is a fairly easy, short hike. Snacks: Bring some of your favorite snacks to enjoy along the trail. Weather appropriate clothing: Check the weather forecast and plan accordingly. Sunscreen: If it is sunny and you’re like Mattson, who easily burns, bring sunscreen! Insect Repellent: Insect repellent can greatly improve your hiking experience. Bear Spray: You are in bear country. Always hike with bear spray that is easily accessible. Camera: There are numerous photo opportunities
For a downloadable PDF version of this guide CLICK HERE!
Grotto Canyon is a relatively simple trail walk with interesting features that make it a very worthwhile excursion. Walking between the narrow walls of the canyon provides an eerie experience and at the end of the canyon there is a small waterfall and cave to explore. You can also find ancient pictographs painted on the canyon walls if you know where to look!
ADVENTURE STATISTICS
Time Required: 1-2 Hours
Location: 16km east of Canmore, AB
Distance: Up to 7km round trip
Highest Elevation:1550m
Elevation Gain:250m
Difficulty:3/10 – Some uneven footing
Season: Year-Round – May be icy and slippery in the winter.
Additional Requirements: N/A
DRIVING DIRECTIONS
From Calgary: Take the Trans-Canada (Hwy 1) west approximately 65 km to Exit 114 and take Hwy 1X north. After 3.5km turn left and head west on Hwy 1A. Follow Hwy 1A 11km and park at the Grotto Pong Day use area.
From Canmore: Take Hwy 1A east approximately 16km and park at the Grotto Pond Day use area.
WHAT TO BRING
Comfortable Footwear: A pair of comfortable sneakers will be sufficient for this hike. In the winter you may want winter boots and potentially micro spikes as it could be icy.
Water: One water bottle per hiker will be sufficient as this is a fairly easy, short hike.
Snacks: Bring some of your favorite snacks to enjoy along the trail.
Weather appropriate clothing: Check the weather forecast and plan accordingly.
Sunscreen: If it is sunny and you’re like Mattson, who easily burns, bring sunscreen!
Insect Repellent: Insect repellent can greatly improve your hiking experience.
Bear Spray: You are in bear country. Always hike with bear spray that is easily accessible.
Camera: There are numerous photo opportunities you won’t want to miss.
This Guide: Print a copy of this guide to reference throughout the hike
OTHER CONSIDERATIONS
Wildlife: You will be hiking in bear country. It is always advisable to check in at the local Visitor Information Center to learn of any trail closures due to wildlife. Carry bear spray in an easily accessible location. Travel in groups of multiple hikers and make lots of noise to avoid an unexpected encounter.
Leave No Trace: It is important that we enjoy the outdoors responsibly and sustainably. Some key principles to consider when hiking to “Leave No Trace” are:
Plan ahead and prepare: Proper planning allows adventurers to hike safely while minimizing damage to the land.
Travel on durable surfaces: Stick to the trail when possible. If there is no trail, or you must travel off trail, stay on durable surfaces to reduce your impact.
Dispose of waste properly: Pack it in, pack it out.
Leave what you find: Leave rocks, plants, archaeological artifacts and other objects of interest as you find them.
Respect wildlife: Observe wildlife from a distance. Never feed wild animals.
Be considerate of other visitors: Be courteous to others to allow everyone to enjoy their outdoor experience.
Summary: The Hike through Grotto Canyon begins at the Grotto Pond Day Use Area just off Hwy 1A. There is a well-marked trail that will take you from the Day Use Area to the entrance of Grotto Canyon. As you venture up the canyon follow this guide to find ancient hopi pictographs painted on the canyon walls, the waterfall that feeds grotto creek and a small cave.
Image 1: Grotto Canyon Adventure Map
Step-By-Step Guide:
From the Grotto Pond Day Use Area, the trailhead to Grotto Canyon is clearly marked (Route marker #1 on the map). Begin following the trail into the forest. 450m down the trail you will come to a work access road. Cross the road and continue following the trail towards the noisy Baymeg Plant.
Image 2: Grotto Canyon Trailhead
Image 3: Cross the work access road
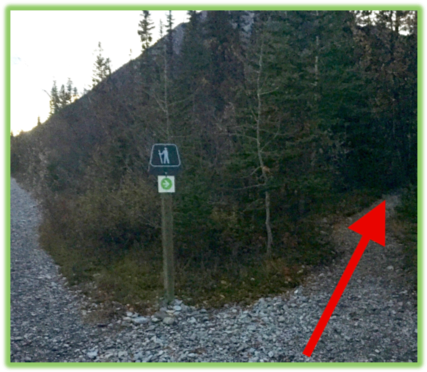
Follow the trail 350m more and you will hit a fork in the road. Follow the right trail indicated by the arrow in the green circle on the sign.
Image 4: The trail to Grotto Canyon
This path will take you to a rocky creek bed which leads to the canyon. At this point you can climb down into the creek bed and follow it or take the higher trail on the right side through the trees. The trail through the trees will traverse the hillside and then lead you down into the canyon.
Image 5: The creek bed
Image 6: The upper trail through the trees
Follow the rocky creek bed into the canyon. You will cross back and forth over the creek as you make your way deeper into the canyon
Image 7: Grotto Canyon
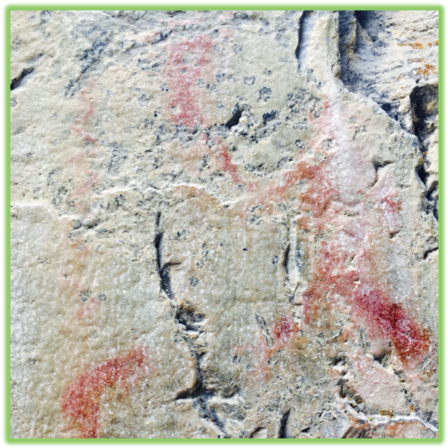
600m into the canyon from where you first hit the rocky creek bed is the rock wall where ancient Hopi Pictographs can be seen (Route marker #2 on the map). They are a faint red color approximately at eye level. The picture below shows a group of hikers viewing the pictographs.
Image 8: Hopi Pictographs
Image 9: Hopi Pictographs
Image 10: Hopi Pictographs
Image 11: Hopi Pictographs
Image 12: Hopi Pictographs
200m further down the canyon you will come to a T-intersection. The creek is fed from a small waterfall to your right. A very short walk along the creek will take you to the waterfall (Route marker #3 on the map). Be cautious on the wet rocks as they are very slippery.
Image 13: The view towards the waterfall
Image 14: The waterfall
If you go left from the T-intersection the canyon will widen and you will trek through a valley of rock cairns built by previous hikers.
Image 15: Rock Cairns
1km down this path you will come to a small cave on the side of the rock face (Route marker #4 on the map). It is a steep climb to get up to the cave, but it is worth checking out before starting the return journey.
Image 16: Grotto Canyon Cave
When you’ve seen enough of Grotto Canyon head back the way you came to the Grotto Pond Day Use Area.
WE WANT TO HEAR FROM YOU
Thank you for choosing Epic Trip Adventures as your guide. We are committed to continually updating our guides to be as relevant and accurate as possible. If you have feedback to improve this guide please leave it in the comments below.
We also want to hear about your Grotto Canyon adventures. If you have stories, pictures or even a link to your own adventure video please share them below!
For a downloadable PDF version of this guide Grizzly peak is one of our favorite hikes in the Kananaskis area. Wildlife, breathtaking views the whole way up, moderate scrambling, and a lush grassy field before the summit are a few of the reasons Grizzly Peak rates so high on our list of favorites. This hike is short but steep. Fortunately, there are lots of scenic spots to stop for a breather on the way up. ADVENTURE STATISTICS Time Required: 4-6 Hours Location: 78km east of Canmore in Kananaskis Country Distance: 6.5km round trip Highest Elevation: 2520m Elevation Gain: 825m Difficulty: 6/10 – Route finding, rapid elevation gain Season: June to mid-October Additional Requirements: N/A DRIVING DIRECTIONS From Calgary: Take the Trans-Canada (Hwy 1) west approximately 70 km to Kananaskis Trail (Hwy 40) and then follow that approx. 46km. The hike begins off Hwy 40 on the east side of the road. Between Km 45 and Km 46 you will pass unsigned “Ripple Creek” on your left. Pull over to the shoulder, this is where the hike begins. NOTE: There is no sign saying Ripple Creek, but Ripple Creek is located between a sign saying “Grizzly Creek” that you will pass first, and “Hood Creek”. If you see the sign saying Hood Creek, you’ve gone too far. From Canmore: Take the Trans-Canada (Hwy 1) east approximately 30 km to Kananaskis Trail (Hwy 40) and then follow that approx. 46km. The hike begins off Hwy 40 on the east side of the road. Between Km 45 and Km 46 you will pass unsigned “Ripple Creek” on your left. Pull over to the shoulder, this is where the hike begins. NOTE: There is no sign saying Ripple Creek, but Ripple Creek is located between a sign saying “Grizzly
For a downloadable PDF version of this guide CLICK HERE!
Grizzly peak is one of our favorite hikes in the Kananaskis area. Wildlife, breathtaking views the whole way up, moderate scrambling, and a lush grassy field before the summit are a few of the reasons Grizzly Peak rates so high on our list of favorites. This hike is short but steep. Fortunately, there are lots of scenic spots to stop for a breather on the way up.
ADVENTURE STATISTICS
Time Required: 4-6 Hours
Location: 78km east of Canmore in Kananaskis Country
Distance: 6.5km round trip
Highest Elevation:2520m
Elevation Gain:825m
Difficulty:6/10 – Route finding, rapid elevation gain
Season: June to mid-October
Additional Requirements: N/A
DRIVING DIRECTIONS
From Calgary: Take the Trans-Canada (Hwy 1) west approximately 70 km to Kananaskis Trail (Hwy 40) and then follow that approx. 46km. The hike begins off Hwy 40 on the east side of the road. Between Km 45 and Km 46 you will pass unsigned “Ripple Creek” on your left. Pull over to the shoulder, this is where the hike begins. NOTE: There is no sign saying Ripple Creek, but Ripple Creek is located between a sign saying “Grizzly Creek” that you will pass first, and “Hood Creek”. If you see the sign saying Hood Creek, you’ve gone too far.
From Canmore: Take the Trans-Canada (Hwy 1) east approximately 30 km to Kananaskis Trail (Hwy 40) and then follow that approx. 46km. The hike begins off Hwy 40 on the east side of the road. Between Km 45 and Km 46 you will pass unsigned “Ripple Creek” on your left. Pull over to the shoulder, this is where the hike begins. NOTE: There is no sign saying Ripple Creek, but Ripple Creek is located between a sign saying “Grizzly Creek” that you will pass first, and “Hood Creek”. If you see the sign saying Hood Creek, you’ve gone too far.
WHAT TO BRING
Comfortable Footwear: Hiking shoes. Make sure your shoes are broken in prior to tackling this hike to prevent unexpected blisters. You could get away with running shoes but having extra grip on the rock surfaces will definitely come in handy!
Water: This hike has lots of elevation gain. Be sure to bring enough water for at least 6 hours of physical exertion.
Snacks: Bring some of your favorite snacks to enjoy along the hike as well as a light lunch for the summit. Some of our favorite snacks are trail mix, bananas, beef jerky and licorice.
Weather appropriate clothing: You will be exposed to the elements throughout this hike. Check the weather forecast and plan accordingly.
Sunscreen: If it is sunny and you’re like Mattson, who easily burns, bring sunscreen!
Insect Repellent: Insect repellent can greatly improve your hiking experience.
Bear Spray: You are in bear country. Always hike with bear spray that is easily accessible.
Camera: There are numerous photo opportunities you won’t want to miss.
This Guide: Print a copy of this guide to reference throughout the hike
OTHER CONSIDERATIONS
Wildlife: You will be hiking in bear country. It is always advisable to check in at the local Visitor Information Center to learn of any trail closures due to wildlife. Carry bear spray in an easily accessible location. Travel in groups of multiple hikers and make lots of noise to avoid an unexpected encounter.
Leave No Trace: It is important that we enjoy the outdoors responsibly and sustainably. Some key principles to consider when hiking to “Leave No Trace” are:
Plan ahead and prepare: Proper planning allows adventurers to hike safely while minimizing damage to the land.
Travel on durable surfaces: Stick to the trail when possible. If there is no trail, or you must travel off trail, stay on durable surfaces to reduce your impact.
Dispose of waste properly: Pack it in, pack it out.
Leave what you find: Leave rocks, plants, archaeological artifacts and other objects of interest as you find them.
Respect wildlife: Observe wildlife from a distance. Never feed wild animals.
Be considerate of other visitors: Be courteous to others to allow everyone to enjoy their outdoor experience.
Summary: This hike, for the most part, is fairly straight forward. The path begins on the north side of ripple creek, and wraps around to the back side of Grizzly Peak on a well-travelled trail. BUT, there are more than a few stories of hikers straying from the trail and finding themselves stuck in a gully or on a difficult scramble. If this happens, try to retrace your steps and find the trail again. In our experience, you will lose the trail more often when descending. On the way down stay high whenever possible so you don’t end up bushwhacking through the gully!
Image 1: Hiking Grizzly Peak Adventure Map
Step-By-Step Guide:
The trail begins heading up from the left (north) side of Ripple Creek (Route marker #1 on the map) with a quick ascent and a bit of a wakeup call for the legs. The first km or two are quite aggressive in elevation but about halfway up the trail levels out and travels counterclockwise around the mountain.
Image 2: Grizzly Peak
Image 3: Mattson ascending the trail
It can be a little difficult to follow the trail through this section. If in doubt keep sidehilling it around the mountain and stay high so that you don’t end up in the gully.
Image 4: Working our way around the mountain
Image 5: Rocky scenery along the way
After you round the corner from this rocky area, you’ll be able to spot the saddle (Route marker #2 on the map) between the Grizzly Peak and Mount Evan-Thomas peak. Getting up to the saddle may be the most difficult part of the hike. There is a mini gully that is mostly scree that will take you to the grassy opening between the two peaks. It is a tiresome climb but that makes it even more rewarding once you get there. Some people stay way right of the scree gully and say it is a much easier ascent than going straight up the scree. Whichever way you choose, you will have to grind your way up to the saddle.
Image 6: Scenic view along the way
Image 7: The Saddle
After you make it to the saddle, the summit isn’t far. Take a left so that you’re facing west, and walk up the nice gradual grassy slope. The grassy slope will quickly turn into the rocky ridge that leads to the summit of Grizzly Peak (Route marker #3 on the map)!
Remember on the way down to stay high and don’t head down into the gully. We ended up in the gully and had to bushwhack our way along Ripple Creek to the highway.
Image 8: Enjoying some snacks at the summit
Image 9: Grizzly Peak Summit
WE WANT TO HEAR FROM YOU
Thank you for choosing Epic Trip Adventures as your guide. We are committed to continually updating our guides to be as relevant and accurate as possible. If you have feedback to improve this guide please leave it in the comments below.
We also want to hear about your Grizzly Peak adventures. If you have stories, pictures or even a link to your own adventure video please share them below!
For a downloadable PDF version of this guide The Subway is one of the highlights of Zion National Park and is located outside the main canyon. The Subway can be done from the top down or from the bottom up. To do the top down route you will need climbing equipment and rope for rappelling. We did the nontechnical bottom up route which takes you out and back to the Subway. In this guide we will describe the bottom up route to the Subway. ADVENTURE STATISTICS Time Required: 5-7 Hours Trailhead: Left Fork Trailhead Distance: 12.5km (8 miles) round trip Elevation Gain: 180m (600ft) Difficulty: 7/10 – Elevation gain, distance Season: Year-round. Spring and fall are most pleasant. Summer can be very hot and busy. Winter can be cold Additional Requirements: If attempting in winter, dry suits are highly recommended. DRIVING DIRECTIONS From St. George: Travel on the I-15 North towards Salt Lake City, after 11 km (7 miles) merge onto UT-9 East via exit 16 and travel 20km (12.5 miles) through Hurricane and then up to La Verkin. Take a right turn in La Verkin to continue on the UT-9 East for 9.6km (6 miles) until you come into Virgin. Take a left on Pocketville Rd, then another left onto Kolob Terrace Rd. Continue on Kolob Terrace Rd for 12.5km (7.8 miles), and the trailhead/parking lot will be on your right. Note: The trailhead for The Subway is not in the main Zion canyon. The Zion Canyon Shuttle Service doesn’t go to the trailhead for The Subway. WHAT TO BRING Footwear: Bring shoes that can get wet! In the summer water shoes are a good idea. In the winter we recommend the boots and neoprene socks that come with a dry suit
For a downloadable PDF version of this guide CLICK HERE!
The Subway is one of the highlights of Zion National Park and is located outside the main canyon. The Subway can be done from the top down or from the bottom up. To do the top down route you will need climbing equipment and rope for rappelling. We did the nontechnical bottom up route which takes you out and back to the Subway. In this guide we will describe the bottom up route to the Subway.
ADVENTURE STATISTICS
Time Required: 5-7 Hours
Trailhead: Left Fork Trailhead
Distance: 12.5km (8 miles) round trip
Elevation Gain:180m (600ft)
Difficulty:7/10 – Elevation gain, distance
Season: Year-round. Spring and fall are most pleasant. Summer can be very hot and busy. Winter can be cold
Additional Requirements: If attempting in winter, dry suits are highly recommended.
DRIVING DIRECTIONS
From St. George: Travel on the I-15 North towards Salt Lake City, after 11 km (7 miles) merge onto UT-9 East via exit 16 and travel 20km (12.5 miles) through Hurricane and then up to La Verkin. Take a right turn in La Verkin to continue on the UT-9 East for 9.6km (6 miles) until you come into Virgin. Take a left on Pocketville Rd, then another left onto Kolob Terrace Rd. Continue on Kolob Terrace Rd for 12.5km (7.8 miles), and the trailhead/parking lot will be on your right.
Note: The trailhead for The Subway is not in the main Zion canyon. The Zion Canyon Shuttle Service doesn’t go to the trailhead for The Subway.
WHAT TO BRING
Footwear: Bring shoes that can get wet! In the summer water shoes are a good idea. In the winter we recommend the boots and neoprene socks that come with a dry suit rental from Zion Adventure Guides. The water will be cold!
Water: This hike is long and tiring. Be sure to bring enough water for 5-7 hours of physical exertion.
Snacks: Bring some of your favorite snacks to enjoy along the hike as well as a light lunch for when you arrive at the turnaround point. Some of our favorite snacks are trail mix, bananas, beef jerky and licorice.
Weather appropriate clothing: Depending on the time of year you do this hike it could be very hot, or quite cold. Check the water temperature as well as you will be walking through water.
Swimsuit: If you do this hike in the summer it is advisable to bring a swimsuit as you will get wet!
Dry Suit: If you are doing this hike in the wintertime, bring a dry suit. You will need it to walk through the cold water. You can rent them from the Zion Adventure Company in Springdale.
A walking stick: A walking stick will come in handy to keep your balance on the rocky terrain underneath the water. They can also be rented from Zion Adventure Company
Sunscreen: If it is sunny and you’re like Mattson, who easily burns, bring sunscreen!
Camera: There are numerous photo opportunities you won’t want to miss.
This Guide: Print a copy of this guide to reference throughout the hike
OTHER CONSIDERATIONS
Flash Floods: It’s important when hiking through water flow areas (The Subway and The Narrows), to check the local forecast for rain and always be on high alert for noticeable changes in the weather. The Zion Visitor Center posts river flow rates for these hikes and can advise when they are safe to do. Flash floods are a real danger and can sneak up on you when you least expect it. If you do find yourself in a flash flood situation, get to high ground on the side of the canyon as quick as you can to stay safe.
Wilderness Permits: A Zion wilderness permit is required before doing The Subway. This hike has gained popularity over the years and park authorities are trying to regulate traffic and damage done to the hike. A wilderness permit can be purchased on their website. If you are planning a trip to Zion in the busy summer months there is a lottery for permits where you must submit 2 months in advance. There are also walk in permits that can be acquired first come first serve the day prior to doing the hike.
Leave No Trace: It is important that we enjoy the outdoors responsibly and sustainably. Some key principles to consider when hiking to “Leave No Trace” are:
Plan ahead and prepare: Proper planning allows adventurers to hike safely while minimizing damage to the land.
Travel on durable surfaces: Stick to the trail when possible. If there is no trail, or you must travel off trail, stay on durable surfaces to reduce your impact.
Dispose of waste properly: Pack it in, pack it out.
Leave what you find: Leave rocks, plants, archaeological artifacts and other objects of interest as you find them.
Respect wildlife: Observe wildlife from a distance. Never feed wild animals.
Be considerate of other visitors: Be courteous to others to allow everyone to enjoy their outdoor experience.
Summary: The bottom up route to the Subway is a relatively straightforward hike. From the trailhead a well-marked trail will take you down switchbacks to the bottom of the canyon. From that point there is a creek that you will follow upstream all the way to the Subway. Along the creek there isn’t a well-defined trail, it is up to you to find the best way around boulders, through pools of water and up small waterfalls.
Image 1: The Subway Adventure Map
Step-By-Step Guide:
The hike starts at the Left Fork Trailhead (Route marker #1 on the map) at the top of the canyon. To start the hike, follow the trail from the parking lot northeast for about 800 meters as it zig zags into the canyon below.
Image 2: Left Fork Trailhead
Image 3: Mattson descending into the canyon
When you get to the bottom of the canyon the trail runs into a creek (Route marker #2 on the map). There is a small sign marking the trail you just came down. Make a note of it so that you don’t miss the turn off on your return trip! There’s nothing worse than missing your exit and hiking extra miles you don’t have to.
Image 4: The sign marking the trail back to the trailhead
Image 5: Anderson following the creek upstream
From here on out the hike is straightforward. Keep following the main creek upstream and eventually you will reach the Subway. Along the way there isn’t a defined trail to follow so how you navigate the route is up to you. There are massive boulders to climb over, little ponds to walk around, waterfalls to climb and rock hopping to help keep your mind occupied as you hike along the creek.
Image 6: Continuing upstream
Image 7: A waterfall along the hike
From the trailhead it’s about 4 miles to The Subway. As you get closer to The Subway the canyon walls narrow and there are more waterfalls that you’ll have to walk over. After walking through the final sections of waterfalls and pool you will reach the tube of the Subway (Route marker #3 on the map). It’s a long, round, curved tube eroded into the canyon from hundreds of years of waterflow and you can walk right through it.
Image 8: The Subway
Image 10: Anderson entering The Subway
Inside the subway you will notice “potholes” filled with water, and if you keep going deeper water leading further into the canyon. This usually marks the turnaround point for the hike but if you want to wade through the water for the few minutes you can reach what is known as the waterfall room (Route marker #4 on the map). If you’ve got a dry suit on, or the water is warm, it is worth checking out before turning around and making your way back out to the trailhead.
Image 10: The potholes filled with water
Image 11: Anderson continuing into the deeper water
Image 12: The Waterfall Room
WE WANT TO HEAR FROM YOU
Thank you for choosing Epic Trip Adventures as your guide. We are committed to continually updating our guides to be as relevant and accurate as possible. If you have feedback to improve this guide please leave it in the comments below.
We also want to hear about your The Subway adventures. If you have stories, pictures or even a link to your own adventure video please share them below!
For a downloadable PDF version of this guide Angels Landing is the top attraction in Zion National Park and one of the most famous hikes in any US National Park. The first three quarters of this hike follow a paved trail to a scenic lookout point. The final portion of this daring hike traverses a narrow trail, with steep drop-offs on either side, to a lofty perch that provides a breathtaking 360-degree view of Zion Canyon. ADVENTURE STATISTICS Time Required: 3-4 Hours Trailhead: Grotto Picnic Area Distance: 8km (5 miles) round trip Highest Elevation: 1767m (5797ft) Elevation Gain: 463m (1519ft) Difficulty: 8/10 – Strenuous switchbacks, exposure to steep drop-offs Season: Year round. Spring and fall are most pleasant. Summer can be very hot and winter can be icy and dangerous. Additional Requirements: N/A DRIVING DIRECTIONS From St. George: Travel on the I-15 North towards Salt Lake City, after 11 km (7 miles) merge onto UT-9 East via exit 16 and travel 20km (12.5 miles) through Hurricane and then up to La Verkin. Take a right turn in La Verkin to continue on the UT-9 East for 32km (20 miles) until you come into Springdale. Follow that same road until you pull up to the Zion park entrance. From Arizona: Travel US-89A North through Fredonia, AZ and Kanab, UT. Follow US-89 to Mount Carmel Junction. Take UT-9 West to Zion’s East Park Entrance. From the North: Travel the I-15 South past Beaver, UT and exit on Hwy 20. Head east until you reach US-89, then head south to the Mount Carmel Junction. Take UT-9 west to Zion’s East Park Entrance. WHAT TO BRING Comfortable Footwear: Hiking shoes. Make sure your shoes are broken in prior to tackling this hike to prevent unexpected blisters. You
For a downloadable PDF version of this guide CLICK HERE!
Angels Landing is the top attraction in Zion National Park and one of the most famous hikes in any US National Park. The first three quarters of this hike follow a paved trail to a scenic lookout point. The final portion of this daring hike traverses a narrow trail, with steep drop-offs on either side, to a lofty perch that provides a breathtaking 360-degree view of Zion Canyon.
ADVENTURE STATISTICS
Time Required: 3-4 Hours
Trailhead: Grotto Picnic Area
Distance: 8km (5 miles) round trip
Highest Elevation: 1767m (5797ft)
Elevation Gain:463m (1519ft)
Difficulty:8/10 – Strenuous switchbacks, exposure to steep drop-offs
Season: Year round. Spring and fall are most pleasant. Summer can be very hot and winter can be icy and dangerous.
Additional Requirements: N/A
DRIVING DIRECTIONS
From St. George: Travel on the I-15 North towards Salt Lake City, after 11 km (7 miles) merge onto UT-9 East via exit 16 and travel 20km (12.5 miles) through Hurricane and then up to La Verkin. Take a right turn in La Verkin to continue on the UT-9 East for 32km (20 miles) until you come into Springdale. Follow that same road until you pull up to the Zion park entrance.
From Arizona: Travel US-89A North through Fredonia, AZ and Kanab, UT. Follow US-89 to Mount Carmel Junction. Take UT-9 West to Zion’s East Park Entrance.
From the North: Travel the I-15 South past Beaver, UT and exit on Hwy 20. Head east until you reach US-89, then head south to the Mount Carmel Junction. Take UT-9 west to Zion’s East Park Entrance.
WHAT TO BRING
Comfortable Footwear: Hiking shoes. Make sure your shoes are broken in prior to tackling this hike to prevent unexpected blisters. You could get away with runners but having extra grip on the rock surfaces will definitely come in handy!
Water: This hike is long with lots of elevation gain to reach the summit. Be sure to bring enough water for 4-6 hours of physical exertion in the hot sun.
Snacks: Bring some of your favorite snacks to enjoy along the hike. Some of our favorites snacks are trail mix, bananas, beef jerky and licorice
Weather appropriate clothing: Temperatures can get up to 40 degrees Celsius (104 Fahrenheit) in the summertime. Shorts, a breathable long sleeve shirt, and a hat can help protect you from the sun and heat. In the winter, the temperature can drop below freezing and it is possible to encounter snow. Check the weather forecast and plan accordingly.
Sunscreen: If it is sunny and you’re like Mattson, who easily burns, bring sunscreen!
Camera: There are numerous photo opportunities you won’t want to miss.
This Guide: Print a copy of this guide to reference throughout the hike
OTHER CONSIDERATIONS
Heat and Dehydration: In Zion National Park, the days can be very hot. Limit sun exposure during the hottest parts of the day. Appropriate clothing such as a hat and long sleeve shirt can protect your skin from the sun as well as reduce the risk of dehydration. The hot weather increases your need for fluid intake. Ensure you are hydrating throughout the day. Don’t wait until you’re thirsty to start drinking water.
Steep Cliffs: Falls from cliffs along the trail have resulted in death. Stay on the trail, stay back from cliff edges and be careful of sand or loose rocks that can make for a slippery surface. Always be aware of your surroundings, especially when you are trying to capture the perfect photo. During the winter months, the trail can be snow and ice covered so be extra careful and wear traction devices on your shoes for extra grip.
Leave No Trace: It is important that we enjoy the outdoors responsibly and sustainably. Some key principles to consider when hiking to “Leave No Trace” are:
Plan ahead and prepare: Proper planning allows adventurers to hike safely while minimizing damage to the land.
Travel on durable surfaces: Stick to the trail when possible. If there is no trail, or you must travel off trail, stay on durable surfaces to reduce your impact.
Dispose of waste properly: Pack it in, pack it out.
Leave what you find: Leave rocks, plants, archaeological artifacts and other objects of interest as you find them.
Respect wildlife: Observe wildlife from a distance. Never feed wild animals.
Be considerate of other visitors: Be courteous to others to allow everyone to enjoy their outdoor experience.
Zion Shuttle System: During the busy months (March to November), Zion National Park has a free shuttle system to help move large numbers of visitors around the park. When the shuttle is in operation Zion Canyon Scenic Drive is closed to private vehicles so visitors must rely on the shuttle service. The shuttle departs from the Zion Visitor Center and stops at nine locations in the park. The shuttles run very frequently between 7am and 6:15pm and you should never have to wait more than 10-15 minutes. Although you can park at the Visitor Center, the lot fills up quickly so it is best to park in the town of Springdale and take the Springdale Shuttle to the park gate.
The Springdale Shuttle leaves from the Majestic View Lodge and stops at the Zion Canyon Theatre. From the Zion Canyon Theatre, cross through the National Park Pedestrian Entrance to pay the entry fee, then catch the Zion Canyon Shuttle from the Visitor Center.
There are many Springdale Shuttle stops between the Majestic View Lodge, and Zion Canyon Theater. Walk to the nearest stop from your accommodation or drive and park in a marked “Shuttle Parking” area.
Image 1: Zion Canyon Line Shuttle Stops
HIKING DIRECTIONS
Summary: Starting at the Grotto Picnic Area you’ll follow the West Rim Trail along the Virgin River and then up long steep switchbacks into Refrigerator Canyon. You’ll then enjoy a nice cool walk through Refrigerator Canyon before a strenuous climb up the Walter’s Wiggles Switchbacks to Scout’s Lookout. At Scout’s Lookout, the real adventure begins. To reach Angels Landing, you must scramble along a very exposed narrow ridge that feeds into the middle of Zion National Park. The summit offers an amazing view of the Canyon, and is aptly described by Frederick Fisher who discovered it: “Only an angel could land on it”.
Image 2: Angels Landing Adventure Map
Step-By-Step Guide:
Depending on if the shuttles are running, either take the shuttle to, or park at the Grotto Picnic Area (Route marker #1 on the map). This is the sixth stop from the Visitors Center on the Zion Canyon Shuttle. From the parking lot, head west and cross the bridge over the Virgin River. Just past the bridge the trail veers right. This is the West Rim Trail.
Image 3: Crossing the Virgin River on West Rim Trail
Follow the West Rim Trail along the canyon wall as it gains elevation. This path is quite steep but is paved and well maintained. As you climb along the trail, you are given a taste of the spectacular views of the canyon to come.
Image 4: Anderson following the West Rim Trail
Image 5: Gaining elevation on the West Rim Trail
After following the West Rim Trail for about a mile, you’ll take a left into Refrigerator Canyon (Route marker #2 on the map). This is a great spot for a break to take some pictures looking back at the canyon. The path through Refrigerator Canyon is cool and shaded with cliff walls rising hundreds of feet on your left and right. The incline lets up for this leg of the hike and on a warm day, the walk through Refrigerator Canyon can be exceptionally refreshing.
At the end of the canyon, you’ll turn around and begin climbing the Walter’s Wiggles Switchbacks (Route marker #3 on the map). These are a series of 21 steep and compact switchbacks that lead to the top of Refrigerator Canyon and out to Scout’s Lookout (Route marker #4 on the map).
Image 6: Anderson climbing the Walter’s Wiggles Switchbacks
At Scout’s Lookout, the West Rim Trail heads north through Cabin Spring and on to Lava Point while the trail to Angels Landing heads south. At this point you are only about a half-mile from the summit, but the trail gets much more challenging and adventurous. If you don’t have much scrambling experience or are afraid of heights, do not travel further than Scout’s lookout.
Image 7: The view from Scout’s Lookout
The trail from Scout’s Lookout to Angels Landing will get your adrenaline pumping. You have another 150m (500ft) of elevation to gain and the terrain gets more difficult. You will be walking along a narrow, rocky ridge to the summit. At some points you can look hundreds of feet to the canyon floor below on either side of the trail. If at any moment you start to panic or feel uncomfortable, turn back because it doesn’t get any easier. There are chains and guard rails bolted into the rock to help provide some extra stability and security. There are also natural steps formed into the rock that assist with the climb. Follow the chains to the summit.
Image 8: Following the trail towards the summit
Image 9: Chains assist you along the narrow trail
Follow the ridge until you reach the final viewpoint. From here you have one of the most incredible 360-degree views right from the center of Zion National Park. Although it isn’t as high in elevation as some of the rim trails, the view from Angels Landing is like no other. Take a break, have a snack, beware of chipmunks and enjoy the views!
Image 10: We made it!
WE WANT TO HEAR FROM YOU
Thank you for choosing Epic Trip Adventures as your guide. We are committed to continually updating our guides to be as relevant and accurate as possible. If you have feedback to improve this guide please leave it in the comments below.
We also want to hear about your Angels Landing adventures. If you have stories, pictures or even a link to your own adventure video please share them below!
For a downloadable PDF version of this guide Mount Norquay is an iconic mountain in the Banff National Park. It has everything from wedding venues and events to outdoor activities like hiking and skiing. The Mount Norquay Via Ferrata is one of the many activities that can be experienced on the mountain. It’s the perfect summer outdoor activity for a group of adventurous friends. We ended up doing this hike for Mattson’s birthday and were able to get 8 friends all together in one group. We chose to challenge the Summiteer route which was a 6-hour tour. ADVENTURE STATISTICS Time Required: 6 Hours Location: Just north of Banff Distance: 3.2km round trip Highest Elevation: 2450m Elevation Gain: 360m Difficulty: 5/10 – Heights and exposure Season: June to mid-October Additional Requirements: A tour reservation DRIVING DIRECTIONS From Calgary: Take the Trans-Canada (Hwy 1) west to Banff, take the second Banff exit onto Mt Norquay Road and turn right (away from Banff) and follow Mt Norquay Road until you reach the resort. WHAT TO BRING Comfortable Footwear: Hiking shoes with good grip and lots of support. If you don’t have a good pair they can supply hiking boots. Make sure your shoes are broken in prior to tackling this hike to prevent unexpected blisters. Water: This hike has lots of elevation gain to reach the summit. Be sure to bring enough water. Snacks: A bag lunch is provided with the 6-hour tour but if you have specific diet needs or wants bring your own snacks! Weather appropriate clothing: You will be exposed to the elements throughout this hike. Check the weather forecast and plan accordingly. Sunscreen: If it is sunny and you’re like Mattson, who easily burns, bring sunscreen! Insect Repellent: Insect repellent can greatly improve your
For a downloadable PDF version of this guide CLICK HERE!
Mount Norquay is an iconic mountain in the Banff National Park. It has everything from wedding venues and events to outdoor activities like hiking and skiing. The Mount Norquay Via Ferrata is one of the many activities that can be experienced on the mountain. It’s the perfect summer outdoor activity for a group of adventurous friends. We ended up doing this hike for Mattson’s birthday and were able to get 8 friends all together in one group. We chose to challenge the Summiteer route which was a 6-hour tour.
ADVENTURE STATISTICS
Time Required: 6 Hours
Location: Just north of Banff
Distance: 3.2km round trip
Highest Elevation: 2450m
Elevation Gain:360m
Difficulty:5/10 – Heights and exposure
Season:June to mid-October
Additional Requirements: A tour reservation
DRIVING DIRECTIONS
From Calgary:Take the Trans-Canada (Hwy 1) west to Banff, take the second Banff exit onto Mt Norquay Road and turn right (away from Banff) and follow Mt Norquay Road until you reach the resort.
WHAT TO BRING
Comfortable Footwear: Hiking shoes with good grip and lots of support. If you don’t have a good pair they can supply hiking boots. Make sure your shoes are broken in prior to tackling this hike to prevent unexpected blisters.
Water: This hike has lots of elevation gain to reach the summit. Be sure to bring enough water.
Snacks: A bag lunch is provided with the 6-hour tour but if you have specific diet needs or wants bring your own snacks!
Weather appropriate clothing: You will be exposed to the elements throughout this hike. Check the weather forecast and plan accordingly.
Sunscreen: If it is sunny and you’re like Mattson, who easily burns, bring sunscreen!
Insect Repellent: Insect repellent can greatly improve your hiking experience.
Camera: There are numerous photo opportunities you won’t want to miss.
OTHER CONSIDERATIONS
Leave No Trace: It is important that we enjoy the outdoors responsibly and sustainably. Some key principles to consider when hiking to “Leave No Trace” are:
Plan ahead and prepare: Proper planning allows adventurers to hike safely while minimizing damage to the land.
Travel on durable surfaces: Stick to the trail when possible. If there is no trail, or you must travel off trail, stay on durable surfaces to reduce your impact.
Dispose of waste properly: Pack it in, pack it out.
Leave what you find: Leave rocks, plants, archaeological artifacts and other objects of interest as you find them.
Respect wildlife: Observe wildlife from a distance. Never feed wild animals.
Be considerate of other visitors: Be courteous to others to allow everyone to enjoy their outdoor experience.
Summary: Every tour is guided so you don’t have to worry about taking the right route or getting lost. The guides a Mt Norquay are fantastic and made sure we were 100% prepared to take on the mountain.
Via Ferrata is Italian for “Iron path” which is the perfect way to describe this adventure. A Via Ferrata is a climbing route up a mountain that has been made easier, and safe, with the use of carabiners, harnesses, cables and iron hand/foot holds that have been mounted into the mountain itself.
Image 1: Anderson crossing a 3 cable bridge
Image 2: Mattson crossing a 2 cable bridge
Mt Norquay has 4 options for routes:
Explorer – 2-2.5 hour hike
Ridgewalker – 3.5-4 hour hike
Skyline – 4.5-5 hour hike
Summiteer – 5-6 hour hike
Each hike has its own highlights and attractions from ladders to suspension bridges. This adventure requires a reservation so be sure to call or book online.
Thank you for choosing Epic Trip Adventures as your guide. We are committed to continually updating our guides to be as relevant and accurate as possible. If you have feedback to improve this guide please leave it in the comments below.
We also want to hear about your Via Ferrata adventures. If you have stories, pictures or even a link to your own adventure video please share them below!
For a downloadable PDF version of this guide The rope swing west of Calgary is an awesome place to spend a day. Just 25 minutes from downtown is a swimming hole plenty deep to swing or jump into. There is a platform roughly 30ft high and a long rope connected to a tree that you can swing off into the water. Lots of people will take floaty rafts and hang around in the calm refreshing Bow River water. ADVENTURE STATISTICS Time Required: 2 Hours Location: 10 km west of Calgary Distance: 2 km round trip Elevation Gain: 100m Difficulty: 3/10 – Easy trail to follow with minimal elevation gain. Season: June to September Additional Requirements: N/A DRIVING DIRECTIONS From Calgary: Take the Trans-Canada (Hwy 1) approximately 4km west of Stoney Trail and take the Old Banff Coach Road exit north. Keep following that road until a T intersection and turn right onto Township Rd 250. Follow that road till it ends and park there. WHAT TO BRING Comfortable Footwear: A pair of sneakers is all you’ll need for the walk to the rope swing. Water: Always good to bring water on a hot day. Swim suit: You’ll want a swim suit if you plan on jumping into the refreshing water. Towel: The water is cold. You will want to dry off after your swim. Snacks: Bring some of your favorite snacks and refreshments to enjoy at the Rope Swing. Some of our favorite snacks are trail mix, bananas, beef jerky and licorice. Sunscreen: If it is sunny and you’re like Mattson, who easily burns, bring sunscreen! Insect Repellent: Insect repellent can greatly improve your hiking experience. Camera: The rope swing is a great place to take photos. This Guide: Print a copy of this guide to reference throughout the hike OTHER CONSIDERATIONS Rope Swing: Know your limits.
For a downloadable PDF version of this guide CLICK HERE!
The rope swing west of Calgary is an awesome place to spend a day. Just 25 minutes from downtown is a swimming hole plenty deep to swing or jump into. There is a platform roughly 30ft high and a long rope connected to a tree that you can swing off into the water. Lots of people will take floaty rafts and hang around in the calm refreshing Bow River water.
ADVENTURE STATISTICS
Time Required: 2 Hours
Location: 10 km west of Calgary
Distance: 2 km round trip
Elevation Gain:100m
Difficulty: 3/10 – Easy trail to follow with minimal elevation gain.
Season: June to September
Additional Requirements: N/A
DRIVING DIRECTIONS
From Calgary: Take the Trans-Canada (Hwy 1) approximately 4km west of Stoney Trail and take the Old Banff Coach Road exit north. Keep following that road until a T intersection and turn right onto Township Rd 250. Follow that road till it ends and park there.
WHAT TO BRING
Comfortable Footwear: A pair of sneakers is all you’ll need for the walk to the rope swing.
Water: Always good to bring water on a hot day.
Swim suit: You’ll want a swim suit if you plan on jumping into the refreshing water.
Towel: The water is cold. You will want to dry off after your swim.
Snacks: Bring some of your favorite snacks and refreshments to enjoy at the Rope Swing. Some of our favorite snacks are trail mix, bananas, beef jerky and licorice.
Sunscreen: If it is sunny and you’re like Mattson, who easily burns, bring sunscreen!
Insect Repellent: Insect repellent can greatly improve your hiking experience.
Camera: The rope swing is a great place to take photos.
This Guide: Print a copy of this guide to reference throughout the hike
OTHER CONSIDERATIONS
Rope Swing: Know your limits. The rope can be slippery to hang on. Be sure your swing trajectory is clear and hang on tight!
Leave No Trace: It is important that we enjoy the outdoors responsibly and sustainably. Some key principles to consider when hiking to “Leave No Trace” are:
Plan ahead and prepare: Proper planning allows adventurers to hike safely while minimizing damage to the land.
Travel on durable surfaces: Stick to the trail when possible. If there is no trail, or you must travel off trail, stay on durable surfaces to reduce your impact.
Dispose of waste properly: Pack it in, pack it out.
Leave what you find: Leave rocks, plants, archaeological artifacts and other objects of interest as you find them.
Respect wildlife: Observe wildlife from a distance. Never feed wild animals.
Be considerate of other visitors: Be courteous to others to allow everyone to enjoy their outdoor experience.
Summary: The hike to the rope swing is a relatively easy 1 km walk. There are two fences you will need to jump along the way but otherwise the trail is straightforward and easy to follow.
Image 1: Calgary Rope Swing Adventure Map
Step-By-Step Guide:
From the parking area (Route marker #1 on the map), the trail begins off to the left (heading north) over a barbed wire fence. The trail should be pretty easy to follow from then on. There are a few forks in the trail but if you stay left you are going the correct way. Eventually you will come to another fence you need to hop.
Image 2: The trail to the rope swing
Image 3: The second fence along the trail
As you follow the trail you will have very nice view to the north across the river. Not too much further and you will decline in elevation to the swimming hole where the rope swing is located (Route marker #2 on the map). Enjoy and be safe!
Image 4: Views of the river from the trail
Image 5: The rope swing
WE WANT TO HEAR FROM YOU
Thank you for choosing Epic Trip Adventures as your guide. We are committed to continually updating our guides to be as relevant and accurate as possible. If you have feedback to improve this guide please leave it in the comments below.
We also want to hear about your Rope Swing adventures. If you have stories, pictures or even a link to your own adventure video please share them below!
For a downloadable PDF version of this guide White Road hike is one of the most adventurous hikes we’ve done. The hike is located on the north side of the Big Island at the back end of the Waipio Valley. The hike takes you through irrigation tunnels, includes spectacular views of the valley below and finishes off with a natural waterslide at the end. NOTE: THIS HIKE INVOLVES TRESPASSING ON PRIVATE LAND. IN RECENT YEARS DNLR OFFICERS HAVE STOPPED AND CITED HIKERS ADVENTURE STATISTICS Time Required: 3 Hours Trailhead: 3.5 miles east of Waimea Distance: 8km round trip Highest Elevation: 800m Elevation Gain: Minimal Difficulty: 7/10 – Route finding/slippery trail with exposure Season: Year round. Additional Requirements: Headlamps, inflatable tubes, swimsuit DRIVING DIRECTIONS From Waimea: Head East on Hawaii Belt Road (Hwy 19) for 3.5 miles, turn left onto White Road and go north for a half mile where you’ll come to a gate. This is the start of the hike. WHAT TO BRING Comfortable Footwear: Hiking shoes. Make sure your shoes are broken in prior to tackling this hike to prevent unexpected blisters. A pair of water shoes might come in handy as your feet will get very wet when walking through the tunnels. Water: Always bring water. Snacks: Bring some of your favorite snacks to enjoy along the hike. Some of our favorite snacks are trail mix, bananas, beef jerky and licorice. Weather appropriate clothing: You will be exposed to the elements throughout this hike. Be sure to bring a swimsuit! Check the weather forecast and plan accordingly. Inflatable tube: If you want to try the slide bring an inflatable tube to sit on. Headlamp: The irrigation tunnels are dark. A headlamp will make them easier to navigate. Sunscreen: If it is sunny
For a downloadable PDF version of this guide CLICK HERE!
White Road hike is one of the most adventurous hikes we’ve done. The hike is located on the north side of the Big Island at the back end of the Waipio Valley. The hike takes you through irrigation tunnels, includes spectacular views of the valley below and finishes off with a natural waterslide at the end.
NOTE: THIS HIKE INVOLVES TRESPASSING ON PRIVATE LAND. IN RECENT YEARS DNLR OFFICERS HAVE STOPPED AND CITED HIKERS
ADVENTURE STATISTICS
Time Required: 3 Hours
Trailhead: 3.5 miles east of Waimea
Distance: 8km round trip
Highest Elevation: 800m
Elevation Gain:Minimal
Difficulty:7/10 – Route finding/slippery trail with exposure
From Waimea: Head East on Hawaii Belt Road (Hwy 19) for 3.5 miles, turn left onto White Road and go north for a half mile where you’ll come to a gate. This is the start of the hike.
WHAT TO BRING
Comfortable Footwear: Hiking shoes. Make sure your shoes are broken in prior to tackling this hike to prevent unexpected blisters. A pair of water shoes might come in handy as your feet will get very wet when walking through the tunnels.
Water: Always bring water.
Snacks: Bring some of your favorite snacks to enjoy along the hike. Some of our favorite snacks are trail mix, bananas, beef jerky and licorice.
Weather appropriate clothing: You will be exposed to the elements throughout this hike. Be sure to bring a swimsuit! Check the weather forecast and plan accordingly.
Inflatable tube: If you want to try the slide bring an inflatable tube to sit on.
Headlamp: The irrigation tunnels are dark. A headlamp will make them easier to navigate.
Sunscreen: If it is sunny and you’re like Mattson, who easily burns, bring sunscreen!
Insect Repellent: Insect repellent can greatly improve your hiking experience.
Camera: There are numerous photo opportunities you won’t want to miss.
This Guide: Print a copy of this guide to reference throughout the hike
OTHER CONSIDERATIONS
Trespassing: This hike is illegal. The route passes through private property. Hikers have been fined by DNLR officers!
Leave No Trace: It is important that we enjoy the outdoors responsibly and sustainably. Some key principles to consider when hiking to “Leave No Trace” are:
Plan ahead and prepare: Proper planning allows adventurers to hike safely while minimizing damage to the land.
Travel on durable surfaces: Stick to the trail when possible. If there is no trail, or you must travel off trail, stay on durable surfaces to reduce your impact.
Dispose of waste properly: Pack it in, pack it out.
Leave what you find: Leave rocks, plants, archaeological artifacts and other objects of interest as you find them.
Respect wildlife: Observe wildlife from a distance. Never feed wild animals.
Be considerate of other visitors: Be courteous to others to allow everyone to enjoy their outdoor experience.
Summary: The starting point is at the end of White Road. The trail continues through a gate and along some irrigation water channels to Waipio Valley. From there the trail follows the edge of the valley to a mile-long irrigation tunnel. This tunnel will lead you to the slide.
Image 1: White Road Adventure Map
Step-By-Step Guide:
There is a gate at the end of White Road (Route marker #1 on the map) that you will have to hop over to start the hike. The road still continues along the same path, it just changes from paved to dirt. The path will zig zag around a large circular pond and then into the forest. The trail is well tracked and pretty easy to follow. You will come to a gate, go through the gate, and close it behind you.
Image 2: The dirt road to the gate
From there the trail follows along an irrigation ditch. Water may or may not be flowing through it depending on the rainfall in the last few days. The trail is full of lush, dense jungle but is pretty easy to follow. It will stray from the irrigation ditch to a lookout point of Waipio Valley (Route marker #2 on the map). The views from the lookout are stunning!
Image 3: The irrigation ditch
Image 4: Waipio Valley Lookout
Turn left and take the trail along the edge of the drop off to the valley below. Be careful on this trail, it follows the edge of the valley and one wrong step and you could fall off a cliff. Keep walking on the trail until you reach a black irrigation tube (these act as bridges for the water to run over the valley). You will have to either cross over the tube or go through it. Water levels through the irrigation tube vary. Both climbing through and climbing on top of the tube present risks. If the water flow is too high it may be dangerous to enter the tunnel but falling from on top of the tube could be fatal. Use your judgement on what the best option to get across is at the time you are there.
Image 5: Anderson crossing the tube
Image 6: Mattson crossing the tube
From here the most straight forward route to the slide is through the irrigation tunnel. There is also a trail to the slide that continues to the right and goes back along the valley to the waterfall. If the waterflow is high it may be easier to follow the trail along the valley instead of goiing through the tunnel.
Image 7: Anderson entering the irrigation tunnel
Image 8: Mattson following the trail along the valley
If you choose the irrigation tunnel hopefully you have a headlamp with you! The tunnel is dark and has fast flowing water in places. The tunnel is about a mile long and will open up a couple times before you make it to the waterslide. If you follow the tunnel you will eventually reach the waterslide (Route marker #3 on the map)! The alternative route is along the valley and can be slippery with a steep drop into the valley. Be careful of your footing if you take this route.
Image 9: The Waterslide
After enjoying the slide head back to White Road by heading back on the route you came.
WE WANT TO HEAR FROM YOU
Thank you for choosing Epic Trip Adventures as your guide. We are committed to continually updating our guides to be as relevant and accurate as possible. If you have feedback to improve this guide please leave it in the comments below.
We also want to hear about your White Road adventures. If you have stories, pictures or even a link to your own adventure video please share them below!
For a downloadable PDF version of this guide Hiking the Sliding Sands and Halemau’u trail on Haleakala is a difficult but rewarding adventure. It’s a 17.8 km (11 mile) one-way hike that takes you down into the crater of Haleakala and then out to the Halemau’u Trail Parking Area. Although you’re in Hawaii, the temperatures and landscape up on the volcano make it feel like you’re in another world! ADVENTURE STATISTICS Time Required: 6-8 Hours Location: 60km (37 miles) from Kahului Distance: 17.8km (11 miles) one way Highest Elevation: 3055m (10023ft) Elevation Gain: 600m Difficulty: 7/10 – Long hike, rapid elevation gain Season: Year Round Additional Requirements: N/A DRIVING DIRECTIONS From Kahului: Take HI-37 and State Hwy 377 to State Hwy 378 in Kula. Hwy 378 is a 20 mile, very winding road that takes you to the top of Haleakala Mountain. This hike (the way we did it) is a one-way hike and we recommend starting at the top and hiking down. For this reason, you want to park at Halemau’u Trail Parking Area, the finish point. From there you may be able to hitch a ride to the summit with someone if you’re lucky. WHAT TO BRING Comfortable Footwear: Hiking shoes. Make sure your shoes are broken in prior to tackling this hike to prevent unexpected blisters. You could get away with running shoes but having extra grip always comes in handy! Water: This hike is long with lots of elevation gain at the end. Be sure to bring enough water for 6-8 hours of physical exertion. Snacks: Bring some of your favorite snacks to enjoy along the hike. Some of our favorite snacks are trail mix, bananas, beef jerky and licorice. Weather appropriate clothing: You will be exposed to the elements throughout this hike. We got stuck
For a downloadable PDF version of this guide CLICK HERE!
Hiking the Sliding Sands and Halemau’u trail on Haleakala is a difficult but rewarding adventure. It’s a 17.8 km (11 mile) one-way hike that takes you down into the crater of Haleakala and then out to the Halemau’u Trail Parking Area. Although you’re in Hawaii, the temperatures and landscape up on the volcano make it feel like you’re in another world!
ADVENTURE STATISTICS
Time Required: 6-8 Hours
Location: 60km (37 miles) from Kahului
Distance: 17.8km (11 miles) one way
Highest Elevation: 3055m (10023ft)
Elevation Gain:600m
Difficulty:7/10 – Long hike, rapid elevation gain
Season: Year Round
Additional Requirements: N/A
DRIVING DIRECTIONS
From Kahului: Take HI-37 and State Hwy 377 to State Hwy 378 in Kula. Hwy 378 is a 20 mile, very winding road that takes you to the top of Haleakala Mountain. This hike (the way we did it) is a one-way hike and we recommend starting at the top and hiking down. For this reason, you want to park at Halemau’u Trail Parking Area, the finish point. From there you may be able to hitch a ride to the summit with someone if you’re lucky.
WHAT TO BRING
Comfortable Footwear: Hiking shoes. Make sure your shoes are broken in prior to tackling this hike to prevent unexpected blisters. You could get away with running shoes but having extra grip always comes in handy!
Water: This hike is long with lots of elevation gain at the end. Be sure to bring enough water for 6-8 hours of physical exertion.
Snacks: Bring some of your favorite snacks to enjoy along the hike. Some of our favorite snacks are trail mix, bananas, beef jerky and licorice.
Weather appropriate clothing: You will be exposed to the elements throughout this hike. We got stuck in rain and snow so warm waterproof clothing should be packed just in case. Check the weather forecast and plan accordingly.
Sunscreen: If it is sunny and you’re like Mattson, who easily burns, bring sunscreen!
Camera: There are numerous photo opportunities you won’t want to miss.
This Guide: Print a copy of this guide to reference throughout the hike
OTHER CONSIDERATIONS
Leave No Trace: It is important that we enjoy the outdoors responsibly and sustainably. Some key principles to consider when hiking to “Leave No Trace” are:
Plan ahead and prepare: Proper planning allows adventurers to hike safely while minimizing damage to the land.
Travel on durable surfaces: Stick to the trail when possible. If there is no trail, or you must travel off trail, stay on durable surfaces to reduce your impact.
Dispose of waste properly: Pack it in, pack it out.
Leave what you find: Leave rocks, plants, archaeological artifacts and other objects of interest as you find them.
Respect wildlife: Observe wildlife from a distance. Never feed wild animals.
Be considerate of other visitors: Be courteous to others to allow everyone to enjoy their outdoor experience.
Summary: We did a variation of Sliding Sands hike. At about 6km, we branched off to the left and hiked the Halemau’u trail to where we parked our car at the Halemau’u Trail Parking Area. We hitch hiked up to the top to avoid doing an out and back hike and turned it into a loop. If you have 2 vehicles or can get a ride from Halemau’u Trail Parking Area to the summit, we highly recommend this route as there is no backtracking.
Image 1: Hiking Haleakala Adventure Map
Step-By-Step Guide:
This hike starts at the visitor center at the top of Haleakala (Route marker #1 on the map) and travels down into the crater behind it. The trail is easy to follow and there are signs every few km’s. The trail descends 800m in the first 7km. If you want to continue to do Sliding Sands, continue straight. If you parked down at Halemau’u Trailhead, you must branch off left at roughly 6km’s. This will put you on Kaulupo trail.
Image 2: The Sliding Sands Trail
Image 3: Descending into the crater
Stay left at every fork you come to. Two km’s from when you left Sliding Sands you will be on Halemau’u Trail which will take you to the parking lot at the trailhead. After another couple km’s, keep your eyes open to the left and you will see a campground and a cabin called Holua cabin (Route marker #2 on the map).
Image 4: A sign marking the Halemau’u Trail
Image 5: Haleakala’s crater floor
Image 6: Holua Cabin
Shortly after passing the cabin the tough hike up to Halemau’u Trail Parking Area begins. Switchbacks make their way up the side of the crater and then eventually the trail heads around to the backside of that mountain. If you follow the trail you will eventually arrive at the parking lot (Route marker #3 on the map).
Image 7: The switchbacks up to Halemau’u Trail Parking Area
Image 8: Anderson enjoying the view into Haleakala crater
We think the loop offers a better mix of scenery than the out and back of just Sliding Sands Trail. It is roughly the same distance, but you get a little more diversity. The big challenge is getting someone to pick you up and take you to the top. But it’s possible!! Have fun!
Image 9: View from the top of Halemau’u Trail
WE WANT TO HEAR FROM YOU
Thank you for choosing Epic Trip Adventures as your guide. We are committed to continually updating our guides to be as relevant and accurate as possible. If you have feedback to improve this guide please leave it in the comments below.
We also want to hear about your Haleakala adventures. If you have stories, pictures or even a link to your own adventure video please share them below!
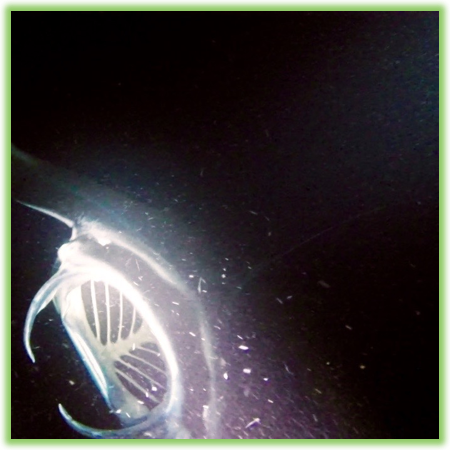
For a downloadable PDF version of this guide Swimming with manta rays is a once in a lifetime experience that can be had right offshore on the big island of Hawaii. Diving with manta rays can also be experienced in other parts of the world, but Hawaii is one of the best spots! Every trip out usually delivers at LEAST a few mantas and having the dive site right in Kona makes it extra convenient. ADVENTURE STATISTICS Time Required: 2-4Hours Location: Kaeuhou Bay Difficulty: 4/10 – Must be comfortable in the water at night Season: Year round Additional Requirements: Kayak, underwater flashlight, snorkel gear, or a booking on one of the many snorkel/dive tours. DRIVING DIRECTIONS From Kona: From Ali Hwy, head south onto Kaleiopapa Street until you reach the end. There is a boat launch there and some spots for parking. WHAT TO BRING If doing a self-guided tour: Kayak/paddles: You will need to paddle out to the Mantas Lifejacket: A lifejacket will keep you safe and is nice to float with when viewing the mantas. SUV/Truck: You will need to transport the kayak to the boat launch. Lights/Glow sticks: It is important to strap lights to your boat and yourself so other boats can see you. Waterproof headlamp: It is nice to have a headlamp so you can paddle out without having to hold a light. Underwater flashlight: Lights attract the plankton that the mantas eat. Bring a flashlight so that you can see underwater. Swimsuit: You will be jumping in the water Warm Clothes: It will be chilly when you get out of the water. Towel: You will want to dry off after swimming. Snorkel Gear: Fins, mask and goggles. Gopro/underwater camera: This is an amazing experience and you will want pictures and videos from your adventure. This Guide: Print
For a downloadable PDF version of this guide CLICK HERE!
Swimming with manta rays is a once in a lifetime experience that can be had right offshore on the big island of Hawaii. Diving with manta rays can also be experienced in other parts of the world, but Hawaii is one of the best spots! Every trip out usually delivers at LEAST a few mantas and having the dive site right in Kona makes it extra convenient.
ADVENTURE STATISTICS
Time Required: 2-4Hours
Location: Kaeuhou Bay
Difficulty:4/10 – Must be comfortable in the water at night
Season: Year round
Additional Requirements: Kayak, underwater flashlight, snorkel gear, or a booking on one of the many snorkel/dive tours.
DRIVING DIRECTIONS
From Kona: From Ali Hwy, head south onto Kaleiopapa Street until you reach the end. There is a boat launch there and some spots for parking.
WHAT TO BRING
If doing a self-guided tour:
Kayak/paddles: You will need to paddle out to the Mantas
Lifejacket: A lifejacket will keep you safe and is nice to float with when viewing the mantas.
SUV/Truck: You will need to transport the kayak to the boat launch.
Lights/Glow sticks: It is important to strap lights to your boat and yourself so other boats can see you.
Waterproof headlamp: It is nice to have a headlamp so you can paddle out without having to hold a light.
Underwater flashlight: Lights attract the plankton that the mantas eat. Bring a flashlight so that you can see underwater.
Swimsuit: You will be jumping in the water
Warm Clothes: It will be chilly when you get out of the water.
Towel: You will want to dry off after swimming.
Snorkel Gear: Fins, mask and goggles.
Gopro/underwater camera: This is an amazing experience and you will want pictures and videos from your adventure.
This Guide: Print a copy of this guide to reference throughout the hike
If going on a guided tour:
Swimsuit: You will be jumping in the water
Warm Clothes: It will be chilly when you get out of the water.
Towel: You will want to dry off after swimming.
Seasickness medication: The water can be choppy and you will be on the boat for a while. If you get seasickness we recommend bringing seasickness medication.
Gopro/underwater camera: This is an amazing experience and you will want pictures and videos from your adventure.
Other: Anything else your tour guide company recommends.
OTHER CONSIDERATIONS
Safety: It is a popular tour and there are many boats in the area. Make sure you and your boat is well lit so other boat drivers can see you. Always be aware of your surroundings and where the shore and other boats are. You will need to have someone in the kayak at all times to make sure it doesn’t drift away.
Mantas: Don’t touch the mantas! Mantas are not dangerous and may swim very close to you but be careful not to touch them. They have a protective mucus that protects them and if you touch them you may harm the manta.
** If you are unfamiliar with the area we highly recommend booking a tour. All the tour companies in Kona are great and they will take care of the entire excursion. They are pros at this are will make sure you stay safe.
ADVENTURE DIRECTIONS
Summary: This is one of the best tours on the Big Island. We highly recommend booking a tour as professional dive/snorkel companies will give you the best and safest Manta Ray experience. We’ve done this tour with Jack’s Diving Locker and had a great time. If you want to have this experience without a tour company read our tips below.
Step-By-Step Guide:
Note: We did our snorkel in Keauhou Bay but there is a smaller site at Mauna Kea Beach where you can sometimes see mantas. They turn on a small light on the North side of the bay that attracts the mantas. This is an easier excursion as it is possible to snorkel right from the beach.
One of the main places to see mantas is right in front of the Sheraton Kona Resort. The Boat launch is just north east of the hotel. There is parking nearby but you will need to drop off your kayak at the boat launch and then park. It is about a 500m paddle to the site. At dusk, there will be a bunch of tour boats in front of the Sheraton. Once you have paddled out, there will be clusters of snorkelers with glow sticks and lights. This is where you want to be to see the mantas!
Image 1: Anderson getting his gear ready
Image 2: Paddling to the mantas
Once you reach the boats, jump in! Have someone stay with the boats so they don’t float away too far. Once in the water, you should be able to see the main spotlight at the bottom of the ocean with some divers down there waiting as well. Try not to get in the way of the bigger boats and don’t touch the mantas.
Image 3: Two manta rays
Image 4: Snorkeling with the mantas
WE WANT TO HEAR FROM YOU
Thank you for choosing Epic Trip Adventures as your guide. We are committed to continually updating our guides to be as relevant and accurate as possible. If you have feedback to improve this guide please leave it in the comments below.
We also want to hear about your Manta Ray adventures. If you have stories, pictures or even a link to your own adventure video please share them below!
For a downloadable PDF version of this guide Located on the north side of the town of Canmore is Mount Lady Macdonald. Lady Mac is a big old piece of rock that offers plenty of stunning Rocky Mountain views the whole hike up. Lady Mac is a challenge and really allows the hiker to experience what it’s like hiking in the Canadian Rockies. Because of its convenient location, it is a local favorite and is one of the mountains climbed as part of Canmore’s Triple Crown or 4 peak challenge. ADVENTURE STATISTICS Time Required: 4-6 Hours Location: NE of Canmore – Bow Valley Wildland Provincial Park Distance: 11km round trip Highest Elevation: 2600m Elevation Gain: 1180m Difficulty: 7/10 – Rapid elevation gain and extreme exposure at the summit. Season: June to mid-October Additional Requirements: N/A DRIVING DIRECTIONS From Canmore: Follow Benchlands Trail north of the Trans Canada and then take the second exit at the traffic circle to continue on Benchlands Trail. At any point after that traffic circle, find a spot in the parking lot to your right. If it’s full try to find parking on the street. WHAT TO BRING Comfortable Footwear: Hiking shoes. Make sure your shoes are broken in prior to tackling this hike to prevent unexpected blisters. You could get away with running shoes but having extra grip on the rock surfaces will definitely come in handy! Water: This hike is long with lots of elevation gain to reach the summit. Be sure to bring enough water for 5-6 hours of physical exertion. Snacks: Bring some of your favorite snacks to enjoy along the hike. Some of our favorite snacks are trail mix, bananas, beef jerky and licorice. Weather appropriate clothing: You will be exposed to the elements throughout this hike. It
For a downloadable PDF version of this guide CLICK HERE!
Located on the north side of the town of Canmore is Mount Lady Macdonald. Lady Mac is a big old piece of rock that offers plenty of stunning Rocky Mountain views the whole hike up. Lady Mac is a challenge and really allows the hiker to experience what it’s like hiking in the Canadian Rockies. Because of its convenient location, it is a local favorite and is one of the mountains climbed as part of Canmore’s Triple Crown or 4 peak challenge.
ADVENTURE STATISTICS
Time Required: 4-6 Hours
Location: NE of Canmore – Bow Valley Wildland Provincial Park
Distance: 11km round trip
Highest Elevation: 2600m
Elevation Gain:1180m
Difficulty:7/10 – Rapid elevation gain and extreme exposure at the summit.
Season: June to mid-October
Additional Requirements: N/A
DRIVING DIRECTIONS
From Canmore: Follow Benchlands Trail north of the Trans Canada and then take the second exit at the traffic circle to continue on Benchlands Trail. At any point after that traffic circle, find a spot in the parking lot to your right. If it’s full try to find parking on the street.
WHAT TO BRING
Comfortable Footwear: Hiking shoes. Make sure your shoes are broken in prior to tackling this hike to prevent unexpected blisters. You could get away with running shoes but having extra grip on the rock surfaces will definitely come in handy!
Water: This hike is long with lots of elevation gain to reach the summit. Be sure to bring enough water for 5-6 hours of physical exertion.
Snacks: Bring some of your favorite snacks to enjoy along the hike. Some of our favorite snacks are trail mix, bananas, beef jerky and licorice.
Weather appropriate clothing: You will be exposed to the elements throughout this hike. It can be deceivingly cold up at the summit, and especially windy. Check the weather forecast and plan accordingly.
Sunscreen: If it is sunny and you’re like Mattson, who easily burns, bring sunscreen!
Insect Repellent: Insect repellent can greatly improve your hiking experience.
Bear Spray: You are in bear country. Always hike with bear spray that is easily accessible.
Camera: There are numerous photo opportunities you won’t want to miss.
This Guide: Print a copy of this guide to reference throughout the hike
OTHER CONSIDERATIONS
Wildlife: You will be hiking in bear country. It is always advisable to check in at the local Visitor Information Center to learn of any trail closures due to wildlife. Carry bear spray in an easily accessible location. Travel in groups of multiple hikers and make lots of noise to avoid an unexpected encounter.
Leave No Trace: It is important that we enjoy the outdoors responsibly and sustainably. Some key principles to consider when hiking to “Leave No Trace” are:
Plan ahead and prepare: Proper planning allows adventurers to hike safely while minimizing damage to the land.
Travel on durable surfaces: Stick to the trail when possible. If there is no trail, or you must travel off trail, stay on durable surfaces to reduce your impact.
Dispose of waste properly: Pack it in, pack it out.
Leave what you find: Leave rocks, plants, archaeological artifacts and other objects of interest as you find them.
Respect wildlife: Observe wildlife from a distance. Never feed wild animals.
Be considerate of other visitors: Be courteous to others to allow everyone to enjoy their outdoor experience.
Summary: This hike begins at the parking lot on Benchlands Trail and begins by following the wide rocky outwash from cougar creek. From there the trail winds up switchbacks to the “Teahouse” above the tree line. Then to reach the summit you must ascend a scree slope and cross a very narrow exposed ridge.
Image 1: Lady MacDonald Adventure Map
Step-By-Step Guide:
From the parking lot (Route marker #1 on the map), walk along the west side of the gravel outwash for about 700m. At this point there will be a trail to enter into the trees and a sign marking Montane Traverse Trail.
Image 2: The gravel outwash
Image 3: Montana Traverse trailhead
Follow Montane Traverse Trail for a little ways until you reach another fork. Take the right fork onto Lady Macdonald Trail. If you go left, you’ll stay on Montane Traverse Trail. At first the trail is well travelled and relatively effortless to walk on, but it quickly starts to gain elevation up long switchbacks.
Image 4: The fork to Lady MacDonald Trail
Image 5: The trail map
Eventually, you’ll poke out of the trees and begin hiking the rockier section of the trail. Keep following the trail up the mountain and eventually you’ll reach the “Teahouse” (Route marker #2 on the map). Here you’ll find a big old wooden helipad. This is a great spot to stop for a break before you make the push to the summit. They call it the “Teahouse” because there was an unfinished teahouse being built in the mid 1990’s that was suddenly abandoned. The plan was for it to be open to the public Friday through Sunday as a place to stop during the hike, enjoy a cup of tea and take in the amazing views. When the construction was cut short the building was left half finished. In 2013, the Bow Valley Wildland Provincial Park decided to tear down the teahouse and an old wooden helipad is all that remains.
Image 6: The Teahouse helipad
The helipad is the turnaround point for many hikers. The rest of the hike is substantially more difficult and there is dangerous exposure on the ridge to the summit. From the helipad you can see a very faded goat path up the scree slope. If you are choosing to hike to the summit take the path up the scree slope. It can be frustrating hiking up the scree because for every step you take, it feels like you’re sliding back down a half step.
Image 7: Anderson hiking up the scree slope
Image 8: The trail to the summit ridge
Once you reach the top of the scree slope, you’ve made it to what people call “the knife edge summit”. If you’re adventurous enough you can walk the knife edge and make it to the true summit (Route marker #3 on the map). Take as much caution as possible as this ridge has an extreme amount of exposure on either side and is very dangerous. If the weather conditions aren’t right or you’re not comfortable with the exposure, don’t risk it.
Image 9: The ridge walk
Image 10: Crossing the knife edge ridge
WE WANT TO HEAR FROM YOU
Thank you for choosing Epic Trip Adventures as your guide. We are committed to continually updating our guides to be as relevant and accurate as possible. If you have feedback to improve this guide please leave it in the comments below.
We also want to hear about your Lady Macdonald adventures. If you have stories, pictures or even a link to your own adventure video please share them below!