Fortress Mountain is located in Kananaskis Country and has the highest base elevation of any ski resort in Canada. This means it gets a ton of POW! We have no other Cat Ski experience to compare to, but KPOW treated us really well, provided us with morning snacks, lunch, cold beer, avalanche safety training and epic snow! We would absolutely go Cat Skiing with KPOW again! DRIVING DIRECTIONS From Calgary: Take Hwy 1 West until you reach the Stoney Nakoda Casino and Hwy 40. Head South on Hwy 40 for 45km (18km past the Nakiska exit). At the Centrex Gas Station turn right and drive about 400m and park on the right side of the road. KPOW will meet you here in the morning. WHAT TO BRING Gear: Snowboard boots and board (move bindings to the back of board) or if you are skiing; skis, poles and boots (KPOW recommends a minimum of 100mm underfoot for skis. Snacks: KPOW will provide some snacks and a lunch but if you want specific things you'll have to bring them. Weather appropriate clothing: Wind/water proof outer layers. Jacket, pants, gloves, neck warmer, warm socks, toque. Sunscreen: You can get a sunburn in the winter time. Ask Mattson Helmet: Helmets are not required but very much recommended. Hand and foot warmers: Having cold feet is the worst. Camera: It is fun to be able to watch some footage after or at least review some pics. Book at: www.kpow.ca Their website is easy to navigate and has more information on how to book a day of riding than this guide. So check it out. Pricing is: Single seats in the low season are $425.00 per person. (Dec. 1st to Feb 13th) Single seats in the high season are $525.00 per person (Feb. 17th to April 17th)
Fortress Mountain is located in Kananaskis Country and has the highest base elevation of any ski resort in Canada. This means it gets a ton of POW! We have no other Cat Ski experience to compare to, but KPOW treated us really well, provided us with morning snacks, lunch, cold beer, avalanche safety training and epic snow! We would absolutely go Cat Skiing with KPOW again!
DRIVING DIRECTIONS
From Calgary: Take Hwy 1 West until you reach the Stoney Nakoda Casino and Hwy 40. Head South on Hwy 40 for 45km (18km past the Nakiska exit). At the Centrex Gas Station turn right and drive about 400m and park on the right side of the road. KPOW will meet you here in the morning.
WHAT TO BRING
Gear: Snowboard boots and board (move bindings to the back of board) or if you are skiing; skis, poles and boots (KPOW recommends a minimum of 100mm underfoot for skis.
Snacks: KPOW will provide some snacks and a lunch but if you want specific things you’ll have to bring them.
Their website is easy to navigate and has more information on how to book a day of riding than this guide. So check it out.
Pricing is:
Single seats in the low season are $425.00 per person. (Dec. 1st to Feb 13th)
Single seats in the high season are $525.00 per person (Feb. 17th to April 17th)
Image 1: KPOW Cat Skiing
WE WANT TO HEAR FROM YOU
Thank you for choosing Epic Trip Adventures as your guide. We are committed to continually updating our guides to be as relevant and accurate as possible. If you have feedback to improve this guide please leave it in the comments below.
We also want to hear about your KPOW Cat Skiing adventures. If you have stories, pictures or even a link to your own adventure video please share them below!
For a downloadable PDF version of this guide Hiking Black Rock Mountain in the winter was a gnarly adventure, but in the summer months the hike is straightforward and only moderately difficult. Getting to the trailhead of this hike is an adventure as you will need to 4x4 through a (mostly dried up) riverbed. The hike has some easy scrambling, but the most difficult part is the steep final push to the summit. At the top you are rewarded by unreal 360-degree views of the Rockies. ADVENTURE STATISTICS Time Required: 4-5 Hours Location: 45km west of Calgary Distance: 10.9km round trip Highest Elevation: 2440m Elevation Gain: 980m Difficulty: 7/10 – Consistent elevation gain Season: May to October for summer conditions. Additional Requirements: 4x4 vehicle to reach the trailhead. DRIVING DIRECTIONS From Cochrane: Head west on Bow Valley Trail/AB-1A for 14km and then turn right onto Forestry Trunk Rd/AB-40 North. Follow Hwy 40 for 38.2km and take a left at Ghost Airstrip Campground followed by another immediate left. Head south for 12.8km then turn right, follow this road for 6.2km and you will reach a steep hill going down to the riverbed. Once you hit the riverbed, follow the road in the riverbed heading north for about 2km. The trailhead will be on the (North) other side of the creek. NOTE: You will likely need a 4X4 vehicle to drive in the riverbed. WHAT TO BRING Comfortable Footwear: Hiking shoes. Boots if it’s winter. Water: This hike is long with lots of elevation gain to reach the summit. Be sure to bring enough water for 4-5 hours of physical exertion. Snacks: Bring some of your favorite snacks to enjoy along the hike as well as a light lunch for when you arrive at the falls. Some of our favorite snacks
For a downloadable PDF version of this guide CLICK HERE!
Hiking Black Rock Mountain in the winter was a gnarly adventure, but in the summer months the hike is straightforward and only moderately difficult. Getting to the trailhead of this hike is an adventure as you will need to 4×4 through a (mostly dried up) riverbed. The hike has some easy scrambling, but the most difficult part is the steep final push to the summit. At the top you are rewarded by unreal 360-degree views of the Rockies.
ADVENTURE STATISTICS
Time Required: 4-5 Hours
Location: 45km west of Calgary
Distance: 10.9km round trip
Highest Elevation: 2440m
Elevation Gain:980m
Difficulty:7/10 – Consistent elevation gain
Season: May to October for summer conditions.
Additional Requirements: 4×4 vehicle to reach the trailhead.
DRIVING DIRECTIONS
From Cochrane: Head west on Bow Valley Trail/AB-1A for 14km and then turn right onto Forestry Trunk Rd/AB-40 North. Follow Hwy 40 for 38.2km and take a left at Ghost Airstrip Campground followed by another immediate left. Head south for 12.8km then turn right, follow this road for 6.2km and you will reach a steep hill going down to the riverbed. Once you hit the riverbed, follow the road in the riverbed heading north for about 2km. The trailhead will be on the (North) other side of the creek. NOTE: You will likely need a 4X4 vehicle to drive in the riverbed.
WHAT TO BRING
Comfortable Footwear: Hiking shoes. Boots if it’s winter.
Water: This hike is long with lots of elevation gain to reach the summit. Be sure to bring enough water for 4-5 hours of physical exertion.
Snacks: Bring some of your favorite snacks to enjoy along the hike as well as a light lunch for when you arrive at the falls. Some of our favorite snacks are trail mix, bananas, beef jerky and licorice.
Weather appropriate clothing: You will be exposed to the elements throughout this hike. Check the weather forecast and plan accordingly.
Sunscreen: If it is sunny and you’re like Mattson, who easily burns, bring sunscreen!
Insect Repellent: Insect repellent can greatly improve your hiking experience.
Bear Spray: You are in bear country. Always hike with bear spray that is easily accessible.
Camera: There are numerous photo opportunities you won’t want to miss.
This Guide: Print a copy of this guide to reference throughout the hike
OTHER CONSIDERATIONS
Wildlife: You will be hiking in bear country. Carry bear spray in an easily accessible location. Travel in groups of multiple hikers and make lots of noise to avoid an unexpected encounter.
Leave No Trace: It is important that we enjoy the outdoors responsibly and sustainably. Some key principles to consider when hiking to “Leave No Trace” are:
Plan ahead and prepare: Proper planning allows adventurers to hike safely while minimizing damage to the land.
Travel on durable surfaces: Stick to the trail when possible. If there is no trail, or you must travel off trail, stay on durable surfaces to reduce your impact.
Dispose of waste properly: Pack it in, pack it out.
Leave what you find: Leave rocks, plants, archaeological artifacts and other objects of interest as you find them.
Respect wildlife: Observe wildlife from a distance. Never feed wild animals.
Be considerate of other visitors: Be courteous to others to allow everyone to enjoy their outdoor experience.
Summary: The trail up Black Rock Mountain is fairly straightforward and in the summer, is easy to follow. The trail gains elevation to an upper plateau and then there is a final steep push to the summit. In the winter if there is snow, we recommend using an app with GPS (AllTrails) to ensure your taking the correct route.
Image 1: Black Rock Mountain Adventure Map
Step-By-Step Guide:
Finding the trailhead for this hike is potentially the most difficult part of the hike. You will need a 4×4 vehicle to drive the final 2km across the dry riverbed. A broken sign marks the Black Rock Viewpoint trail (Route marker #1 on the map). We used the AllTrails app to find the exact location of the trailhead and it worked great.
Image 2: The Trailhead
Image 3: Following the trail
The trail is easy to follow and reasonably flat for the first few kms of the hike. A forest fire blew through the area a few months before we did the hike, so the trees were charred black and the smell of smoke was still in the air. There was some snow coverage so the trail was difficult to find at times but in the summer the trail would be easy to follow.
We lost the trail and ended up too far right on a steep scree hill. The challenging slippery climb up the scree slope made the hike much harder than it should have been. On the way down we managed to stay on the correct trail and the descent was a lot easier. The trail will eventually reach the upper plateau (Route marker #2 on the map) where it follows the ridge to the false peak. From here you can see the steep final climb to the true summit.
Image 4: Scrambling up the scree
Image 5: The false peak with the summit in the background
Even though the false peak has good views don’t stop there! The steep final section to the summit is tiring but well worth it. If Finn can do it, you can too!
At the summit (Route marker #3 on the map), there is an old fire lookout that was built in 1889. People used to take horses all the way to the top to keep lookout for wildfires. Leave your mark by carving your name into the fire lookout at the top, enjoy some 360 views of the Rockies and then make your way back down the same way you came up! Enjoy!
Image 6: Anderson and Finn at the summit
WE WANT TO HEAR FROM YOU
Thank you for choosing Epic Trip Adventures as your guide. We are committed to continually updating our guides to be as relevant and accurate as possible. If you have feedback to improve this guide please leave it in the comments below.
We also want to hear about your Black Rock Mountain adventures. If you have stories, pictures or even a link to your own adventure video please share them below!
For a downloadable PDF version of this guide Hidden Canyon is located on the east side of Zion about 1000 feet above the floor of the main canyon. They call it a “hanging canyon” because of how high it rests. This hike has a challenging amount of elevation gain to overcome before you reach the entrance to the canyon, but once you get there some fun exploring and scrambling awaits. ADVENTURE STATISTICS Time Required: 2-3 Hours Trailhead: Weeping Rock Trailhead Distance: 5km (3 miles) round trip Elevation Gain: 300m (1000ft) Difficulty: 6/10 – Well trafficked, lots of scrambling Season: Year-round. Spring and fall are most pleasant. Summer can be very hot and winter can be icy and dangerous. Additional Requirements: N/A DRIVING DIRECTIONS From St. George: Travel on the I-15 North towards Salt Lake City, after 11 km (7 miles) merge onto UT-9 East via exit 16 and travel 20km (12.5 miles) through Hurricane and then up to La Verkin. Take a right turn in La Verkin to continue on the UT-9 East for 32km (20 miles) until you come into Springdale. Follow that same road until you pull up to the Zion park entrance. From Arizona: Travel US-89A North through Fredonia, AZ and Kanab, UT. Follow US-89 to Mount Carmel Junction. Take UT-9 West to Zion’s East Park Entrance. From the North: Travel the I-15 South past Beaver, UT and exit on Hwy 20. Head east until you reach US-89, then head south to the Mount Carmel Junction. Take UT-9 west to Zion’s East Park Entrance. WHAT TO BRING Comfortable Footwear: Hiking shoes. Make sure your shoes are broken in prior to tackling this hike to prevent unexpected blisters. You could get away with runners but having extra grip on the rock
For a downloadable PDF version of this guide CLICK HERE!
Hidden Canyon is located on the east side of Zion about 1000 feet above the floor of the main canyon. They call it a “hanging canyon” because of how high it rests. This hike has a challenging amount of elevation gain to overcome before you reach the entrance to the canyon, but once you get there some fun exploring and scrambling awaits.
ADVENTURE STATISTICS
Time Required: 2-3 Hours
Trailhead: Weeping Rock Trailhead
Distance: 5km (3 miles) round trip
Elevation Gain:300m (1000ft)
Difficulty:6/10 – Well trafficked, lots of scrambling
Season: Year-round. Spring and fall are most pleasant. Summer can be very hot and winter can be icy and dangerous.
Additional Requirements: N/A
DRIVING DIRECTIONS
From St. George: Travel on the I-15 North towards Salt Lake City, after 11 km (7 miles) merge onto UT-9 East via exit 16 and travel 20km (12.5 miles) through Hurricane and then up to La Verkin. Take a right turn in La Verkin to continue on the UT-9 East for 32km (20 miles) until you come into Springdale. Follow that same road until you pull up to the Zion park entrance.
From Arizona: Travel US-89A North through Fredonia, AZ and Kanab, UT. Follow US-89 to Mount Carmel Junction. Take UT-9 West to Zion’s East Park Entrance.
From the North: Travel the I-15 South past Beaver, UT and exit on Hwy 20. Head east until you reach US-89, then head south to the Mount Carmel Junction. Take UT-9 west to Zion’s East Park Entrance.
WHAT TO BRING
Comfortable Footwear: Hiking shoes. Make sure your shoes are broken in prior to tackling this hike to prevent unexpected blisters. You could get away with runners but having extra grip on the rock surfaces will definitely come in handy!
Water: This hike is long and can be very hot. Be sure to bring enough water for 3-5 hours of physical exertion in the hot sun.
Snacks: Bring some of your favorite snacks to enjoy along the hike. Some of our favorites snacks are trail mix, bananas, beef jerky and licorice.
Weather appropriate clothing: Temperatures can get up to 40 degrees Celsius (104 Fahrenheit) in the summertime. Shorts, a breathable long sleeve shirt, and a hat can help protect you from the sun and heat. In the winter, the temperature can drop below freezing and it is possible to encounter snow. Check the weather forecast and plan accordingly.
Sunscreen: If it is sunny and you’re like Mattson, who easily burns, bring sunscreen!
Camera: There are tons of photo opportunities along the way you won’t want to miss.
This Guide: Print a copy of this guide to reference throughout the hike
OTHER CONSIDERATIONS
Heat and Dehydration: In Zion National Park, the days can be very hot. Limit sun exposure during the hottest parts of the day. Appropriate clothing such as a hat and long sleeve shirt can protect your skin from the sun as well as reduce the risk of dehydration. The hot weather increases your need for fluid intake. Ensure you are hydrating throughout the day. Don’t wait until you’re thirsty to start drinking water.
Steep Cliffs: Falls from cliffs along the trail could resulted in death. Stay on the trail, stay back from cliff edges and be careful of sand or loose rocks that can make for a slippery surface. Always be aware of your surroundings, especially when you are trying to capture the perfect photo. During the winter months, the trail can be snow and ice covered so be extra careful and wear traction devices on your shoes for extra grip.
Leave No Trace: It is important that we enjoy the outdoors responsibly and sustainably. Some key principles to consider when hiking to “Leave No Trace” are:
Plan ahead and prepare: Proper planning allows adventurers to hike safely while minimizing damage to the land.
Travel on durable surfaces: Stick to the trail when possible. If there is no trail, or you must travel off trail, stay on durable surfaces to reduce your impact.
Dispose of waste properly: Pack it in, pack it out.
Leave what you find: Leave rocks, plants, archaeological artifacts and other objects of interest as you find them.
Respect wildlife: Observe wildlife from a distance. Never feed wild animals.
Be considerate of other visitors: Be courteous to others to allow everyone to enjoy their outdoor experience.
Zion Shuttle System: During the busy months (March to November), Zion National Park has a free shuttle system to help move large numbers of visitors around the park. When the shuttle is in operation Zion Canyon Scenic Drive is closed to private vehicles so visitors must rely on the shuttle service. The shuttle departs from the Zion Visitor Center and stops at nine locations in the park. The shuttles run very frequently between 7am and 6:15pm and you should never have to wait more than 10-15 minutes. Although you can park at the Visitor Center, the lot fills up quickly so it is best to park in the town of Springdale and take the Springdale Shuttle to the park gate.
The Springdale Shuttle leaves from the Majestic View Lodge and stops at the Zion Canyon Theatre. From the Zion Canyon Theatre, cross through the National Park Pedestrian Entrance to pay the entry fee, then catch the Zion Canyon Shuttle from the Visitor Center.
There are many Springdale Shuttle stops between the Majestic View Lodge, and Zion Canyon Theater. Walk to the nearest stop from your accommodation or drive and park in a marked “Shuttle Parking” area.
Image 1: Zion Canyon Line Shuttle Stops
HIKING DIRECTIONS
Summary: Starting at the Weeping Rock Trailhead the hike begins with steep switchbacks that take you up to the wall of the canyon. At that point there is a chain to assist you crossing a narrow ledge hundreds of feet above the canyon floor. After some more climbing and a bit of scrambling you will arrive at the Hidden Canyon Rock Arch. For many hikers this is the turnaround point, but the canyon continues and you can hike further if you are up for more scrambling.
Image 2: Hiking Hidden Canyon Adventure Map
Step-By-Step Guide:
This hike starts at the Weeping Rock Trailhead (Route marker #1 on the map). There is an easy to follow trail that will begin to take you up the canyon and then fork to the left to Weeping Rock (Route Marker #2 on the map). Weeping rock is a short detour worth checking out before heading up to Hidden Canyon.
Image 3: Mattson under the Weeping Rock
Image 4: The view from Weeping Rock
After checking out weeping rock return to the main trail. From here there are some steep switchbacks that take you up to a fork in the trail. If you go left, you will be on the East Rim Trail headed towards Observation Point, so take a right to Hidden Canyon.
Image 5: The trail fork to Hidden Canyon
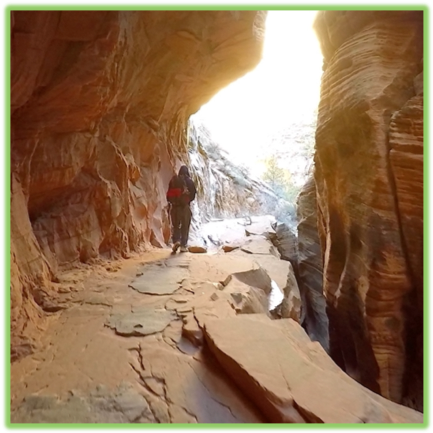
The trail continues to climb up more switchbacks until eventually it narrows to a small ledge on the side of the canyon. There are chains bolted into the cliff walls to hang onto as you cross these narrow sections. After crossing the ledge there is a stone staircase to climb and shortly after you will find yourself in Hidden Canyon.
Image 6: Crossing the narrow ledge
Image 7: The stone staircase
The canyon is narrow and tall, so it is tough to get lost. There is only one way to go but there are some obstacles along the way. This part of the hike requires some rock hopping and scrambling over larger boulders.
Image 8: Headed into Hidden Canyon
Image 7: Scrambling over boulders
About half a mile into the canyon is a large natural rock arch that can’t be missed (Route Marker #3 on the map). This is the point where a lot of hikers turn around but you can continue past the rock arch if you want to keep adventuring.
Image 10: Hidden Canyon Rock Arch
We kept going further into the canyon for about another kilometer (Route Marker #4 on the map). The scrambling did get tougher after the arch but it was a lot of fun! When scrambling keep in mind it is always easier going up then coming down. Know your limits and when its time to turn around. When you are ready to start the return trip, follow the same route in reverse back to Weeping Rock Trailhead.
Image 11: Mattson trying to keep his feet dry
Image 12: Scrambling up a steep section of rock
WE WANT TO HEAR FROM YOU
Thank you for choosing Epic Trip Adventures as your guide. We are committed to continually updating our guides to be as relevant and accurate as possible. If you have feedback to improve this guide please leave it in the comments below.
We also want to hear about your Hidden Canyon adventures. If you have stories, pictures or even a link to your own adventure video please share them below!
For a downloadable PDF version of this guide Red Rock Canyon is a great hike for the entire family. There is a popular trail around the perimeter of the canyon that is well maintained, has little elevation gain, and gives spectacular views of the colorful rock. On a hot day the creek in the canyon is a popular place for kids to cool off and play in the water. If you are looking for a slightly more adventurous hike you can venture up the canyon through the creek. A quick 1km side trip from the south point of the canyon trail takes you to the scenic Blakiston Falls Lookout Point. ADVENTURE STATISTICS Time Required: 1-2 Hours Location: 18km from Waterton on Red Rock Parkway Distance: 3.5km round trip Elevation Gain: 184m Difficulty: 3/10 – Family friendly trail Season: June to mid-October Additional Requirements: N/A DRIVING DIRECTIONS From Waterton: Take Hwy 5 east approximately 4 km and turn left onto Red Rock Parkway (Range Rd 300A). Follow this north 13.5km and the designated Red Rock Canyon parking area will be on your right. Red Rock Parkway is an excellent road for spotting wildlife so keep your eyes open. WHAT TO BRING Comfortable Footwear: Sneakers or Hiking shoes. A pair of water shoes would be ideal if you are heading up the creek in the canyon. Water: Always a good idea to have some water while hiking. Snacks: Bring some of your favorite snacks to enjoy at the canyon. Some of our favorite snacks are trail mix, bananas, beef jerky and licorice. Weather appropriate clothing: Check the weather forecast and plan accordingly. Sunscreen: If it is sunny and you’re like Mattson, who easily burns, bring sunscreen! Insect Repellent: Insect repellent can greatly improve your hiking experience.
For a downloadable PDF version of this guide CLICK HERE!
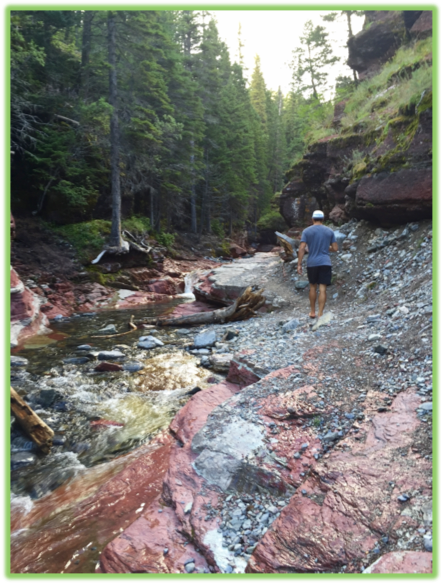
Red Rock Canyon is a great hike for the entire family. There is a popular trail around the perimeter of the canyon that is well maintained, has little elevation gain, and gives spectacular views of the colorful rock. On a hot day the creek in the canyon is a popular place for kids to cool off and play in the water. If you are looking for a slightly more adventurous hike you can venture up the canyon through the creek. A quick 1km side trip from the south point of the canyon trail takes you to the scenic Blakiston Falls Lookout Point.
ADVENTURE STATISTICS
Time Required: 1-2 Hours
Location: 18km from Waterton on Red Rock Parkway
Distance: 3.5km round trip
Elevation Gain:184m
Difficulty:3/10 – Family friendly trail
Season: June to mid-October
Additional Requirements: N/A
DRIVING DIRECTIONS
From Waterton: Take Hwy 5 east approximately 4 km and turn left onto Red Rock Parkway (Range Rd 300A). Follow this north 13.5km and the designated Red Rock Canyon parking area will be on your right. Red Rock Parkway is an excellent road for spotting wildlife so keep your eyes open.
WHAT TO BRING
Comfortable Footwear: Sneakers or Hiking shoes. A pair of water shoes would be ideal if you are heading up the creek in the canyon.
Water: Always a good idea to have some water while hiking.
Snacks: Bring some of your favorite snacks to enjoy at the canyon. Some of our favorite snacks are trail mix, bananas, beef jerky and licorice.
Weather appropriate clothing: Check the weather forecast and plan accordingly.
Sunscreen: If it is sunny and you’re like Mattson, who easily burns, bring sunscreen!
Insect Repellent: Insect repellent can greatly improve your hiking experience.
Bear Spray: You are in bear country. Always hike with bear spray that is easily accessible.
Camera: There are numerous photo opportunities you won’t want to miss.
This Guide: Print a copy of this guide to reference throughout the hike
OTHER CONSIDERATIONS
Wildlife: You will be hiking in bear country. It is always advisable to check in at the local Visitor Information Center to learn of any trail closures due to wildlife. Carry bear spray in an easily accessible location. Travel in groups of multiple hikers and make lots of noise to avoid an unexpected encounter.
Leave No Trace: It is important that we enjoy the outdoors responsibly and sustainably. Some key principles to consider when hiking to “Leave No Trace” are:
Plan ahead and prepare: Proper planning allows adventurers to hike safely while minimizing damage to the land.
Travel on durable surfaces: Stick to the trail when possible. If there is no trail, or you must travel off trail, stay on durable surfaces to reduce your impact.
Dispose of waste properly: Pack it in, pack it out.
Leave what you find: Leave rocks, plants, archaeological artifacts and other objects of interest as you find them.
Respect wildlife: Observe wildlife from a distance. Never feed wild animals.
Be considerate of other visitors: Be courteous to others to allow everyone to enjoy their outdoor experience.
Summary: This guide will describe the route clockwise around the canyon with a detour to Blakiston Falls. After circling the canyon, we highly recommended following the creek upstream through the canyon to explore. This is one of the more popular trails in Waterton so if you want to avoid crowds of people do this hike on a weekday or early in the morning.
Image 1: Red Rock Canyon Adventure Map
Step-By-Step Guide:
Starting at the designated Red Rock Canyon parking lot (Route marker #1 on the map) head west to Red Rock Canyon. Take a left onto the Canyon Loop trail and follow it south.
At the most southerly point of Red Rock Canyon you will cross a bridge to the west side of the canyon and then another bridge south over Blakiston Creek. There is a sign pointing out the side trail to Blakiston Falls. Follow this trail.
Image 2: Red Rock Canyon Trailhead
Image 3: The trail to Blakiston Falls
The trail to Blakiston Falls is just under 1km and gains a bit in elevation (about 40m). There is a lookout platform at the falls that gives the best view of the waterfall (Route marker #2 on the map).
Image 4: Blakiston Falls
From the Falls head back to Red Rock Canyon along the same trail you came. Once back at the canyon head 600m along the west side of the canyon to the most northerly point of Canyon Loop Trail (Route marker #3 on the map). At the top, there is a bridge with a great view down into the canyon. Venture back towards the parking lot on the other side (east) of the canyon.
Image 5: Following the trail along the west side of the canyon
Image 6: The view of Red Rock Canyon from the northern bridge
If you are up for more adventure the most interesting part of this hike is following the creek in the canyon upstream. It is recommended that you change into footwear that can get wet as you will have to walk in the creek at various points. The easiest way down to the creek is at the bridge by the parking lot.
Image 7: Following the creek in Red Rock Canyon
Follow the creek north through the canyon as far as you like. We went just pass the bridge you crossed at the most northerly point of the Upper Canyon Loop. You could venture further but the water gets deep and we didn’t feel like getting wet.
WE WANT TO HEAR FROM YOU
Thank you for choosing Epic Trip Adventures as your guide. We are committed to continually updating our guides to be as relevant and accurate as possible. If you have feedback to improve this guide please leave it in the comments below.
We also want to hear about your Red Rock Canyon adventures. If you have stories, pictures or even a link to your own adventure video please share them below!
The Snake River near Jackson Hole, Wyoming has thrilling class III rapids that deliver an exciting and challenging rafting experience. There are many guided raft tours on this stretch of the river, or you can rent your own raft and take on the rapids yourself. From exciting rapids to calm stretches with beautiful scenery the Snake River is a must visit in Wyoming. Our Tips If you are looking to take a self guided tour rent from "Rent-A-Raft" - http://www.rentaraft.net/index.html Talk to the employees at Rent-A-Raft as they will recommend routes. We paddled from West Table Boat Ramp to Sheep Gulch Boat Ramp If taking our route ask a guide or worker about "Haircut Rock". It can be tough to navigate for newbies. WE WANT TO HEAR FROM YOU Thank you for choosing Epic Trip Adventures as your guide. We are committed to continually updating our guides to be as relevant and accurate as possible. If you have feedback to improve this guide please leave it in the comments below. We also want to hear about your Snake River adventures. If you have stories, pictures or even a link to your own adventure video please share them below! Have fun out there! - ETA
The Snake River near Jackson Hole, Wyoming has thrilling class III rapids that deliver an exciting and challenging rafting experience. There are many guided raft tours on this stretch of the river, or you can rent your own raft and take on the rapids yourself. From exciting rapids to calm stretches with beautiful scenery the Snake River is a must visit in Wyoming.
Our Tips
If you are looking to take a self guided tour rent from “Rent-A-Raft” – http://www.rentaraft.net/index.html
Talk to the employees at Rent-A-Raft as they will recommend routes. We paddled from West Table Boat Ramp to Sheep Gulch Boat Ramp
If taking our route ask a guide or worker about “Haircut Rock”. It can be tough to navigate for newbies.
WE WANT TO HEAR FROM YOU
Thank you for choosing Epic Trip Adventures as your guide. We are committed to continually updating our guides to be as relevant and accurate as possible. If you have feedback to improve this guide please leave it in the comments below.
We also want to hear about your Snake River adventures. If you have stories, pictures or even a link to your own adventure video please share them below!
For a downloadable PDF version of this guide If you're spending time in Zion National Park and want to get one of the best views in the park, Observation Point should be on your list! It is one of the highest points in the main canyon and offers a 360-degree view of its surroundings. The hike is challenging, has interest points along the way such as weeping rock and echo canyon, and the reward at the top is a view that'll make you want to stay there... FOREVER! ADVENTURE STATISTICS Time Required: 4-6 Hours Trailhead: Weeping Rock Trailhead Distance: 13km (8 miles) round trip Highest Elevation: 1980m (6500ft) Elevation Gain: 1463m (4800ft) Difficulty: 7/10 – Long hike with consistent elevation gain Season: Year-round. Spring and fall are most pleasant. Summer can be very hot and winter can be icy and dangerous. Additional Requirements: N/A DRIVING DIRECTIONS From St. George: Travel on the I-15 North towards Salt Lake City, after 11 km (7 miles) merge onto UT-9 East via exit 16 and travel 20km (12.5 miles) through Hurricane and then up to La Verkin. Take a right turn in La Verkin to continue on the UT-9 East for 32km (20 miles) until you come into Springdale. Follow that same road until you pull up to the Zion park entrance. From Arizona: Travel US-89A North through Fredonia, AZ and Kanab, UT. Follow US-89 to Mount Carmel Junction. Take UT-9 West to Zion’s East Park Entrance. From the North: Travel the I-15 South past Beaver, UT and exit on Hwy 20. Head east until you reach US-89, then head south to the Mount Carmel Junction. Take UT-9 west to Zion’s East Park Entrance. WHAT TO BRING Comfortable Footwear: Hiking shoes. Make sure your shoes are broken
For a downloadable PDF version of this guide CLICK HERE!
If you’re spending time in Zion National Park and want to get one of the best views in the park, Observation Point should be on your list! It is one of the highest points in the main canyon and offers a 360-degree view of its surroundings. The hike is challenging, has interest points along the way such as weeping rock and echo canyon, and the reward at the top is a view that’ll make you want to stay there… FOREVER!
ADVENTURE STATISTICS
Time Required: 4-6 Hours
Trailhead: Weeping Rock Trailhead
Distance: 13km (8 miles) round trip
Highest Elevation: 1980m (6500ft)
Elevation Gain:1463m (4800ft)
Difficulty:7/10 – Long hike with consistent elevation gain
Season: Year-round. Spring and fall are most pleasant. Summer can be very hot and winter can be icy and dangerous.
Additional Requirements: N/A
DRIVING DIRECTIONS
From St. George: Travel on the I-15 North towards Salt Lake City, after 11 km (7 miles) merge onto UT-9 East via exit 16 and travel 20km (12.5 miles) through Hurricane and then up to La Verkin. Take a right turn in La Verkin to continue on the UT-9 East for 32km (20 miles) until you come into Springdale. Follow that same road until you pull up to the Zion park entrance.
From Arizona: Travel US-89A North through Fredonia, AZ and Kanab, UT. Follow US-89 to Mount Carmel Junction. Take UT-9 West to Zion’s East Park Entrance.
From the North: Travel the I-15 South past Beaver, UT and exit on Hwy 20. Head east until you reach US-89, then head south to the Mount Carmel Junction. Take UT-9 west to Zion’s East Park Entrance.
WHAT TO BRING
Comfortable Footwear: Hiking shoes. Make sure your shoes are broken in prior to tackling this hike to prevent unexpected blisters. You could get away with runners but having extra grip on the rock surfaces will definitely come in handy!
Water: This hike is long with lots of elevation gain to reach the summit. Be sure to bring enough water for 4-6 hours of physical exertion in the hot sun.
Snacks: Bring some of your favorite snacks to enjoy along the hike. Some of our favorite snacks are trail mix, bananas, beef jerky and licorice.
Weather appropriate clothing: Temperatures can get up to 40 degrees Celsius (104 Fahrenheit) in the summertime. Shorts, a breathable long sleeve shirt, and a hat can help protect you from the sun and heat. In the winter, the temperature can drop below freezing and it is possible to encounter snow. Check the weather forecast and plan accordingly.
Sunscreen: If it is sunny and you’re like Mattson, who easily burns, bring sunscreen!
Camera: There are tons of photo opportunities along the way you won’t want to miss.
This Guide: Print a copy of this guide to reference throughout the hike
OTHER CONSIDERATIONS
Heat and Dehydration: In Zion National Park, the days can be very hot. Limit sun exposure during the hottest parts of the day. Appropriate clothing such as a hat and long sleeve shirt can protect your skin from the sun as well as reduce the risk of dehydration. The hot weather increases your need for fluid intake. Ensure you are hydrating throughout the day. Don’t wait until you’re thirsty to start drinking water.
Steep Cliffs: Stay on the trail, stay back from cliff edges and be careful of sand or loose rocks that can make for a slippery surface. Always be aware of your surroundings, especially when you are trying to capture the perfect photo. During the winter months, the trail can be snow and ice covered so be extra careful and wear traction devices on your shoes for extra grip.
Leave No Trace: It is important that we enjoy the outdoors responsibly and sustainably. Some key principles to consider when hiking to “Leave No Trace” are:
Plan ahead and prepare: Proper planning allows adventurers to hike safely while minimizing damage to the land.
Travel on durable surfaces: Stick to the trail when possible. If there is no trail, or you must travel off trail, stay on durable surfaces to reduce your impact.
Dispose of waste properly: Pack it in, pack it out.
Leave what you find: Leave rocks, plants, archaeological artifacts and other objects of interest as you find them.
Respect wildlife: Observe wildlife from a distance. Never feed wild animals.
Be considerate of other visitors: Be courteous to others to allow everyone to enjoy their outdoor experience.
Zion Shuttle System: During the busy months (March to November), Zion National Park has a free shuttle system to help move large numbers of visitors around the park. When the shuttle is in operation Zion Canyon Scenic Drive is closed to private vehicles so visitors must rely on the shuttle service. The shuttle departs from the Zion Visitor Center and stops at nine locations in the park. The shuttles run very frequently between 7am and 6:15pm and you should never have to wait more than 10-15 minutes. Although you can park at the Visitor Center, the lot fills up quickly so it is best to park in the town of Springdale and take the Springdale Shuttle to the park gate.
The Springdale Shuttle leaves from the Majestic View Lodge and stops at the Zion Canyon Theatre. From the Zion Canyon Theatre, cross through the National Park Pedestrian Entrance to pay the entry fee, then catch the Zion Canyon Shuttle from the Visitor Center.
There are many Springdale Shuttle stops between the Majestic View Lodge, and Zion Canyon Theater. Walk to the nearest stop from your accommodation or drive and park in a marked “Shuttle Parking” area.
Image 1: Zion Canyon Line Shuttle Stops
HIKING DIRECTIONS
Summary: Observation Point is a challenging hike due to its elevation but it is straightforward as far as directions go. From the trailhead we recommend making a quick detour to check out Weeping Rock and then ascending the well-marked trail up multiple sets of switchbacks to Observation Point.
Image 2: Hiking Observation Point Adventure Map
Step-By-Step Guide:
This hike starts at the Weeping Rock Trailhead (Route marker #1 on the map). There is an easy to follow trail that will begin to take you up the canyon and then fork to the left to Weeping Rock (Route Marker #2 on the map). Weeping rock is a short detour worth checking out before heading up to Observation Point.
Image 3: Mattson under the Weeping Rock
Image 4: The view from Weeping Rock
From Weeping Rock backtrack to the main trail and then head up the series of switchbacks with consistent and exhausting elevation gain. You can try to distract yourself from the physical challenge by enjoying the already amazing views of Zion.
Image 5: Anderson climbing the switchbacks
Eventually the trail will level out and you will enter Echo Canyon Passage (Route marker #3 on the map). Echo Canyon is a slot canyon, 1000ft above the valley floor. The hiking trail takes you through the slot canyon making for some great photo opportunities.
Image 6: Echo Canyon Passage
Image 7: Anderson following the trail in Echo Canyon
After Echo Canyon you will come to the East Rim Trail Junction. Take a left and make your way up the final round of switchbacks and elevation gain. Once you’ve reached the end of these switchbacks the terrain levels out for the last mile. This is part of the East Rim Trail that will lead to Observation Point.
Image 8: Mattson ascending more switchbacks
Once you make it to Observation Point (Route marker #4 on the map) you will be treated to incredible views of Zion. This is a tough hike but being atop Observation Point on a nice day is totally worth it! After taking in the views you can return to Weeping Rock trailhead by backtracking the same way you came up.
Image 9: The view from Observation Point
WE WANT TO HEAR FROM YOU
Thank you for choosing Epic Trip Adventures as your guide. We are committed to continually updating our guides to be as relevant and accurate as possible. If you have feedback to improve this guide please leave it in the comments below.
We also want to hear about your Observation Point adventures. If you have stories, pictures or even a link to your own adventure video please share them below!
For a downloadable PDF version of this guide The Narrows in Zion National Park is a unique hike that takes you on a journey through the water up the Virgin River. The walls of the canyon stand roughly a thousand feet tall and are only twenty to thirty feet wide at some of the narrowest points. This is one of Zion's most popular hikes. ADVENTURE STATISTICS Time Required: 3-5 Hours Trailhead: Temple of Sinawava Distance: 16km (10 miles) round trip Elevation Gain: Minimal Difficulty: 4/10 – Hiking through water Season: Year-round. Spring and fall are most pleasant. Summer can be very hot and busy. Winter can be cold Additional Requirements: If attempting in winter, dry suits are highly recommended. DRIVING DIRECTIONS From St. George: Travel on the I-15 North towards Salt Lake City, after 11 km (7 miles) merge onto UT-9 East via exit 16 and travel 20km (12.5 miles) through Hurricane and then up to La Verkin. Take a right turn in La Verkin to continue on the UT-9 East for 32km (20 miles) until you come into Springdale. Follow that same road until you pull up to the Zion park entrance. From Arizona: Travel US-89A North through Fredonia, AZ and Kanab, UT. Follow US-89 to Mount Carmel Junction. Take UT-9 West to Zion’s East Park Entrance. From the North: Travel the I-15 South past Beaver, UT and exit on Hwy 20. Head east until you reach US-89, then head south to the Mount Carmel Junction. Take UT-9 west to Zion’s East Park Entrance. WHAT TO BRING Footwear: Bring shoes that can get wet! In the summer water shoes are a good idea. In the winter we recommend the boots and neoprene socks that come with a dry suit rental from Zion
For a downloadable PDF version of this guide CLICK HERE!
The Narrows in Zion National Park is a unique hike that takes you on a journey through the water up the Virgin River. The walls of the canyon stand roughly a thousand feet tall and are only twenty to thirty feet wide at some of the narrowest points. This is one of Zion’s most popular hikes.
ADVENTURE STATISTICS
Time Required: 3-5 Hours
Trailhead: Temple of Sinawava
Distance: 16km (10 miles) round trip
Elevation Gain:Minimal
Difficulty:4/10 – Hiking through water
Season: Year-round. Spring and fall are most pleasant. Summer can be very hot and busy. Winter can be cold
Additional Requirements: If attempting in winter, dry suits are highly recommended.
DRIVING DIRECTIONS
From St. George: Travel on the I-15 North towards Salt Lake City, after 11 km (7 miles) merge onto UT-9 East via exit 16 and travel 20km (12.5 miles) through Hurricane and then up to La Verkin. Take a right turn in La Verkin to continue on the UT-9 East for 32km (20 miles) until you come into Springdale. Follow that same road until you pull up to the Zion park entrance.
From Arizona: Travel US-89A North through Fredonia, AZ and Kanab, UT. Follow US-89 to Mount Carmel Junction. Take UT-9 West to Zion’s East Park Entrance.
From the North: Travel the I-15 South past Beaver, UT and exit on Hwy 20. Head east until you reach US-89, then head south to the Mount Carmel Junction. Take UT-9 west to Zion’s East Park Entrance.
WHAT TO BRING
Footwear: Bring shoes that can get wet! In the summer water shoes are a good idea. In the winter we recommend the boots and neoprene socks that come with a dry suit rental from Zion Adventure Guides. The water will be cold!
Water: This hike is long and tiring. Be sure to bring enough water for 8-10 hours of physical exertion.
Snacks: Bring some of your favorite snacks to enjoy along the hike as well as a light lunch for when you arrive at the turnaround point. Some of our favorite snacks are trail mix, bananas, beef jerky and licorice.
Weather appropriate clothing: Depending on the time of year you do this hike it could be very hot, or quite cold. Check the water temperature as well as you will be walking through water that can be waist deep.
Swimsuit: If you do this hike in the summer it is advisable to bring a swimsuit as you will get wet!
Dry Suit: If you are doing this hike in the wintertime, bring a dry suit. You will need it to walk through the cold water. You can rent them from the Zion Adventure Company in Springdale.
A walking stick: A walking stick will come in handy to keep your balance on the rocky terrain underneath the water. Sometimes walking sticks can be found at the trailhead, they can also be rented from Zion Adventure Company
Sunscreen: If it is sunny and you’re like Mattson, who easily burns, bring sunscreen!
Camera: There are numerous photo opportunities you won’t want to miss.
This Guide: Print a copy of this guide to reference throughout the hike
OTHER CONSIDERATIONS
Flash Floods: It’s important when hiking through water flow areas (The Subway and The Narrows), to check the local forecast for rain and always be on high alert for noticeable changes in the weather. The Zion Visitor Center posts river flow rates for these hikes and can advise when they are safe to do. If flow rates are too high the National Park will close The Narrows. Flash floods are a real danger and can sneak up on you when you least expect it. If you do find yourself in a flash flood situation, get to high ground on the side of the canyon as quick as you can to stay safe.
Leave No Trace: It is important that we enjoy the outdoors responsibly and sustainably. Some key principles to consider when hiking to “Leave No Trace” are:
Plan ahead and prepare: Proper planning allows adventurers to hike safely while minimizing damage to the land.
Travel on durable surfaces: Stick to the trail when possible. If there is no trail, or you must travel off trail, stay on durable surfaces to reduce your impact.
Dispose of waste properly: Pack it in, pack it out.
Leave what you find: Leave rocks, plants, archaeological artifacts and other objects of interest as you find them.
Respect wildlife: Observe wildlife from a distance. Never feed wild animals.
Be considerate of other visitors: Be courteous to others to allow everyone to enjoy their outdoor experience.
Zion Shuttle System: During the busy months (March to November), Zion National Park has a free shuttle system to help move large numbers of visitors around the park. When the shuttle is in operation Zion Canyon Scenic Drive is closed to private vehicles so visitors must rely on the shuttle service. The shuttle departs from the Zion Visitor Center and stops at nine locations in the park. The shuttles run very frequently between 7am and 6:15pm and you should never have to wait more than 10-15 minutes. Although you can park at the Visitor Center, the lot fills up quickly so it is best to park in the town of Springdale and take the Springdale Shuttle to the park gate.
The Springdale Shuttle leaves from the Majestic View Lodge and stops at the Zion Canyon Theatre. From the Zion Canyon Theatre, cross through the National Park Pedestrian Entrance to pay the entry fee, then catch the Zion Canyon Shuttle from the Visitor Center.
There are many Springdale Shuttle stops between the Majestic View Lodge, and Zion Canyon Theater. Walk to the nearest stop from your accommodation or drive and park in a marked “Shuttle Parking” area.
Image 1: Zion Canyon Line Shuttle Stops
HIKING DIRECTIONS
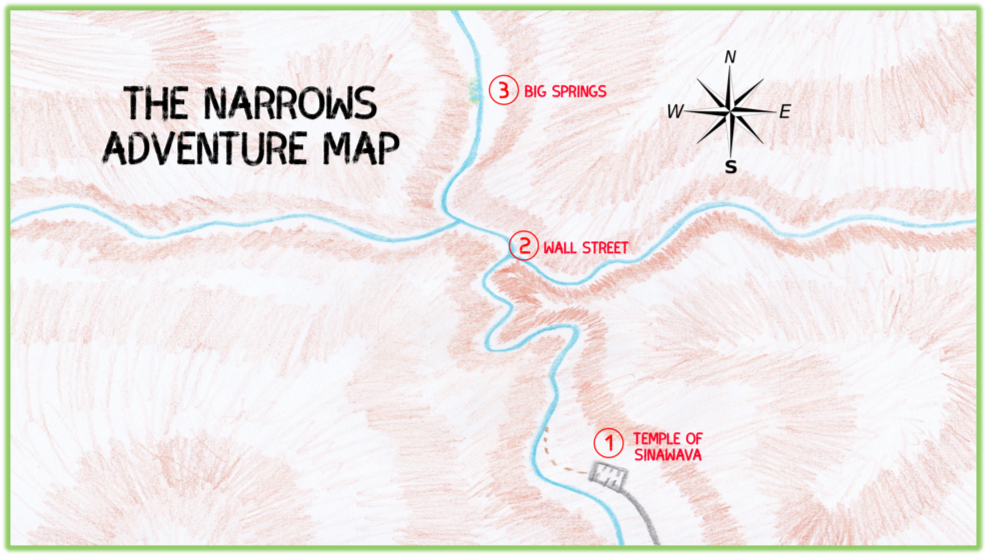
Summary: Hiking the Narrows from the bottom up is a very straight forward hike. From the Temple of Sinawava you follow the Virgin River upstream till you want to turn around, and then you follow it back to the temple.
Image 2: The Narrows Adventure Map
Step-By-Step Guide:
There is an option to do this hike from the top down (which requires a permit). It is a 16 mile full day adventure but we will focus on the bottom up route. The bottom up route does not require a permit and is nice because you can go as far up the river as you’d like (up to 5 miles) before turning back and making your way out. This hike starts at the Temple of Sinawava, the last stop of the shuttle service (Route marker #1 on the map). From the temple there is a paved trail to follow that will take you to the Virgin River. From there you follow the river upstream into the canyon. In some places the water is only ankle deep but there are other sections when the water can be up to your waste. Be careful of your footing, take your time and enjoy the scenery.
Image 3: Entering the canyon
Image 4: Following the river upstream
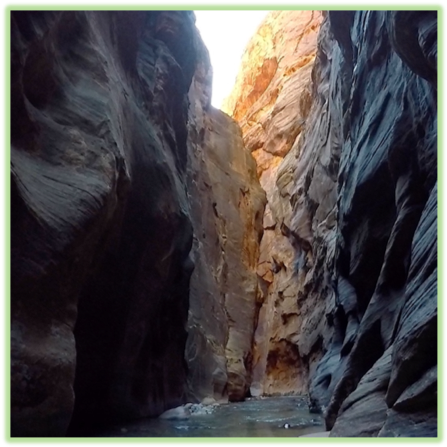
The most spectacular section of The Narrows is known as Wall Street (Route marker #2 on the map). This is the narrowest section of the canyon where the walls extend thousands of feet above you. The high canyon walls block out most of the daylight giving this section of the hike an eerie feeling.
Image 5: Wall Street
Image 6: Mattson at Wall Street
From the temple, you can walk up the river for 5 miles before it is required that you have a permit to go any farther. That leaves a 10 mile round trip, and plenty of canyon to explore. The turnaround point is a place called Big Springs (Route marker #3 on the map).
Image 7: Big Springs
WE WANT TO HEAR FROM YOU
Thank you for choosing Epic Trip Adventures as your guide. We are committed to continually updating our guides to be as relevant and accurate as possible. If you have feedback to improve this guide please leave it in the comments below.
We also want to hear about your The Narrows adventures. If you have stories, pictures or even a link to your own adventure video please share them below!
When you think of scuba diving most people picture swimming through crystal clear water with tropical reef fish surrounding you. Monterey Bay offers a completely different diving experience. The cold water kelp forest off the coast of California offers a unique diving experience that will not be forgotten! Monterey Bay has a number of Dive Shops that offer rentals and guided tours! WE WANT TO HEAR FROM YOU Thank you for choosing Epic Trip Adventures as your guide. We are committed to continually updating our guides to be as relevant and accurate as possible. If you have feedback to improve this guide please leave it in the comments below. We also want to hear about your Monterey Bay Scuba Diving adventures. If you have stories, pictures or even a link to your own adventure video please share them below! Have fun out there! - ETA
When you think of scuba diving most people picture swimming through crystal clear water with tropical reef fish surrounding you. Monterey Bay offers a completely different diving experience. The cold water kelp forest off the coast of California offers a unique diving experience that will not be forgotten! Monterey Bay has a number of Dive Shops that offer rentals and guided tours!
WE WANT TO HEAR FROM YOU
Thank you for choosing Epic Trip Adventures as your guide. We are committed to continually updating our guides to be as relevant and accurate as possible. If you have feedback to improve this guide please leave it in the comments below.
We also want to hear about your Monterey Bay Scuba Diving adventures. If you have stories, pictures or even a link to your own adventure video please share them below!
For a downloadable PDF version of this guide Heart Creek Trail is a popular hike that is suitable for people of all abilities. The hike offers beautiful scenery along an easy walking trail to a waterfall. At the end of the trail if you’re feeling adventurous you can climb into the waterfall canyon or hike to the top of the falls. ADVENTURE STATISTICS Time Required: 2-3 Hours Location: 90km west of Calgary off Hwy 1 Distance: 5-6km round trip depending if you go to the top of the waterfall Elevation Gain: 542m to the top of the waterfall Difficulty: 3/10 – easy trail with minimal elevation gain Season: June to mid-October for summer conditions Additional Requirements: N/A DRIVING DIRECTIONS From Calgary: Take the Trans Canada (Hwy 1) west approximately 90 km to the turnoff for Lac Des Arcs (Range Rd 91A). Park in the designated gravel parking lot just south of Hwy 1. From Canmore: Take the Trans Canada (Hwy 1) east 15 km to the turnoff for Lac Des Arcs (Range Rd 91A). Park in the designated gravel parking lot just south of Hwy 1. WHAT TO BRING Comfortable Footwear: Hiking shoes or a good pair of runners. Water: Even though Heart Creek Trail is a short hike it is always a good idea to bring water Snacks: Bring some of your favorite snacks to enjoy along the hike and at the waterfall. Some of our favorite snacks are trail mix, bananas, beef jerky and licorice. Weather appropriate clothing: You will be exposed to the elements throughout this hike. Check the weather forecast and plan accordingly. Sunscreen: If it is sunny and you’re like Mattson, who easily burns, bring sunscreen! Insect Repellent: Insect repellent can greatly improve your hiking experience. Bear Spray: You
For a downloadable PDF version of this guide CLICK HERE!
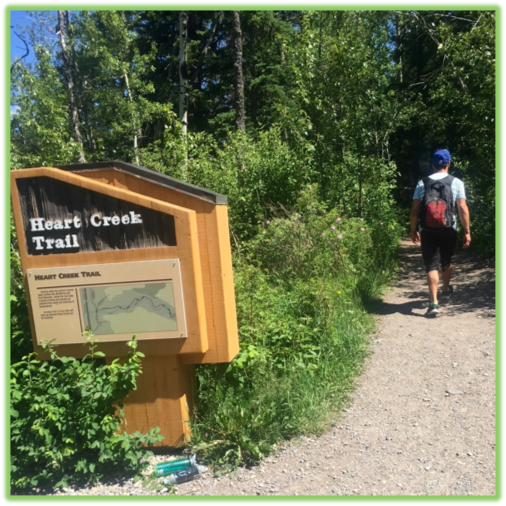
Heart Creek Trail is a popular hike that is suitable for people of all abilities. The hike offers beautiful scenery along an easy walking trail to a waterfall. At the end of the trail if you’re feeling adventurous you can climb into the waterfall canyon or hike to the top of the falls.
ADVENTURE STATISTICS
Time Required: 2-3 Hours
Location: 90km west of Calgary off Hwy 1
Distance: 5-6km round trip depending if you go to the top of the waterfall
Elevation Gain:542m to the top of the waterfall
Difficulty:3/10 – easy trail with minimal elevation gain
Season: June to mid-October for summer conditions
Additional Requirements: N/A
DRIVING DIRECTIONS
From Calgary: Take the Trans Canada (Hwy 1) west approximately 90 km to the turnoff for Lac Des Arcs (Range Rd 91A). Park in the designated gravel parking lot just south of Hwy 1.
From Canmore: Take the Trans Canada (Hwy 1) east 15 km to the turnoff for Lac Des Arcs (Range Rd 91A). Park in the designated gravel parking lot just south of Hwy 1.
WHAT TO BRING
Comfortable Footwear: Hiking shoes or a good pair of runners.
Water: Even though Heart Creek Trail is a short hike it is always a good idea to bring water
Snacks: Bring some of your favorite snacks to enjoy along the hike and at the waterfall. Some of our favorite snacks are trail mix, bananas, beef jerky and licorice.
Weather appropriate clothing: You will be exposed to the elements throughout this hike. Check the weather forecast and plan accordingly.
Sunscreen: If it is sunny and you’re like Mattson, who easily burns, bring sunscreen!
Insect Repellent: Insect repellent can greatly improve your hiking experience.
Bear Spray: You are in bear country. Always hike with bear spray that is easily accessible.
Camera: There are numerous photo opportunities you won’t want to miss.
This Guide: Print a copy of this guide to reference throughout the hike
OTHER CONSIDERATIONS
Wildlife: You will be hiking in bear country. It is always advisable to check in at the local Visitor Information Center to learn of any trail closures due to wildlife. Carry bear spray in an easily accessible location. Travel in groups of multiple hikers and make lots of noise to avoid an unexpected encounter.
Leave No Trace: It is important that we enjoy the outdoors responsibly and sustainably. Some key principles to consider when hiking to “Leave No Trace” are:
Plan ahead and prepare: Proper planning allows adventurers to hike safely while minimizing damage to the land.
Travel on durable surfaces: Stick to the trail when possible. If there is no trail, or you must travel off trail, stay on durable surfaces to reduce your impact.
Dispose of waste properly: Pack it in, pack it out.
Leave what you find: Leave rocks, plants, archaeological artifacts and other objects of interest as you find them.
Respect wildlife: Observe wildlife from a distance. Never feed wild animals.
Be considerate of other visitors: Be courteous to others to allow everyone to enjoy their outdoor experience.
Summary: Heart Creek Trail is an out and back hike that follows a creek to a waterfall. The trail is easy to follow and has minimal elevation gain. Near the waterfall there is a side trail with more elevation that takes you to the top of the waterfall.
Image 1: Heart Creek Trail Adventure Map
Step-By-Step Guide:
From the parking lot (Route marker #1 on the map) follow the clearly marked trail.
Image 2: Heart Creek Trail Trailhead
Take a right at the yellow sign (Route marker #2 on the map) to Heart Creek Canyon and then follow the trail along the creek. The scenic trial is about 2km long and will cross Heart Creek multiple times.
Image 3: The yellow sign (take a right)
Image 4: Heart Creek Canyon
At the end of the trail is a waterfall (Route marker #4 on the map) but it can be difficult to see as it is deep inside the canyon. If you want to get a better view of the waterfall we recommend checking it out from the top of the canyon! From the waterfall canyon backtrack to the last wooden bridge you crossed (Route marker #3 on the map). From there, if you stand on the wooden bridge facing the waterfall canyon, there is a path behind you on the right side that will loop around to the top of the waterfall.
Image 5: Wooden bridges crossing Heart Creek
Follow the trail up to the top of the falls. This is the best place to view and take photos of the waterfall so explore a bit before heading back down to the creek.
If you are feeling adventurous when you arrive back at the creek you can follow it into the canyon to the bottom of the waterfall. We’d recommended that you leave anything electronic or valuable behind before venturing into the canyon as it is very slippery and there is a good chance you will get wet. Be careful of your footing when crossing the floating logs into the canyon as they are not very stable and will move under your feet.
Image 6: Heart Creek Canyon
Image 8: Heart Creek Trail Waterfall
Once you’re inside the canyon you have a good view of the waterfall. You also have the option of going for a very cold swim if you want to get closer!
WE WANT TO HEAR FROM YOU
Thank you for choosing Epic Trip Adventures as your guide. We are committed to continually updating our guides to be as relevant and accurate as possible. If you have feedback to improve this guide please leave it in the comments below.
We also want to hear about your Heart Creek Trail adventures. If you have stories, pictures or even a link to your own adventure video please share them below!
For a downloadable PDF version of this guide If you’re looking for an easy stroll in the outdoors with incredible views and an abundance of lush vegetation, Emerald Pools is the hike for you. The trail is well paved and the minimal elevation gain can be accomplished by anyone. Hiking Emerald Pools is a great chance to get outside and enjoy a taste of what Zion has to offer. ADVENTURE STATISTICS Time Required: 1-2 Hours Trailhead: Zion Lodge Distance: 3.5km (2 miles) round trip Highest Elevation: 1834m (6113ft) Elevation Gain: 60m (200ft) to the Middle Emerald Pool and another 60m (200ft) to the Upper Emerald Pool Difficulty: 4/10 – Minimal elevation gain on a well maintained trail. Season: Year round. Spring and Fall are most pleasant. Summer can be very hot and the waterfalls generally aren’t flowing as strongly. Additional Requirements: N/A DRIVING DIRECTIONS From St. George: Travel on the I-15 North towards Salt Lake City, after 11 km (7 miles) merge onto UT-9 East via exit 16 and travel 20km (12.5 miles) through Hurricane and then up to La Verkin. Take a right turn in La Verkin to continue on the UT-9 East for 32km (20 miles) until you come into Springdale. Follow that same road until you pull up to the Zion park entrance. From Arizona: Travel US-89A North through Fredonia, AZ and Kanab, UT. Follow US-89 to Mount Carmel Junction. Take UT-9 West to Zion’s East Park Entrance. From the North: Travel the I-15 South past Beaver, UT and exit on Hwy 20. Head east until you reach US-89, then head south to the Mount Carmel Junction. Take UT-9 west to Zion’s East Park Entrance. WHAT TO BRING Comfortable Footwear: A good pair of comfortable sneakers is all that
For a downloadable PDF version of this guide CLICK HERE!
If you’re looking for an easy stroll in the outdoors with incredible views and an abundance of lush vegetation, Emerald Pools is the hike for you. The trail is well paved and the minimal elevation gain can be accomplished by anyone. Hiking Emerald Pools is a great chance to get outside and enjoy a taste of what Zion has to offer.
ADVENTURE STATISTICS
Time Required: 1-2 Hours
Trailhead: Zion Lodge
Distance: 3.5km (2 miles) round trip
Highest Elevation: 1834m (6113ft)
Elevation Gain:60m (200ft) to the Middle Emerald Pool and another 60m (200ft) to the Upper Emerald Pool
Difficulty:4/10 – Minimal elevation gain on a well maintained trail.
Season: Year round. Spring and Fall are most pleasant. Summer can be very hot and the waterfalls generally aren’t flowing as strongly.
Additional Requirements: N/A
DRIVING DIRECTIONS
From St. George: Travel on the I-15 North towards Salt Lake City, after 11 km (7 miles) merge onto UT-9 East via exit 16 and travel 20km (12.5 miles) through Hurricane and then up to La Verkin. Take a right turn in La Verkin to continue on the UT-9 East for 32km (20 miles) until you come into Springdale. Follow that same road until you pull up to the Zion park entrance.
From Arizona: Travel US-89A North through Fredonia, AZ and Kanab, UT. Follow US-89 to Mount Carmel Junction. Take UT-9 West to Zion’s East Park Entrance.
From the North: Travel the I-15 South past Beaver, UT and exit on Hwy 20. Head east until you reach US-89, then head south to the Mount Carmel Junction. Take UT-9 west to Zion’s East Park Entrance.
WHAT TO BRING
Comfortable Footwear: A good pair of comfortable sneakers is all that this hike requires.
Water: One bottle of water per hiker should be sufficient as this hike is short and not too strenuous.
Snacks: Bring some of your favorite snacks to enjoy along the hike. Some of our favorites snacks are trail mix, bananas, beef jerky and licorice
Weather appropriate clothing: Temperatures can get up to 40 degrees Celsius (104 Fahrenheit) in the summertime. Shorts, a breathable long sleeve shirt, and a hat can help protect you from the sun and heat. In the winter, the temperature can drop below freezing and it is possible to encounter snow. Check the weather forecast and plan accordingly.
Sunscreen: If it is sunny and you’re like Mattson, who easily burns, bring sunscreen!
Camera: There are numerous photo opportunities you won’t want to miss.
This Guide: Print a copy of this guide to reference throughout the hike
OTHER CONSIDERATIONS
Heat and Dehydration: In Zion National Park, the days can be very hot. Limit sun exposure during the hottest parts of the day. Appropriate clothing such as a hat and long sleeve shirt can protect your skin from the sun as well as reduce the risk of dehydration. The hot weather increases your need for fluid intake. Ensure you are hydrating throughout the day. Don’t wait until you’re thirsty to start drinking water.
Steep Cliffs: Falls from cliffs along the trail have resulted in death. Stay on the trail, stay back from cliff edges and be careful of sand or loose rocks that can make for a slippery surface. Always be aware of your surroundings, especially when you are trying to capture the perfect photo. During the winter months, the trail can be snow and ice covered so be extra careful and wear traction devices on your shoes for extra grip.
Leave No Trace: It is important that we enjoy the outdoors responsibly and sustainably. Some key principles to consider when hiking to “Leave No Trace” are:
Plan ahead and prepare: Proper planning allows adventurers to hike safely while minimizing damage to the land.
Travel on durable surfaces: Stick to the trail when possible. If there is no trail, or you must travel off trail, stay on durable surfaces to reduce your impact.
Dispose of waste properly: Pack it in, pack it out.
Leave what you find: Leave rocks, plants, archaeological artifacts and other objects of interest as you find them.
Respect wildlife: Observe wildlife from a distance. Never feed wild animals.
Be considerate of other visitors: Be courteous to others to allow everyone to enjoy their outdoor experience.
Zion Shuttle System: Emerald Pools is perfect for hikers and adventurers of all levels and abilities. The trail starts at the Zion Lodge and immediately crosses over the Virgin River. The first stop along Emerald Pools Trail in the Lower Pool. From the Lower Pool the trail gains elevation to the Middle Pool and then finally climbs to the Upper Pool.
Image 1: Zion Canyon Line Shuttle Stops
HIKING DIRECTIONS
Summary: Emerald Pools is perfect for hikers and adventurers of all levels and abilities. The trail starts at the Zion Lodge and immediately crosses over the Virgin River. The first stop along Emerald Pools Trail in the Lower Pool. From the Lower Pool the trail gains elevation to the Middle Pool and then finally climbs to the Upper Pool.
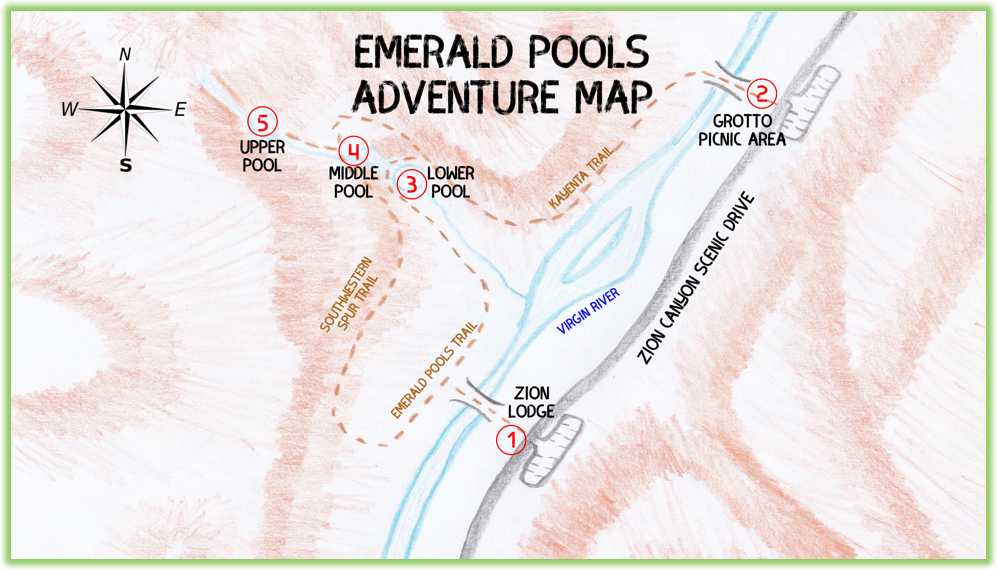
Image 2: Emerald Pools Adventure Map
Step-By-Step Guide:
There are three different possible routes for this hike. Our recommended route, and the route we will describe in this guide begins at the Zion Lodge (Route marker #1 on the map). If the Zion Shuttle service is in operation, this is the fifth stop. If the shuttle is not running, park at the Emerald Pools Parking Lot. Alternatively you can begin this hike at shuttle stop #6 the Grotto Picnic Area (Route marker #2 on the map), and take the Kayenta Trail to the Emerald Pools. This makes the hike around 3-4 hours. The third option is taking the Southwestern Spur Trail from the Zion Lodge straight to Middle Emerald Pools. We do not recommend this route as it bypasses the Lower Emerald Pool, which is our favorite of the three pools. Also the Southwestern Spur Trail is also often closed due to rainfall and flooding. If you wish to take this trail, check in at the Visitors Center first to check if its open. Please respect all trail closure signs as they are there for your safety.
The route description below is from Zion Lodge (Route marker #1 on the map) taking Emerald Pools Trail.
From the trailhead at Zion Lodge follow the trail over the Virgin River and take a right to head northeast on Emerald Pools Trail along the river.
Image 3: Emerald Pools Trailhead
Image 4: Emerald Pools Trail
Emerald Pools Trail is paved and has a very gradual incline. The trail follows the Virgin River with some shade provided by small collonwood trees. After following the trail for about one kilometer, you will reach Lower Emerald Pool (Route marker #3 on the map). The Lower Pool is home to lots of lush, green vegetation growing from the moisture filled rocks. The mist caused from the waterfalls creates a microclimate where plants thrive. In the winter months, the mist freezes, forming icicle branches on the trees, which creates a unique photo opportunity. The trail follows the canyon wall behind the two waterfalls that drain from the Middle Pool and fill the Lower Pool. Be careful in the winter, if the temperature is below freezing, the trail may be slippery with ice.
Image 5: Anderson walking behind the falls at Lower Pool
After wrapping around the Lower Pool the hike starts to get a little bit more challenging. The trail becomes less paved and you begin to gain elevation more rapidly. A rocky staircase along the way helps to ease the sudden elevation increase. The trail loops around to the Middle Pool (Route marker #4 on the map) at the top of the cliff that you just walked under. The Middle Pool supplies the water to the falls viewed previously from Lower Pool. It is small and the least scenic of the three pools but there are good photo opportunities looking back into the main Zion Canyon from this vantage point.
Image 6: Mattson at Middle Pool
The last leg to the Upper Pool (Route marker #5 on the map) is only 450m (0.3 miles) but can be difficult as you have 60m (200ft) in elevation to gain. Whe you arrive at the Upper Pool, you’ll realize that every step was worth it! The Upper Pool sits at the base of a monsterous 300-foot cliff with a waterfall cascading into the pool below. The Spring and Fall are the best times of the year to view the waterfall because it has the highest volume of water. Upper Pool is a great place to find some shade, relax, and have some lunch.
Image 7: Upper Emerald Pool Waterfall
On the return trip you can either follow Emerald Pools Trail back the way you came, or take the Southwestern Spur Trail (if its open) south from Middle Pool to complete a loop and see some different scenery.
WE WANT TO HEAR FROM YOU
Thank you for choosing Epic Trip Adventures as your guide. We are committed to continually updating our guides to be as relevant and accurate as possible. If you have feedback to improve this guide please leave it in the comments below.
We also want to hear about your Emerald Pools adventures. If you have stories, pictures or even a link to your own adventure video please share them below!