For a downloadable PDF version of this guide Gem Lakes is a small grouping of deep, beautiful lakes in central Saskatchewan named after precious stones. A 5.5km hiking trail winds around the lakes providing spectacular views and access to fish, camp, canoe and kayak at the various lakes. ADVENTURE STATISTICS Location: 148km Northeast of Prince Albert Distance: 5.5km round trip Difficulty: 3/10 – Some steep sections along trail Season: June to September for camping Additional Requirements: N/A DRIVING DIRECTIONS From Prince Albert: Head northeast on SK-55 E for 41km to Meath Park and then take a left onto SK-120 N. Take the 120 53 km and then turn left on SK-913. Follow the 913 for 50km and take a left to the Gem Lakes parking lot. WHAT TO BRING Comfortable Footwear: Comfortable sneakers are sufficient for this hike but if you prefer hiking shoes bring those.Bring a pair of flip flops or comfortable sneakers for the evening. Water: Bring enough water for camping and hiking as there are no facilities with water at Gem Lakes. Food: Bring some of your favorite snacks to enjoy during the day as well as food for dinner and breakfast. Some of our favorite snacks are trail mix, bananas, beef jerky and licorice. Camping Gear: Tent, hammock, sleeping bag, axe/hatchet and fire-starting tools. Fishing Rod: The lakes are stocked and a great place to enjoy some fishing. Kayak/Canoe: Gem Lakes is a perfect place for paddling. Toilet paper: The only outhouse is at the parking area and there is no guarantee there will be toilet paper. Weather appropriate clothing: Check the weather forecast and plan accordingly. Bring some warm clothes to change into in the evening. Swimming attire: The lakes are chilly but it can be nice to take a refreshing dip. Sunscreen: If it is sunny and
For a downloadable PDF version of this guide CLICK HERE!
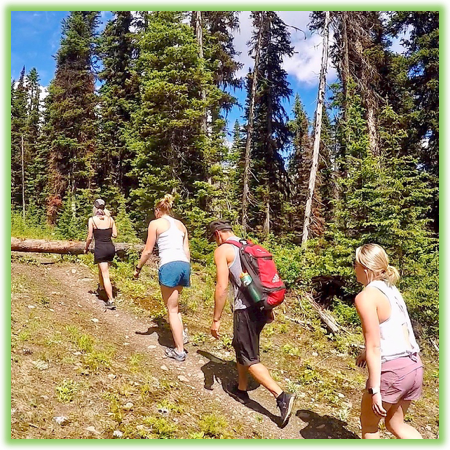
Gem Lakes is a small grouping of deep, beautiful lakes in central Saskatchewan named after precious stones. A 5.5km hiking trail winds around the lakes providing spectacular views and access to fish, camp, canoe and kayak at the various lakes.
ADVENTURE STATISTICS
Location: 148km Northeast of Prince Albert
Distance:5.5km round trip
Difficulty:3/10 – Some steep sections along trail
Season: June to September for camping
Additional Requirements: N/A
Image 1: Gem Lakes
DRIVING DIRECTIONS
From Prince Albert: Head northeast on SK-55 E for 41km to Meath Park and then take a left onto SK-120 N. Take the 120 53 km and then turn left on SK-913. Follow the 913 for 50km and take a left to the Gem Lakes parking lot.
WHAT TO BRING
Comfortable Footwear: Comfortable sneakers are sufficient for this hike but if you prefer hiking shoes bring those.Bring a pair of flip flops or comfortable sneakers for the evening.
Water: Bring enough water for camping and hiking as there are no facilities with water at Gem Lakes.
Food: Bring some of your favorite snacks to enjoy during the day as well as food for dinner and breakfast. Some of our favorite snacks are trail mix, bananas, beef jerky and licorice.
Camping Gear: Tent, hammock, sleeping bag, axe/hatchet and fire-starting tools.
Fishing Rod: The lakes are stocked and a great place to enjoy some fishing.
Kayak/Canoe: Gem Lakes is a perfect place for paddling.
Toilet paper: The only outhouse is at the parking area and there is no guarantee there will be toilet paper.
Weather appropriate clothing: Check the weather forecast and plan accordingly. Bring some warm clothes to change into in the evening.
Swimming attire: The lakes are chilly but it can be nice to take a refreshing dip.
Sunscreen: If it is sunny and you’re like Mattson, who easily burns, bring sunscreen!
Insect Repellent: Insect repellent can greatly improve your hiking/camping experience.
Bear Spray: You are in bear country. Always hike with bear spray that is easily accessible.
Camera: The lakes are beautiful and there are numerous photo opportunities you won’t want to miss.
This Guide: Print a copy of this guide to reference.
OTHER CONSIDERATIONS
Wildlife: You will be camping in bear country. Carry bear spray in an easily accessible location. Travel in groups of multiple hikers and make lots of noise to avoid an unexpected encounter.
Leave No Trace: It is important that we enjoy the outdoors responsibly and sustainably. Some key principles to consider when hiking to “Leave No Trace” are:
Plan ahead and prepare: Proper planning allows adventurers to hike safely while minimizing damage to the land.
Travel on durable surfaces: Stick to the trail when possible. If there is no trail, or you must travel off trail, stay on durable surfaces to reduce your impact.
Dispose of waste properly: Pack it in, pack it out.
Leave what you find: Leave rocks, plants, archaeological artifacts and other objects of interest as you find them.
Respect wildlife: Observe wildlife from a distance. Never feed wild animals.
Be considerate of other visitors: Be courteous to others to allow everyone to enjoy their outdoor experience.
Summary: Gem Lakes is a fantastic place to camp but can also be enjoyed as a leisurely day hike. The trail winding around the lakes is 5.5km with some short steep sections. There are three camping areas along the trail with a fire pits and picnic benches.
Image 2: Gem Lakes Adventure Map
There are three official camping areas. One at Jade Lake (Route Marker #1 on the map), one at Diamond Lake (Route Marker #2 on the map). and one at Opal Lake (Route Marker #3 on the map). They are 150m, 1km and 1.5km from the parking area respectively. We would recommend camping at Diamond or Opal lake as they are less busy and trafficked than Jade Lake. That being said, if you have a lot of camping stuff to carry in, Jade Lake is very close to the parking area so you won’t have far to carry your gear.
Image 3: The Diamond Lake Campsite
Image 4: Starting our fire
Other Tips:
Check if there are any fire bans. If there are you may have to adjust your meal plan.
The only outhouse is at the parking area. Be sure to use it before heading out to hike and camp.
If camping over the weekend get there early Friday so you can get a camping spot before they are taken.
When hiking around the lakes there are signs with interesting information and history on the area
Image 5: Anderson enjoying the view
Image 6: A Loon at Little Jade Lake
WE WANT TO HEAR FROM YOU
Thank you for choosing Epic Trip Adventures as your guide. We are committed to continually updating our guides to be as relevant and accurate as possible. If you have feedback to improve this guide please leave it in the comments below.
We also want to hear about your Gem Lakes adventures. If you have stories, pictures or even a link to your own adventure video please share them below!
For a downloadable PDF version of this guide McCloud Falls is a fun place for the whole family and is only 30 minutes east of the town of Mount Shasta. It’s a great daily getaway location for locals, and it’s not too far off the main drag if you’re driving through. McCloud Falls is a short 4 mile hike along the stunning McCloud River. It includes three different waterfalls and there is a campground if you plan to stay for more than a day. If you’re driving south on the I-5, you have to make the stop at McCloud Falls and enjoy the scenery. ADVENTURE STATISTICS Time Required: 2 Hours Location: 25 miles east of Mount Shasta Distance: 4 miles return trip (can be hiked or driven) Highest Elevation: 300 feet Difficulty: 3/10 Season: May to October are ideal, but McCloud Falls can be visited year-round Additional Requirements: N/A DRIVING DIRECTIONS From Mt Shasta: Head south on Mt. Shasta Blvd, take a left on CA-89 (Volcanic Legacy Scenic Byway) and follow that highway for 15.5 miles. Take a right off that highway onto Fowler’s Public Camp Rd. You will see a sign saying “Fowler/Lower Falls” on the highway. Follow it for about a mile down to the Lower Falls parking lot. There will be signs directing you to the Upper and Middle Falls if you want to drive to them from Lower Falls. WHAT TO BRING Comfortable Footwear: Always nice to have comfortable footwear. Water: In the summer months this area can be very warm. It is important to stay hydrated. Snacks: Bring some of your favorite snacks to enjoy along the hike as well as a light lunch for when you arrive at the falls. Some of our favorite snacks are trail mix, bananas, beef jerky and licorice. Weather appropriate
For a downloadable PDF version of this guide CLICK HERE!
McCloud Falls is a fun place for the whole family and is only 30 minutes east of the town of Mount Shasta. It’s a great daily getaway location for locals, and it’s not too far off the main drag if you’re driving through. McCloud Falls is a short 4 mile hike along the stunning McCloud River. It includes three different waterfalls and there is a campground if you plan to stay for more than a day. If you’re driving south on the I-5, you have to make the stop at McCloud Falls and enjoy the scenery.
ADVENTURE STATISTICS
Time Required: 2 Hours
Location: 25 miles east of Mount Shasta
Distance: 4 miles return trip (can be hiked or driven)
Highest Elevation:300 feet
Difficulty:3/10
Season: May to October are ideal, but McCloud Falls can be visited year-round
Additional Requirements: N/A
Image 1: Mattson at Middle Falls
DRIVING DIRECTIONS
From Mt Shasta: Head south on Mt. Shasta Blvd, take a left on CA-89 (Volcanic Legacy Scenic Byway) and follow that highway for 15.5 miles. Take a right off that highway onto Fowler’s Public Camp Rd. You will see a sign saying “Fowler/Lower Falls” on the highway. Follow it for about a mile down to the Lower Falls parking lot. There will be signs directing you to the Upper and Middle Falls if you want to drive to them from Lower Falls.
WHAT TO BRING
Comfortable Footwear: Always nice to have comfortable footwear.
Water: In the summer months this area can be very warm. It is important to stay hydrated.
Snacks: Bring some of your favorite snacks to enjoy along the hike as well as a light lunch for when you arrive at the falls. Some of our favorite snacks are trail mix, bananas, beef jerky and licorice.
Weather appropriate clothing: If it’s a hot day, bring a swim suit. If you like cliff jumping, bring some water shoes to break the surface tension of the water. The Middle Falls is a great location for cliff jumping and usually quite popular in the summer.
Beer: Beer and a lawn chair. It isn’t uncommon to see people unfold a lawn chair and crack a cold one on the rocks at the Lower Falls. It’s a great place to relax and spend time with friends and family.
Sunscreen: If it is sunny and you’re like Mattson, who easily burns, bring sunscreen!
Insect Repellent: Insect repellent can greatly improve your hiking experience.
Bear Spray: You are in bear country. Always hike with bear spray that is easily accessible.
Camping Gear: If you plan on camping, bring a tent, sleeping bag, cooking gear etc.
Camera: There are numerous photo opportunities you won’t want to miss.
This Guide: Print a copy of this guide to reference throughout the hike
OTHER CONSIDERATIONS
Wildlife: You will be hiking in bear country. It is always advisable to check in at the local Visitor Information Center to learn of any trail closures due to wildlife. Carry bear spray in an easily accessible location. Travel in groups of multiple hikers and make lots of noise to avoid an unexpected encounter.
Camping Permits: Fowlers Campground has a ton of very well kept campsites with lots of activities and amenities in the area. Here is a link if you’d like to book a spot.
Leave No Trace: It is important that we enjoy the outdoors responsibly and sustainably. Some key principles to consider when hiking to “Leave No Trace” are:
Plan ahead and prepare: Proper planning allows adventurers to hike safely while minimizing damage to the land.
Travel on durable surfaces: Stick to the trail when possible. If there is no trail, or you must travel off trail, stay on durable surfaces to reduce your impact.
Dispose of waste properly: Pack it in, pack it out.
Leave what you find: Leave rocks, plants, archaeological artifacts and other objects of interest as you find them.
Respect wildlife: Observe wildlife from a distance. Never feed wild animals.
Be considerate of other visitors: Be courteous to others to allow everyone to enjoy their outdoor experience.
Summary: McCloud falls is a very straightforward hike easy enough for anyone to enjoy. Our guide outlines the hike starting from Lower Falls, and continuing to both Middle and Upper Falls. Alternatively, there are roads with parking lots at each falls, so another option is to drive to each of the falls separately.
Image 2: McCloud Falls Adventure Map
Step-By-Step Guide:
This hike is very easy, straightforward and can be done by almost all skill level of hiker. Starting at the Lower Falls (Route marker #1 on the map), follow the paved trail up along the river. You will pass the Fowler’s Campground Area and the paved trail will end and turn into a dirt trail. The distance between the Lower and Middle Falls is roughly one mile. Depending on your adventurousness/skill level, you could also rock hop your way along the river from the Lower Falls to the Middle Falls.
Image 3: Lower Falls
In our opinion, the Middle Falls (Route marker #2 on the map) is the most exciting of the three. At about 50 feet high and twice that in width, Middle Falls is the biggest by far. This is a great location for a swim on a hot day, or to go cliff jumping if you’re looking for an adrenaline rush. Always make sure to check the depth of the water before cliff jumping! In the winter months it is too cold to swim but the falls are still very worth checking out. Middle Falls can be viewed from the lookout point up top, or you can make your way down a steep trail to view the falls closer up. Both areas provide spectacular vantage points.
Image 4: Middle Falls
Image 5: Bird’s-eye View of Middle Falls
Upper Falls can be reached by following the railing from the lookout point at Middle Falls. Along the way you will hike through some trees and be treated to views of the McCloud River Canyon below. As you hike, look back towards the Northwest and you may be able to catch a glimpse of Mount Shasta poking through the trees. After about 10-15 minutes, you will come to the Upper Falls pouring out of a narrow gorge into a pool below (Route marker #3 on the map). The pool is surrounded by immense rock walls on either side. The Upper Falls and river gorge can also be viewed from above as you continue following the trail.
Image 6: Upper Falls
This is a very straightforward hike easy enough for anyone to enjoy. There is also the option to drive to and from each of the falls, and there are wheelchair accessible paths from each parking lot to the waterfall lookout points. In the summer months the falls can be busy and it can be difficult to find parking. This makes making the hike between the falls the more attractive option.
Whichever way you choose to experience McCloud Falls, we hope you enjoy it, and we hope this guide helps you along the way!
WE WANT TO HEAR FROM YOU
Thank you for choosing Epic Trip Adventures as your guide. We are committed to continually updating our guides to be as relevant and accurate as possible. If you have feedback to improve this guide please leave it in the comments below.
We also want to hear about your McCloud Falls adventures. If you have stories, pictures or even a link to your own adventure video please share them below!
The Four Peak Challenge, also known as the Canmore Quad, consists of running/walking up the 4 main peaks surrounding Canmore. The peaks are Grotto Mountain, Mount Lady MacDonald, East End of Rundle, and Ha Ling Peak. To add to the difficulty, you must start and finish in the town of Canmore and can only travel on foot between the mountains! In total, this amounts to around 57km with 4800m elevation! ADVENTURE STATISTICS Time Required: Must be completed in one day Location: Canmore, Alberta Distance: 57km Highest Elevation: 2706m Elevation Gain: 4800m Difficulty: 10/10 – Extreme elevation gain and distance! Season: June when there is the most daylight Additional Requirements: Serious physical and mental preparation 4 Peak Challenge Rules To officially complete the 4 Peak Challenge you must follow the below rules: The start and finish point is at the Georgetown Inn in Canmore The challenge must be finished before midnight (completed in one day) You must summit and take a photo at the top of Grotto Mountain, Mount Lady Macdonald, East End of Rundle and Ha Ling Peak You can only travel by foot between the mountains Our Route Although there are no rules on which order you must complete the summits, most people begin with Grotto Mountain and end with Ha Ling. In total the 4 Peak Challenge took us 18 hours and 24 minutes. Our goal was simply to complete this challenge but if you want to go for a record the fastest time recorded is 9 hours and 14 minutes.... which is insane! Starting from the Georgetown Inn (Route marker #1 on the map) we ran through town and along the Horseshoe Trails to the Alpine Club of Canada. From there we headed up Grotto Mountain to the summit (Route marker #2 on the map).
The Four Peak Challenge, also known as the Canmore Quad, consists of running/walking up the 4 main peaks surrounding Canmore. The peaks are Grotto Mountain, Mount Lady MacDonald, East End of Rundle, and Ha Ling Peak. To add to the difficulty, you must start and finish in the town of Canmore and can only travel on foot between the mountains! In total, this amounts to around 57km with 4800m elevation!
ADVENTURE STATISTICS
Time Required: Must be completed in one day
Location: Canmore, Alberta
Distance: 57km
Highest Elevation:2706m
Elevation Gain:4800m
Difficulty:10/10 – Extreme elevation gain and distance!
Season: June when there is the most daylight
Additional Requirements: Serious physical and mental preparation
4 Peak Challenge Rules
To officially complete the 4 Peak Challenge you must follow the below rules:
The start and finish point is at the Georgetown Inn in Canmore
The challenge must be finished before midnight (completed in one day)
You must summit and take a photo at the top of Grotto Mountain, Mount Lady Macdonald, East End of Rundle and Ha Ling Peak
You can only travel by foot between the mountains
Our Route
Although there are no rules on which order you must complete the summits, most people begin with Grotto Mountain and end with Ha Ling. In total the 4 Peak Challenge took us 18 hours and 24 minutes. Our goal was simply to complete this challenge but if you want to go for a record the fastest time recorded is 9 hours and 14 minutes…. which is insane!
Image 1: 4 Peak Challenge Adventure Map
Starting from the Georgetown Inn (Route marker #1 on the map) we ran through town and along the Horseshoe Trails to the Alpine Club of Canada. From there we headed up Grotto Mountain to the summit (Route marker #2 on the map).
From Grotto Mountain we descended the same trail we went up and cut back through the Horseshoe Trails to the Lady Macdonald Trail Head. There are many trails between the two mountains but to shave off a few kilometres we took the furthest west one. The hike to the top of Lady Macdonald is a well beaten trail until the top of the ridge where there is a very sketchy ridge walk to reach the true summit of Mount Lady MacDonald (Route marker #3 on the map).
After completing Lady Macdonald we ran back through town, stopped for lunch, and then began the long trek to the East End of Rundle. We cut through downtown, across the Bow River on the Canmore Engine Bridge, and up to Three Sisters Parkway (742) near the Canmore Nordic Centre. From there it was a long run/walk along the Three Sisters Parkway to reach the trailhead to the East End of Rundle.
Note: We cut through Grassi Lakes on the way up, but it probably would have been faster to just stay on the road.
Both the East End of Rundle (Route marker #4 on the map) and Ha Ling Peak (Route marker #5 on the map) are popular well trodden hikes. We did EEOR first and then Ha Ling Peak as our last summit of the day.
After Ha Ling it was a long jog back down the Three Sister Parkway (742) and through Canmore to the Georgetown Inn where we completed the challenge with 6 minutes to spare!
WE WANT TO HEAR FROM YOU
Thank you for choosing Epic Trip Adventures as your guide. We are committed to continually updating our guides to be as relevant and accurate as possible. If you have feedback to improve this guide please leave it in the comments below.
If you’ve attempted the 4 Peak Challenge, we want to hear about it. If you have stories, pictures or even a link to your own adventure video please share them below!
For a downloadable PDF version of this guide The hike into Waimanu Valley is nothing less than exhilarating and is by far the most challenging hike we have done on the Big Island. Waimanu Valley is incredibly lush with waterfalls cascading down its green slopes and ocean waves crashing on the rocky shore. Sleeping in Waimanu is a camping experience well worth the grueling hike to get there! ADVENTURE STATISTICS Time Required: 2 days+ Location: Kohala Forest Reserve, 50 miles northwest of Hilo Distance: 19 miles (30.5km) round trip Highest Elevation: 1394ft (425m) Elevation Gain: 5250ft (1600m) round trip Difficulty: 9/10 – Rapid elevation gain, long and exhausting, can be very slippery if wet. Season: Year Round Additional Requirements: DLNR Camping Permit DRIVING DIRECTIONS From Kailua-Kona: Take the Hawaii Belt Rd North for 53 miles to the town of Honokaa. Turn left onto Plumeria St, follow it for 0.7 miles and then turn left onto HI-240/Honokaa-Waipio Rd. This road will take you to the parking lot at Waipio Lookout. From Hilo: Take the Hawaii Belt Rd North 39 miles to HI-240/Honokaa-Waipio Rd. Take a right onto the 240 and follow it to the parking lot at Waipio Lookout. WHAT TO BRING Comfortable Footwear: Hiking shoes.Make sure your shoes are broken in prior to tackling this hike to prevent unexpected blisters. You could get away with running shoes but this trail can become very slippery with the slightest rain so some hefty hikers might be your best bet. Pack an extra pair of light shoes or sandals for when you arrive at your campsite as you will want to get out of your hikers and walk around a bit. You may also want to consider bringing water shoes/sandals. There are two large streams that must be crossed by foot. You can
For a downloadable PDF version of this guide CLICK HERE!
The hike into Waimanu Valley is nothing less than exhilarating and is by far the most challenging hike we have done on the Big Island. Waimanu Valley is incredibly lush with waterfalls cascading down its green slopes and ocean waves crashing on the rocky shore. Sleeping in Waimanu is a camping experience well worth the grueling hike to get there!
ADVENTURE STATISTICS
Time Required: 2 days+
Location: Kohala Forest Reserve, 50 miles northwest of Hilo
Distance: 19 miles (30.5km) round trip
Highest Elevation: 1394ft (425m)
Elevation Gain:5250ft (1600m) round trip
Difficulty:9/10 – Rapid elevation gain, long and exhausting, can be very slippery if wet.
Season: Year Round
Additional Requirements: DLNR Camping Permit
DRIVING DIRECTIONS
From Kailua-Kona: Take the Hawaii Belt Rd North for 53 miles to the town of Honokaa. Turn left onto Plumeria St, follow it for 0.7 miles and then turn left onto HI-240/Honokaa-Waipio Rd. This road will take you to the parking lot at Waipio Lookout.
From Hilo: Take the Hawaii Belt Rd North 39 miles to HI-240/Honokaa-Waipio Rd. Take a right onto the 240 and follow it to the parking lot at Waipio Lookout.
WHAT TO BRING
Comfortable Footwear: Hiking shoes.Make sure your shoes are broken in prior to tackling this hike to prevent unexpected blisters. You could get away with running shoes but this trail can become very slippery with the slightest rain so some hefty hikers might be your best bet. Pack an extra pair of light shoes or sandals for when you arrive at your campsite as you will want to get out of your hikers and walk around a bit. You may also want to consider bringing water shoes/sandals. There are two large streams that must be crossed by foot. You can either remove your shoes and go barefoot, or pack some water shoes/sandals. Be aware that the streams are full of slippery rocks and it can be hard on your feet if you choose to go barefoot.
Water: This hike is long with intervals of very intense elevation gain. If the sun is out, you will sweat a lot so bring plenty of water. It is also important to bring water purification tablets or a water filter pump. There are plenty of places to refill water along the trail and there is a freshwater stream near the campsites but you MUST purify the water!
Food: Plan your meals based on the amount of days you will stay in Waimanu Valley. There are campfires at each campsite or you can bring a camping stove to cook your food. Don’t forget to bring snacks to enjoy along the hike as well. Some of our favorite snacks are trail mix, bananas, beef jerky and licorice.
Weather appropriate clothing: You will be exposed to the elements throughout this hike. Waimanu is in the rainforest so there is a good chance you will be rained on at some point. Bring tarps, rain coats, and possibly a few changes of clothes. If you get a sunny day, light breathable clothing is your best bet as it is Hawaii and it can get pretty hot. Check the weather forecast and plan accordingly.
Games/Entertainment: Bring playing cards or other small compact games for entertainment at the campsite in the evening.
Lighter/matches: If you want to have a campfire make sure you remember to bring a lighter or some matches.
Sunscreen:If it is sunny and you’re like Mattson, who easily burns, bring sunscreen!
Insect Repellent: Insect repellent can greatly improve your hiking experience.
Headlamp/Flashlight: Once the sun goes down in the valley it gets very dark! be sure you have a flashlight or headlamp to find your way around.
Toilet paper: Overnight trip… enough said
Camera: There are numerous photo opportunities you won’t want to miss.
This Guide: Print a copy of this guide to reference throughout the hike
OTHER CONSIDERATIONS
Flash Floods: This area of the Big Island receives over 100 inches of rain annually. Heavy rains can cause flash floods in streams and rivers. If there is flooding and fast moving water, attempting to cross streams and rivers can be very dangerous and potentially fatal.
Parking: Cars parked at the Waipio Valley Lookout for more than 24 hours may be towed. Parking is available at Waipio Valley Artworks for $20 a day. Call them ahead of time at 808-775-0958.
Permits: All campers must register for and purchase a camping permit to stay in Waimanu Valley. Permits can be reserved up to a month in advance and cost 18$/night for up to 6 people (12$/night for Hawaii residents). There are nine campsites to choose from. They are labelled 1-9 running east to west. We would recommend campsites 6-9 as they are closer to the sandy section of the beach and are more private.
Purchase a permit at the Department of Land and Natural Resources camping permit website (https://camping.ehawaii.gov/camping/all,details,31720.html).
Leave No Trace: It is important that we enjoy the outdoors responsibly and sustainably. Some key principles to consider when hiking to “Leave No Trace” are:
Plan ahead and prepare: Proper planning allows adventurers to hike safely while minimizing damage to the land.
Travel on durable surfaces: Stick to the trail when possible. If there is no trail, or you must travel off trail, stay on durable surfaces to reduce your impact.
Dispose of waste properly: Pack it in, pack it out.
Leave what you find: Leave rocks, plants, archaeological artifacts and other objects of interest as you find them.
Respect wildlife: Observe wildlife from a distance. Never feed wild animals.
Be considerate of other visitors: Be courteous to others to allow everyone to enjoy their outdoor experience.
Summary: The 19-mile round trip hike to Waimanu Valley begins at the Waipio Valley lookout and starts with a steep, short walk down into the valley. The trail to Waimanu Valley, also known as the Muliwai Trail, begins across the black sand beach at the west wall of Waipio Valley. The Muliwai trail ascends the steep west wall of the valley and then traverses 13 gullies before descending into Waimanu Valley. Waimanu Valley has 9 designated camping spots that are just off the beach. Once in Waimanu you can take a bonus side trip into the heart of the valley to check out Wai’ilikahi Falls.
Image 1: Waimanu Valley Adventure Map
Step-By-Step Guide:
Take a couple of minutes to soak in the views at the Waipio Valley Lookout (Route marker #1 on the map) before you begin your trek down the paved road into the valley. The road down is very steep and walking down it can be hard on the legs. Stick your thumb out as you descend and maybe if you’re lucky someone will let you jump in the back of their pickup. Once you get to the bottom of the valley turn right and follow the dirt road to the beach.
Image 2: Waipio Valley
Image 3: The descent into Waipio
Once you reach the beach, head west across the valley. You will have to cross a large stream blocking your path as you head west. We recommend taking your shoes off to keep them dry, or switching to water shoes if you have them. Be careful as there are large, slippery rocks in the water that make the footing difficult. After you cross the river, the warm sand on your feet feels nice as you walk along the beach to the west wall of the valley.
Image 4: Anderson crossing the river
From the beach you can see the large Z pattern cut out of the west side of the valley in front of you. That is the first part of Muliwai Trail (they call this part the Z-trail) that takes you out of Waipio Valley. There is a trail just south of the beach that runs parallel to the ocean that will take you to the start of the Muliwai Trail.
Image 5: The west wall of Waipio Valley
Image 6: The trail parallel to the ocean
Walk on the trail behind the beach until you reach a sign and gate. Do not go through the gate. To the right of the gate is a sign and the trailhead for then Muliwai Trail (Route marker #2 on the map).
The first section of the Muliwai trail is the most challenging part of the entire hike. You will ascend about 1200 feet of elevation up long steep switchbacks. Take your time as you ascend and enjoy the spectacular views. On a clear day, you can see deep into the heart of Waipio Valley and catch a glimpse of a massive waterfall called Hi’ilawe Falls.
Image 7: The beginning of the Muliwai Trail
Image 8: View from the top of the switchbacks
Once you’re at the top of the Z-trail and out of Waipio Valley the hike gets much easier. It is about 5-miles to Waimanu Valley from here and along the way there will be boulder hopping, stream crossings, and gully dipping. There are 13 gullies that you will dip in and out of. Some are big, some small, some have waterfalls, and some are dry. Gully number seven is our personal favorite because it has a nice spot to stop for a refreshing swim. Try to keep count of the gullies so you know approximately how much futher you have to go. There are also some State of Hawaii mile markers along the trail.
Image 9: A waterfall along the trail
After 5 miles you will reach the final descent into Waimanu Valley. Take extra care on this section of the hike as the trail is narrow and can be VERY slippery! Once you reach the valley floor you will have one final stream to cross before you reach the camping area (Route marker #3 on the map). There is a rope running perpendicular to the river that can be used for guidance and stability. Once again, be careful when crossing the river as the rocks are slippery.
Camping:
The campsites are labelled 1-9 from east to west. There are also two outhouses that you can use. If you need to refill water the trail continues past campsite 9 to a small waterfall on the west wall of Waimanu Valley. Be sure to purify this water before drinking it!
Image 10: Waimanu Valley Camping Map
Image 11: Setting up our campsite
Image 12: The water source
Wai’ilikahi Falls:
If you’re eager for more adventure and have time to spend in the valley, you can hike to Wai’ilikahi Falls (Route marker #4 on the map).This hike is about an hour each way but isn’t very well marked or maintained. There is a lot of bush whacking and trail finding necessary, plus you will be walking through tons of spider webs.
The trail to Wai’ilikahi Falls heads from campsite 9 inland along the west wall of the valley. Follow the trail to the small water source near the campsites and then keep going. There are colored markers tied to the trees marking the best way to the falls but they can be difficult to find. If you get lost, the valley wall should be on your right and if you follow that wall long enough you will eventually reach Wai’ilikahi Falls. When you’re about ten minutes from the falls you will come to a stream on your left. Keep it on your left and follow it upstream to the falls.
Image 13: Markers showing the best path to the falls
Image 14: Wai’ilikahi Falls
After enjoying your stay in Waimanu Valley it is time for the challenging hike back to the Waipio Valley Lookout. Follow the Muliwai Trail back to Waipio Valley the same way you came. Be sure to leave some extra energy in the tank because the hike up the east wall of Waipio Valley is brutal!
WE WANT TO HEAR FROM YOU
Thank you for choosing Epic Trip Adventures as your guide. We are committed to continually updating our guides to be as relevant and accurate as possible. If you have feedback to improve this guide please leave it in the comments below.
We also want to hear about your Waimanu Valley adventures. If you have stories, pictures or even a link to your own adventure video please share them below!
For a downloadable PDF version of this guide Valencia Peak Trail is located on the central coast of California in Montana De Oro State Park. It is a doable hike for most skill levels and rewards successful hikers with panoramic views of the coastline. If you look north from the summit, you can see all the way to Morro Bay and catch a glimpse of Morro Rock. ADVENTURE STATISTICS Time Required: 2-3 Hours Location: 5 miles south of Los Osos, CA Distance: 4.5 mile (7.2km) round Highest Elevation: 1347ft (410m) Elevation Gain: 1275ft (388m) Difficulty: 5/10 – elevation gain Season: Year Round Additional Requirements: N/A DRIVING DIRECTIONS From Los Osos: Head West on Foothills Blvd. Turn right on Los Osos Valley Rd and follow for 8.5 miles. At mile 7 you will need to stay left to remain on Los Osos Valley Rd. Continue onto Pecho Valley Rd for another 3.8 miles. You will reach a parking lot at the Montana De Oro State Park. Park 100 yards further in a small lot at the Valencia Peak Trailhead. WHAT TO BRING Comfortable Footwear: Hiking shoes.Make sure your shoes are broken in prior to tackling this hike to prevent unexpected blisters. You could get away with running shoes but having extra grip on the rock surfaces will definitely come in handy! Water: This hike is long, exposed to the hot sun and has lots of elevation gain. Be sure to bring enough water for 2-3 hours of physical exertion. Snacks: Bring some of your favorite snacks to enjoy along the hike as well as a light lunch for when you arrive at the summit. Some of our favorite snacks are trail mix, bananas, beef jerky and licorice. Weather appropriate clothing: You will be exposed to the elements throughout this hike. Check the weather forecast
For a downloadable PDF version of this guide CLICK HERE!
Valencia Peak Trail is located on the central coast of California in Montana De Oro State Park. It is a doable hike for most skill levels and rewards successful hikers with panoramic views of the coastline. If you look north from the summit, you can see all the way to Morro Bay and catch a glimpse of Morro Rock.
ADVENTURE STATISTICS
Time Required: 2-3 Hours
Location: 5 miles south of Los Osos, CA
Distance: 4.5 mile (7.2km) round
Highest Elevation: 1347ft (410m)
Elevation Gain:1275ft (388m)
Difficulty:5/10 – elevation gain
Season: Year Round
Additional Requirements: N/A
DRIVING DIRECTIONS
From Los Osos: Head West on Foothills Blvd. Turn right on Los Osos Valley Rd and follow for 8.5 miles. At mile 7 you will need to stay left to remain on Los Osos Valley Rd. Continue onto Pecho Valley Rd for another 3.8 miles. You will reach a parking lot at the Montana De Oro State Park. Park 100 yards further in a small lot at the Valencia Peak Trailhead.
WHAT TO BRING
Comfortable Footwear: Hiking shoes.Make sure your shoes are broken in prior to tackling this hike to prevent unexpected blisters. You could get away with running shoes but having extra grip on the rock surfaces will definitely come in handy!
Water: This hike is long, exposed to the hot sun and has lots of elevation gain. Be sure to bring enough water for 2-3 hours of physical exertion.
Snacks: Bring some of your favorite snacks to enjoy along the hike as well as a light lunch for when you arrive at the summit. Some of our favorite snacks are trail mix, bananas, beef jerky and licorice.
Weather appropriate clothing: You will be exposed to the elements throughout this hike. Check the weather forecast and plan accordingly.
Sunscreen: If it is sunny and you’re like Mattson, who easily burns, bring sunscreen!
Insect Repellent: Insect repellent can greatly improve your hiking experience.
Camera: There are numerous photo opportunities you won’t want to miss.
This Guide: Print a copy of this guide to reference throughout the hike
OTHER CONSIDERATIONS
Leave No Trace: It is important that we enjoy the outdoors responsibly and sustainably. Some key principles to consider when hiking to “Leave No Trace” are:
Plan ahead and prepare: Proper planning allows adventurers to hike safely while minimizing damage to the land.
Travel on durable surfaces: Stick to the trail when possible. If there is no trail, or you must travel off trail, stay on durable surfaces to reduce your impact.
Dispose of waste properly: Pack it in, pack it out.
Leave what you find: Leave rocks, plants, archaeological artifacts and other objects of interest as you find them.
Respect wildlife: Observe wildlife from a distance. Never feed wild animals.
Be considerate of other visitors: Be courteous to others to allow everyone to enjoy their outdoor experience.
Summary: The starting point for this hike is in Montana De Oro State Park near Spooner’s Cove (Route marker #2 on the map). The trail to the summit of Valencia Peak is well maintained and marked so there will be no issues finding your way to the summit.
Image 1: Valencia Peak Adventure Map
Morro Bay:
We highly recommend making a pit stop at Morro Bay (Route marker #1 on the map) on the way to Valencia Peak. Morro Bay is about 5 minutes North of Los Osos and is a quaint little fishing town that is worth checking out!
Image 2: The Morro Rock
Image 3: A small seafood restaurant in Morro Bay
Valencia Peak Step-By-Step Guide:
The Valencia Peak trailhead is at a small parking lot just south of Spooner’s Cove (Route marker #2 on the map)and the Montana De Oro State Park Visitors Center. From the parking area, the trail heads inland towards a large pyramid shaped peak. This trail is well trafficked, well marked and should be easy for you to follow.
Image 4: The Valencia Peak Trailhead
Image 5: The trail up Valencia Peak
After following the trail for about a half mile, you will begin gaining elevation up a series switchbacks. There is a consistent elevation up this leg of the journey. You will come to a junction with Badger Trail at 1.15 miles but the intersection is well signed to direct you onward to Valencia Peak. Once you reach the summit, relax at the picnic table and enjoy the coastal views.
Image 6: Mattson and Noelle at the summit of Valencia Peak
The hike down from the peak is substantially easier and the view out to the ocean is beautiful. Once you reach the parking lot at the bottom, be sure to check out Spooner’s Cove (Route marker #2 on the map). It is a small bay at the entrance to Montana De Oro State Park with big rocks and bluffs to walk along. Spooner’s Cove is a great place to watch the sunset and we recommend planning your day to be here at that time.
Image 7: Anderson in Spooner’s Cove
Image 7: Spooner’s Cove
WE WANT TO HEAR FROM YOU
Thank you for choosing Epic Trip Adventures as your guide. We are committed to continually updating our guides to be as relevant and accurate as possible. If you have feedback to improve this guide please leave it in the comments below.
We also want to hear about your Valencia Peak adventures. If you have stories, pictures or even a link to your own adventure video please share them below!
For a downloadable PDF version of this guide Tent Ridge is one of our favorite hikes in the Kananaskis area! It’s an 11km loop trail that is both challenging for beginner hikers and difficult enough for those with more experience. This hike has it all, from ridge walks and forest trails to scrambling up rocks and sliding down snow. To top it all off, the views from the summit are absolutely breathtaking. ADVENTURE STATISTICS Time Required: 4-5 Hours Location: 100km west of Calgary Distance: 11km round trip Highest Elevation: 2540m Elevation Gain: 615m Difficulty: 7/10 – Scrambling in areas, snow most of the year. Season: June to October Additional Requirements: Snowshoes potentially DRIVING DIRECTIONS From Canmore: Take Smith-Dorrien (Hwy742) south from Canmore for 35.5km. There will be a turn off to your right for Mt Engadine Lodge. Turn right and follow this road for 1.8km. Follow the road past the Lodge and at 1.8km you will see a parking lot on your right. WHAT TO BRING Comfortable Footwear:Hiking shoes.Make sure your shoes are broken in prior to tackling this hike to prevent unexpected blisters. You could get away with running shoes but having extra grip on the rock surfaces will definitely come in handy! Water:This hike requires some effort to reach the summit.Be sure to bring enough water to stay hydrated. A couple liters per person minimum. Snacks: Bring some of your favorite snacks to enjoy along the hike as well as a light lunch for when you arrive at the summit. Some of our favorite snacks are trail mix, bananas, beef jerky and licorice. Weather appropriate clothing:This hike is very exposed as most of the ridge is above the tree line. Check the weather forecast and dress appropriately. Sunscreen:If it is sunny and you’re like Mattson, who easily burns,
For a downloadable PDF version of this guide CLICK HERE!
Tent Ridge is one of our favorite hikes in the Kananaskis area! It’s an 11km loop trail that is both challenging for beginner hikers and difficult enough for those with more experience. This hike has it all, from ridge walks and forest trails to scrambling up rocks and sliding down snow. To top it all off, the views from the summit are absolutely breathtaking.
ADVENTURE STATISTICS
Time Required: 4-5 Hours
Location: 100km west of Calgary
Distance: 11km round trip
Highest Elevation:2540m
Elevation Gain:615m
Difficulty:7/10 – Scrambling in areas, snow most of the year.
Season: June to October
Additional Requirements: Snowshoes potentially
Image 1: Tent Ridge
DRIVING DIRECTIONS
From Canmore: Take Smith-Dorrien (Hwy742) south from Canmore for 35.5km. There will be a turn off to your right for Mt Engadine Lodge. Turn right and follow this road for 1.8km. Follow the road past the Lodge and at 1.8km you will see a parking lot on your right.
WHAT TO BRING
Comfortable Footwear:Hiking shoes.Make sure your shoes are broken in prior to tackling this hike to prevent unexpected blisters. You could get away with running shoes but having extra grip on the rock surfaces will definitely come in handy!
Water:This hike requires some effort to reach the summit.Be sure to bring enough water to stay hydrated. A couple liters per person minimum.
Snacks: Bring some of your favorite snacks to enjoy along the hike as well as a light lunch for when you arrive at the summit. Some of our favorite snacks are trail mix, bananas, beef jerky and licorice.
Weather appropriate clothing:This hike is very exposed as most of the ridge is above the tree line. Check the weather forecast and dress appropriately.
Sunscreen:If it is sunny and you’re like Mattson, who easily burns, bring sunscreen!
Insect Repellent:Insect repellent can greatly improve your hiking experience.
Bear Spray:You are in bear country. Always hike with bear spray that is easily accessible.
Camera:There are numerous photo opportunities you won’t want to miss.
This Guide:Print a copy of this guide to reference throughout the hike
OTHER CONSIDERATIONS
Wildlife:You will be hiking in bear country. It is always advisable to check in at the local Visitor Information Center to learn of any trail closures due to wildlife. Carry bear spray in an easily accessible location. Travel in groups of multiple hikers and make lots of noise to avoid an unexpected encounter.
Leave No Trace: It is important that we enjoy the outdoors responsibly and sustainably. Some key principles to consider when hiking to “Leave No Trace” are:
Plan ahead and prepare: Proper planning allows adventurers to hike safely while minimizing damage to the land.
Travel on durable surfaces: Stick to the trail when possible. If there is no trail, or you must travel off trail, stay on durable surfaces to reduce your impact.
Dispose of waste properly: Pack it in, pack it out.
Leave what you find: Leave rocks, plants, archaeological artifacts and other objects of interest as you find them.
Respect wildlife: Observe wildlife from a distance. Never feed wild animals.
Be considerate of other visitors: Be courteous to others to allow everyone to enjoy their outdoor experience.
Summary: Tent Ridge is a loop that can be completed in either direction. Our recommendation is to begin at the more southern trailhead and complete the loop in a clockwise direction. We believe this direction provides the easiest route and best views!
Image 2: Tent Ridge Adventure Map
Step-By-Step Guide:
There are two trailheads for this hike that are both accessible from the parking area (Route marker #1 on the map). The trailhead farthest to the south is our recommended route as you get the best views of Spray Lakes when traveling the ridge clockwise. The beginning of the well beaten trail from the south trailhead is quiet and easy to follow. You’ll remain in the thick forest for about 45 minutes before you cross a creek and the trees open up into a big meadow. From here you will see the entire horseshoe of Tent Ridge.
Image 3: Following the well beaten trail
Image 4: Enterting the meadow surrounded by Tent Ridge
After you cross the creek and get a nice panorama view of Tent Ridge, the trail veers off to the left (east) and through a little bit more forest. Once you cross the tree line, you will ascend up some scree and have to scramble up a few ledges. This part is challenging as the elevation seems to keep going and going. Be cautious in the early and late summer months as ice can build up on rocks and it can be dangerous. If it’s unsafe, do not proceed.
Image 5: Scrambling towards the top of the ridge
Once you reach the top of the ridge, follow it south to the weather station (Route marker #2 on the map). Be cautious as there are some narrow portions of the ridge with exposure on either side. Take your time on this section while enjoying the stunning views to the East. The weather station is a great spot to stop for a snack break and shelter yourselves from the wind if needed. From here, you can see the route you’ll follow, along the ridge, for the rest of the hike.
Image 6: Following the ridge to the weather station
Image 7: The weather station
From the weather station, continue along the path to the west that heads downward and then up to the highest point on Tent Ridge (Route marker #3 on the map). At the Summit, you’re treated to 360 degree views of the surrounding mountains, valleys, and lakes. From the summit, follow the ridge North towards Spray Lakes. The view of the lakes as you traverse the ridge is an absolute highlight!
Image 8: Mattson at the summit
At the end of the ridge (Route marker #4 on the map), you’ll turn right and head down into a path through the forest cleared by a large avalanche. When we hiked this trail in June there was lots of snow so it was difficult to identify the trail. If you cannot find the trail, follow the avalanche’s path where the trees have been cleared until you reach the lower forest. Once you reach the lower forest you should be able to pick up the trail that will take you northeast back to the parking lot.
Image 1: The route down the avalanche slope
Image 10: Having some fun descending down the snow
WE WANT TO HEAR FROM YOU
Thank you for choosing Epic Trip Adventures as your guide. We are committed to continually updating our guides to be as relevant and accurate as possible. If you have feedback to improve this guide please leave it in the comments below.
We also want to hear about your Tent Ridge adventures. If you have stories, pictures or even a link to your own adventure video please share them below!
For a downloadable PDF version of this guide The stunning visuals provided by Akaka Falls, one of the tallest waterfalls in Hawaii, are well worth the short hike to get there. The paved concrete path has easy to manage stairs with hand rails, and can be accomplished by children and adults of all ages. ADVENTURE STATISTICS Time Required: 45 Minutes Location: 17 miles (27km) north of Hilo Distance: 0.4 mile (0.7km) loop Highest Elevation: 800ft (300m) Elevation Gain: not noteworthy Difficulty: 2/10 – Paved path Season: Year round Additional Requirements: N/A DRIVING DIRECTIONS From Hilo: Take the HI-19 (Hawaii Belt Rd) 11 miles north of Hilo. You’ll come to a small town called Honomu and take a left onto Honomu Rd just passed mile marker 13.5. Very shortly after that, take another left onto State Hwy 220. Turn right to stay on State Hwy 220. Follow that road for 3.3 miles until you reach the Akaka Falls State Park. WHAT TO BRING Comfortable Footwear:Hikers or runners will do just fine. You could probably get away with wearing sandals on this one. Water:This is a short hike, but it is always smart to bring water. It is hot in Hawaii and you don’t want to get dehydrated. Sunscreen:If it is sunny and you’re like Mattson, who easily burns, bring sunscreen! Insect Repellent:Insect repellent can greatly improve your hiking experience. Camera:There are numerous photo opportunities you won’t want to miss. This Guide:Print a copy of this guide to reference throughout the hike OTHER CONSIDERATIONS Fees: The parking lot near the falls charges $5.00 per vehicle but if you wanted to park just outside the parking lot, it’s free and will only add another 200ft to your hike. There is also a $1.00 per person admission fee to enter the
For a downloadable PDF version of this guide CLICK HERE!
The stunning visuals provided by Akaka Falls, one of the tallest waterfalls in Hawaii, are well worth the short hike to get there. The paved concrete path has easy to manage stairs with hand rails, and can be accomplished by children and adults of all ages.
ADVENTURE STATISTICS
Time Required: 45 Minutes
Location: 17 miles (27km) north of Hilo
Distance: 0.4 mile (0.7km) loop
Highest Elevation:800ft (300m)
Elevation Gain:not noteworthy
Difficulty:2/10 – Paved path
Season: Year round
Additional Requirements: N/A
DRIVING DIRECTIONS
From Hilo: Take the HI-19 (Hawaii Belt Rd) 11 miles north of Hilo. You’ll come to a small town called Honomu and take a left onto Honomu Rd just passed mile marker 13.5. Very shortly after that, take another left onto State Hwy 220. Turn right to stay on State Hwy 220. Follow that road for 3.3 miles until you reach the Akaka Falls State Park.
WHAT TO BRING
Comfortable Footwear:Hikers or runners will do just fine. You could probably get away with wearing sandals on this one.
Water:This is a short hike, but it is always smart to bring water. It is hot in Hawaii and you don’t want to get dehydrated.
Sunscreen:If it is sunny and you’re like Mattson, who easily burns, bring sunscreen!
Insect Repellent:Insect repellent can greatly improve your hiking experience.
Camera:There are numerous photo opportunities you won’t want to miss.
This Guide:Print a copy of this guide to reference throughout the hike
OTHER CONSIDERATIONS
Fees: The parking lot near the falls charges $5.00 per vehicle but if you wanted to park just outside the parking lot, it’s free and will only add another 200ft to your hike. There is also a $1.00 per person admission fee to enter the trail.
Time of day: The view of the falls is a little bit brighter in the morning hours when the sun is in the east. The falls are beautiful at any time of the day but there is more direct sunlight on the falls in the morning making this the best time to visit.
Leave No Trace: It is important that we enjoy the outdoors responsibly and sustainably. Some key principles to consider when hiking to “Leave No Trace” are:
Plan ahead and prepare: Proper planning allows adventurers to hike safely while minimizing damage to the land.
Travel on durable surfaces: Stick to the trail when possible. If there is no trail, or you must travel off trail, stay on durable surfaces to reduce your impact.
Dispose of waste properly: Pack it in, pack it out.
Leave what you find: Leave rocks, plants, archaeological artifacts and other objects of interest as you find them.
Respect wildlife: Observe wildlife from a distance. Never feed wild animals.
Be considerate of other visitors: Be courteous to others to allow everyone to enjoy their outdoor experience.
Summary: The starting point for this hike is at the parking lot just off Hwy 220. The trail is a large loop that will take you to view points of both Kahuna Falls and Akaka Falls. We recommend travelling counterclockwise around the loop as Akaka Falls are far superior to Kahuna Falls and make for a better climax to the hike.
Image 1: Akaka Falls Adventure Map
Step-By-Step Guide:
The trailhead (Route marker #1 on the map) is on the west side of the parking lot and the washrooms at the north end. There is usually someone at the trailhead collecting the $1.00 per hiker fee. Follow the trail down a short set of stairs down until you reach a fork. There will be signs marking left to Akaka Falls and right to Kahuna Falls. This is a looped trail so you will see both, but we recommend heading right to Kahuna Falls first.
Image 2: The Akaka Falls Trailhead
Follow the path to the right through beautiful lush green ferns and orchid trees. The elevation is very minimal. This is a very nice trail for the families.
Continue following the loop until you reach the Kahuna Falls lookout point (Route marker #2 on the map). Although Kahuna Falls is nearly the same size as Akaka Falls, it doesn’t receive the same fame and attention as it is more difficult to view. Kahuna Falls can only be viewed from the side so it can be difficult to see with the lush vegetation growing around it. On a day when the water is high and flowing fast, Kahuna can shoot out passed the trees and be very pretty to look at. Although the view of Kahuna falls isn’t spectacular, it is a nice walk through the bamboo trees and a good pre-cursor to the spectacular Akaka Falls.
Image 3: Kahuna Falls
After continuing around the loop from Kahuna Falls the trail leads to the more famous and spectacular Akaka Falls (Route marker #3 on the map). The immense 442ft waterfall pours into a stream-eroded gorge. Akaka falls is one of the most famous waterfalls on the Big Island.
Image 4: The Akaka Falls viewpoint
Enjoy the view of the spectacular falls before continuing along the trail counterclockwise to return to the parking lot where you left your vehicle.
WE WANT TO HEAR FROM YOU
Thank you for choosing Epic Trip Adventures as your guide. We are committed to continually updating our guides to be as relevant and accurate as possible. If you have feedback to improve this guide please leave it in the comments below.
We also want to hear about your Akaka Falls adventures. If you have stories, pictures or even a link to your own adventure video please share them below!
For a downloadable PDF version of this guide Troll Falls is a short, easy hike that takes no more than two hours. It is located in Kananaskis Country near Nakiska Mountain and can be quite busy in the summer months. The hike starts on an easy trail through the forest with minimal elevation and ends at a series of large heavy flowing waterfalls, the first of which is Troll Falls. This hike can also be completed during the winter months (some say the falls are more beautiful this time of year), but you will likely need snowshoes. ADVENTURE STATISTICS Time Required: 2 Hours Location: 100km west of Calgary Distance: 2-4km round trip Highest Elevation: 1500m Elevation Gain: 50m Difficulty: 3/10 – Good for all skill levels Season: April to November Additional Requirements: N/A DRIVING DIRECTIONS From Calgary: Take the Trans-Canada (Hwy 1) west approximately 70 km to Kananaskis Trail (Hwy 40) and follow that south for 25 km to Nakiska Ski Area. Turn right onto Mt Allan Dr. and follow it for 1 km. Take your first right onto the gravel road that leads to Stoney Day use parking area. From Canmore: Take the Trans-Canada (Hwy 1) east approximately 30 kmto Kananaskis Trail (Hwy 40) and follow it south for 13 km. Turn right onto Mt Allan Dr. and follow it for 1 km. Take your first right onto the gravel road that leads to Stoney Day use parking area. WHAT TO BRING Comfortable Footwear:Hiking shoes.Make sure your shoes are broken in prior to tackling this hike to prevent unexpected blisters. You could get away with running shoes but having extra grip on the rock surfaces will definitely come in handy! Water:This hike requires some effort to reach the waterfall. Be sure to bring enough water to stay hydrated. Snacks:
For a downloadable PDF version of this guide CLICK HERE!
Troll Falls is a short, easy hike that takes no more than two hours. It is located in Kananaskis Country near Nakiska Mountain and can be quite busy in the summer months. The hike starts on an easy trail through the forest with minimal elevation and ends at a series of large heavy flowing waterfalls, the first of which is Troll Falls. This hike can also be completed during the winter months (some say the falls are more beautiful this time of year), but you will likely need snowshoes.
ADVENTURE STATISTICS
Time Required: 2 Hours
Location: 100km west of Calgary
Distance: 2-4km round trip
Highest Elevation:1500m
Elevation Gain:50m
Difficulty:3/10 – Good for all skill levels
Season: April to November
Additional Requirements: N/A
Image 1: Troll Falls
DRIVING DIRECTIONS
From Calgary: Take the Trans-Canada (Hwy 1) west approximately 70 km to Kananaskis Trail (Hwy 40) and follow that south for 25 km to Nakiska Ski Area. Turn right onto Mt Allan Dr. and follow it for 1 km. Take your first right onto the gravel road that leads to Stoney Day use parking area.
From Canmore: Take the Trans-Canada (Hwy 1) east approximately 30 kmto Kananaskis Trail (Hwy 40) and follow it south for 13 km. Turn right onto Mt Allan Dr. and follow it for 1 km. Take your first right onto the gravel road that leads to Stoney Day use parking area.
WHAT TO BRING
Comfortable Footwear:Hiking shoes.Make sure your shoes are broken in prior to tackling this hike to prevent unexpected blisters. You could get away with running shoes but having extra grip on the rock surfaces will definitely come in handy!
Water:This hike requires some effort to reach the waterfall. Be sure to bring enough water to stay hydrated.
Snacks: Bring some of your favorite snacks to enjoy along the hike as well as a light lunch for when you arrive at the falls. Some of our favorite snacks are trail mix, bananas, beef jerky and licorice.
Weather appropriate clothing:Check the weather forecast and plan accordingly.
Long pants/high socks:The final two km of this hike are through dense brush. Having long pants or high socks for this portion of the hike will save the skin on your legs.
Sunscreen:If it is sunny and you’re like Mattson, who easily burns, bring sunscreen!
Insect Repellent:Insect repellent can greatly improve your hiking experience.
Bear Spray:You are in bear country. Always hike with bear spray that is easily accessible.
Camera:There are numerous photo opportunities you won’t want to miss.
This Guide:Print a copy of this guide to reference throughout the hike
OTHER CONSIDERATIONS
Wildlife:You will be hiking in bear country. It is always advisable to check in at the local Visitor Information Center to learn of any trail closures due to wildlife. Carry bear spray in an easily accessible location. Travel in groups of multiple hikers and make lots of noise to avoid an unexpected encounter.
Leave No Trace: It is important that we enjoy the outdoors responsibly and sustainably. Some key principles to consider when hiking to “Leave No Trace” are:
Plan ahead and prepare: Proper planning allows adventurers to hike safely while minimizing damage to the land.
Travel on durable surfaces: Stick to the trail when possible. If there is no trail, or you must travel off trail, stay on durable surfaces to reduce your impact.
Dispose of waste properly: Pack it in, pack it out.
Leave what you find: Leave rocks, plants, archaeological artifacts and other objects of interest as you find them.
Respect wildlife: Observe wildlife from a distance. Never feed wild animals.
Be considerate of other visitors: Be courteous to others to allow everyone to enjoy their outdoor experience.
Summary:The starting point for this hike is at the Stoney Day Use Area. From there you will travel the short easy to follow trail to Troll Falls. Those looking for a longer adventure can continue upstream from Troll Falls to discover more waterfalls.
Image 2: Troll Falls Adventure Map
Step-By-Step Guide:
At the end of the Stoney Day Use parking lot (Route marker #1 on the map), follow the big power lines and to your left you’ll see a sign with a trail leading into the forest. This is the trail to Troll Falls.
Image 3: The trail to Troll Falls
As you continue along the trail the forest will open up from time to time and you’ll get a nice view of the mountains. Keep your eyes open for a teepee to the left of the trail.
Image 4: Scenic views of the surrounding mountains
Image 5: A teepee built near the trail
The first falls you find are Troll Falls (Route marker #2 on the map). The path follows a U shape over rocks and around the back of the falls. In order to find the falls further upstream, take the trail to the left up and around Troll Falls.
Image 6: Troll Falls
Image 7: The trail to the top of Troll Falls
The trail to Troll Falls is very well trafficked and easy to follow, but past Troll Falls it becomes slightly more difficult to stay on the “right” trail. There are many different routes, but they all run along the river and lead to the next set of falls. We found the trail on the left side of the river easy to navigate but if you lose the trail, stick near the river and you will run into the next set of falls. (Route marker #3 on the map)
Image 8: The second large waterfall
Image 9: The third large waterfall
It is a short hike from Troll Falls to two different large waterfalls that are slightly different and unique. Both make a great spot to stop and enjoy a picnic before heading back. Once you decide to head back, follow the same trail you took to get there. Enjoy!
WE WANT TO HEAR FROM YOU
Thank you for choosing Epic Trip Adventures as your guide. We are committed to continually updating our guides to be as relevant and accurate as possible. If you have feedback to improve this guide please leave it in the comments below.
We also want to hear about your Troll Falls adventures. If you have stories, pictures or even a link to your own adventure video please share them below!
For a downloadable PDF version of this guide Reservoir Canyon Trail is a great half day hike for anyone in the San Luis Obispo area. The hike takes roughly three hours to complete and begins just outside of the city. From the top, you will be rewarded with incredible views of SLO, the hilly landscape that surrounds it, and the coastline. ADVENTURE STATISTICS Time Required:2.5 - 4 Hours Location: Just east of San Luis Obispo Distance: 5.3 miles (8.5km) round trip Highest Elevation: 1700ft (520m) Elevation Gain: 1358ft (414m) Difficulty: 5/10 – Steep switchbacks Season: Year Round Additional Requirements: N/A DRIVING DIRECTIONS From San Luis Obispo: Jump on the 101 North for a couple miles and take a right on Reservoir Canyon Road. This road is not very well marked and T’s up with the freeway so keep your eyes peeled. A half mile down this road you will get to the parking lot and trailhead. WHAT TO BRING Comfortable Footwear:Hiking shoes.Make sure your shoes are broken in prior to tackling this hike to prevent unexpected blisters. You could get away with running shoes but having extra grip on the rock surfaces will definitely come in handy! Water:This hike has lots of elevation gain in a short period of time. Be sure to bring enough water for 4 hours of physical exertion. Snacks: Bring some of your favorite snacks to enjoy along the hike. Some of our favorite snacks are trail mix, bananas, beef jerky and licorice. Weather appropriate clothing:You will be exposed to the elements throughout this hike. Check the weather forecast and plan accordingly. Sunscreen:If it is sunny and you’re like Mattson, who easily burns, bring sunscreen! Insect Repellent:Insect repellent can greatly improve your hiking experience. Camera:There are numerous photo opportunities you won’t want to miss. This Guide:Print
For a downloadable PDF version of this guide CLICK HERE!
Reservoir Canyon Trail is a great half day hike for anyone in the San Luis Obispo area. The hike takes roughly three hours to complete and begins just outside of the city. From the top, you will be rewarded with incredible views of SLO, the hilly landscape that surrounds it, and the coastline.
ADVENTURE STATISTICS
Time Required:2.5 – 4 Hours
Location: Just east of San Luis Obispo
Distance: 5.3 miles (8.5km) round trip
Highest Elevation:1700ft (520m)
Elevation Gain:1358ft (414m)
Difficulty:5/10 – Steep switchbacks
Season: Year Round
Additional Requirements: N/A
Image 1: Anderson at the summit
DRIVING DIRECTIONS
From San Luis Obispo: Jump on the 101 North for a couple miles and take a right on Reservoir Canyon Road. This road is not very well marked and T’s up with the freeway so keep your eyes peeled. A half mile down this road you will get to the parking lot and trailhead.
WHAT TO BRING
Comfortable Footwear:Hiking shoes.Make sure your shoes are broken in prior to tackling this hike to prevent unexpected blisters. You could get away with running shoes but having extra grip on the rock surfaces will definitely come in handy!
Water:This hike has lots of elevation gain in a short period of time. Be sure to bring enough water for 4 hours of physical exertion.
Snacks: Bring some of your favorite snacks to enjoy along the hike. Some of our favorite snacks are trail mix, bananas, beef jerky and licorice.
Weather appropriate clothing:You will be exposed to the elements throughout this hike. Check the weather forecast and plan accordingly.
Sunscreen:If it is sunny and you’re like Mattson, who easily burns, bring sunscreen!
Insect Repellent:Insect repellent can greatly improve your hiking experience.
Camera:There are numerous photo opportunities you won’t want to miss.
This Guide:Print a copy of this guide to reference throughout the hike
OTHER CONSIDERATIONS
Leave No Trace: It is important that we enjoy the outdoors responsibly and sustainably. Some key principles to consider when hiking to “Leave No Trace” are:
Plan ahead and prepare: Proper planning allows adventurers to hike safely while minimizing damage to the land.
Travel on durable surfaces: Stick to the trail when possible. If there is no trail, or you must travel off trail, stay on durable surfaces to reduce your impact.
Dispose of waste properly: Pack it in, pack it out.
Leave what you find: Leave rocks, plants, archaeological artifacts and other objects of interest as you find them.
Respect wildlife: Observe wildlife from a distance. Never feed wild animals.
Be considerate of other visitors: Be courteous to others to allow everyone to enjoy their outdoor experience.
Summary: The starting point for this hike is just off of Reservoir Canyon Road. From there we recommend taking a quick detour to a small waterfall and cave before following the main trail to the summit.
Image 2: Reservoir Canyon Trail Adventure Map
Step-By-Step Guide:
From the parking lot (Route marker #1 on the map), the trail heads south in line with the road. A short way down the trail you will come to a fork. The path to the left is reservoir canyon trail, but it’s worth your time to go right and check out a nice 30-foot waterfall and cave (Route marker #2 on the map). After checking out the waterfall, head back to the main trail to continue the hike.
Image 3: The Waterfall
Image 4: Anderson entering the cave
The first mile of Reservoir Canyon Trail is quite level, heavily trafficked and easy to follow. The trees provide nice shade to keep you cool on a hot day. The trail follows a nearby creek and eventually crosses it via a large wooden bridge. About half a mile after crossing the bridge the trail begins to gain elevation and the challenging part of the hike begins. Over the next mile and a half, you will gain 1100 feet in elevation ascending steep switchbacks while being exposed to the hot California sun.
Image 5: The wooden bridge
Image 6: Ascending the switchbacks
About half way up the hill, you’ll come across some scrap metal sculptures and swing that hangs from a large eucalyptus tree (Route marker #3 on the map). Enjoy a restful swing, and catch your breath before continuing on as the trail gets steeper.
Image 7: The swing set
Image 8: Scrap metal sculptures
At the summit you’ll find a stone memorial sculpture and a wooden bench to soak in the views (Route marker #4 on the map). San Luis Obispo surrounds the base of the hill and to the south you can see the Pismo sand dunes on the coast. Enjoy the summit views and when you feel rested and energized, follow the same trail back to the hikes starting point.
Image 9: The view from the summit!
WE WANT TO HEAR FROM YOU
Thank you for choosing Epic Trip Adventures as your guide. We are committed to continually updating our guides to be as relevant and accurate as possible. If you have feedback to improve this guide please leave it in the comments below.
We also want to hear about your Reservoir Canyon adventures. If you have stories, pictures or even a link to your own adventure video please share them below!
For a downloadable PDF version of this guide Mauna Kea is one of two major volcanos on the Big Island of Hawaii. Standing 13,800 ft above sea level makes Mauna Kea the highest peak in all of Hawaii. The neighboring volcano, Mona Loa, is just south of Mauna Kea and can be seen from the peak. Mauna Kea hosts the world’s largest astronomical observatory, with telescopes operated from many countries. The lack of light pollution on the Big Island makes this location ideal for observing the faintest galaxies at the edge of the observable universe. For casual star gazers like us, it is an awesome spot to try and find our favorite constellations. Summiting Mauna Kea is an experience you cannot pass up while in Hawaii. ADVENTURE STATISTICS Time Required: 5 Hours Location: 63 miles inland from Kona Distance: 8.7 miles from Visitor Station to the summit. Highest Elevation: 13,800ft (4200m) Elevation Gain: 4600ft from the Visitor Station Difficulty: 1/10 Season: Year Round Additional Requirements: 4WD Vehicle DRIVING DIRECTIONS From Kailua-Kona: Take Highway 190 north from Kona. At Mile Marker 14 turn east onto the new Daniel K. Inouye Highway (Hwy 200). Follow this until Mile Marker 28 and then turn left onto Mauna Kea Access Road. The Visitor Station is about 6 miles up the road on the right side. From Kona, the drive to the Visitor Station takes about 1-1/2 hours. From Hilo: Take the Puainako Extension (Hwy 2000) east and merge onto Saddle Road (Hwy 200). At Mile Marker 8 Highway 200 transitions seamlessly into the Daniel K. Inouye Highway (Hwy 200). Just before Mile Marker 28, turn right onto Mauna Kea Access Road. The Visitor Station is about 6 miles up the road on the right side. The drive from Hilo to the Visitor
For a downloadable PDF version of this guide CLICK HERE!
Mauna Kea is one of two major volcanos on the Big Island of Hawaii. Standing 13,800 ft above sea level makes Mauna Kea the highest peak in all of Hawaii. The neighboring volcano, Mona Loa, is just south of Mauna Kea and can be seen from the peak. Mauna Kea hosts the world’s largest astronomical observatory, with telescopes operated from many countries. The lack of light pollution on the Big Island makes this location ideal for observing the faintest galaxies at the edge of the observable universe. For casual star gazers like us, it is an awesome spot to try and find our favorite constellations. Summiting Mauna Kea is an experience you cannot pass up while in Hawaii.
ADVENTURE STATISTICS
Time Required: 5 Hours
Location: 63 miles inland from Kona
Distance: 8.7 miles from Visitor Station to the summit.
Highest Elevation:13,800ft (4200m)
Elevation Gain:4600ft from the Visitor Station
Difficulty:1/10
Season: Year Round
Additional Requirements: 4WD Vehicle
Image 1: Mauna Kea Summit
DRIVING DIRECTIONS
From Kailua-Kona: Take Highway 190 north from Kona. At Mile Marker 14 turn east onto the new Daniel K. Inouye Highway (Hwy 200). Follow this until Mile Marker 28 and then turn left onto Mauna Kea Access Road. The Visitor Station is about 6 miles up the road on the right side. From Kona, the drive to the Visitor Station takes about 1-1/2 hours.
From Hilo: Take the Puainako Extension (Hwy 2000) east and merge onto Saddle Road (Hwy 200). At Mile Marker 8 Highway 200 transitions seamlessly into the Daniel K. Inouye Highway (Hwy 200). Just before Mile Marker 28, turn right onto Mauna Kea Access Road. The Visitor Station is about 6 miles up the road on the right side. The drive from Hilo to the Visitor Station takes approximately 1 hour.
WHAT TO BRING
Comfortable Footwear:Bring runners so you can walk around once you reach the summit. There won’t be a lot of places to go, but it’s always nice to have comfy feet.
Water:Always important to bring water
Snacks: Bring some of your favorite snacks to enjoy at the summit. Some of our favorite snacks are trail mix, bananas, beef jerky and licorice.
Weather appropriate clothing:Bring warm clothes! Even though you can’t imagine being cold while in Hawaii it is usually only a few degrees above freezing at the summit. High winds are very common as well which makes it feel that much colder. Check the weather forecast and plan accordingly.
Camera:There are numerous photo opportunities you won’t want to miss.
This Guide:Print a copy of this guide to reference throughout the hike
OTHER CONSIDERATIONS
Altitude: Be mindful that there is some serious elevation gain to reach the summit. At the top of Mauna Kea there is 40 percent less oxygen than at sea level. Even the smallest amount of physical exertion will leave you gasping for air and potentially feeling a little dizzy or nauseous. If you feel out of breath or dizzy, sit down and take a break. Do not plan on summiting Mauna Kea within 24 hours after a scuba diving adventure.
Time of Day: We recommend arriving at the summit shortly before sunset. It is very cold at the top so you will not want to spend too much time there. Arriving just before sunset allows you to see the views during the day, enjoy the sunset and then check out the incredible stars from the Visitor Station after driving down from the summit.
Leave No Trace: It is important that we enjoy the outdoors responsibly and sustainably. Some key principles to consider when hiking to “Leave No Trace” are:
Plan ahead and prepare: Proper planning allows adventurers to hike safely while minimizing damage to the land.
Travel on durable surfaces: Stick to the trail when possible. If there is no trail, or you must travel off trail, stay on durable surfaces to reduce your impact.
Dispose of waste properly: Pack it in, pack it out.
Leave what you find: Leave rocks, plants, archaeological artifacts and other objects of interest as you find them.
Respect wildlife: Observe wildlife from a distance. Never feed wild animals.
Be considerate of other visitors: Be courteous to others to allow everyone to enjoy their outdoor experience.
200 yards past the Visitor Station the paved road ends. From the end of the paved road follow the gravel road as it gains elevation. After 5 miles on the gravel road the final 3.5 miles of the road to the summit are paved.
Image 2: Driving to the summit
Image 3: Driving to the summit
If you don’t have a 4WD vehicle, you should not attempt to drive to the top. If you do have a 4WD vehicle, be sure to use your low gears on the way down.
There are companies that will pick you up, drive you to the top for sunset, and then drive you back down. If you don’t want to pay for a ride up, and don’t have a 4WD vehicle there may be friendly people willing to let you hop in with them and hitchhike a ride to the top.
Once you arrive at the summit take some time to walk around before finding a good spot to watch the sunset.
After enjoying the sunset begin the drive back down to the Visitor Station. The Visitor Station is a great place to make a pit stop on the way down to check out the stars. There is also a free star gazing program on Tuesday, Wednesday, Friday and Saturday from 6:00pm – 10:00pm.
Image 4: Mauna Kea Summit
WE WANT TO HEAR FROM YOU
Thank you for choosing Epic Trip Adventures as your guide. We are committed to continually updating our guides to be as relevant and accurate as possible. If you have feedback to improve this guide please leave it in the comments below.
We also want to hear about your Mauna Kea adventures. If you have stories, pictures or even a link to your own adventure video please share them below!